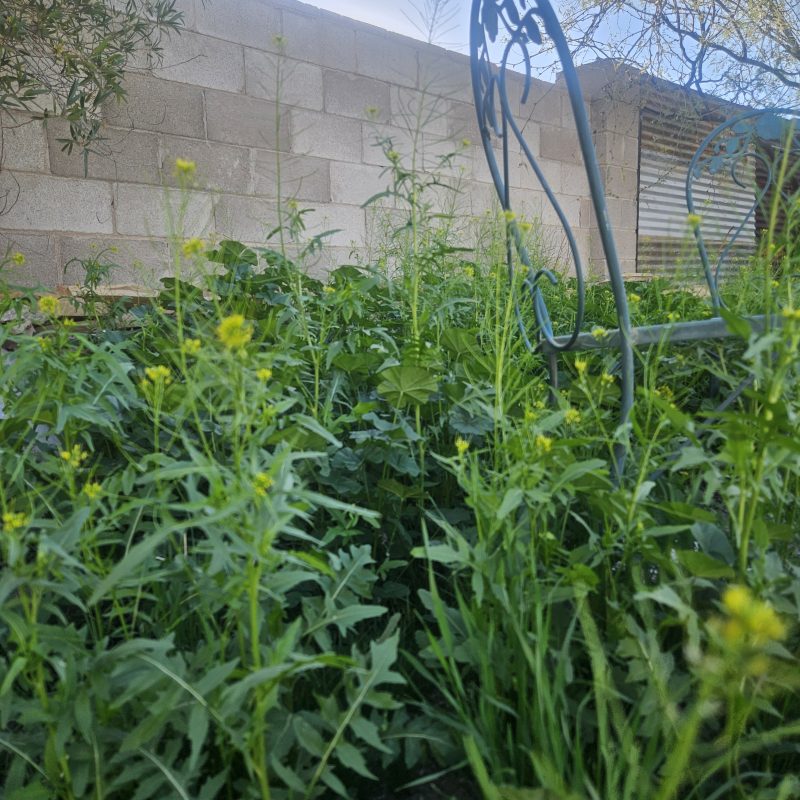
Wonderful! Amy here, celebrating the yellow flowered wild mustards growing my yard and in the desert. Sisymbrium irio grows in dry, disturbed soil around the world but is orginally from the Middle East, southern Europe and northen Africa. One of its names, London Rocket, supposedly refers to how it uncharacteristically took over there after the Great Fire of 1666. (It loves disturbed soil, in my garden or elsewhere!) Arugula, another mustard family plant also known as rocket, has big white flowers and is actually classified as different genius.
Of course the leaves are edible and tender on the short, young basal rosettes. But the small leaves on the tall, flowering plants are suprisingly tender. The flavor of the leaves from mature plants is spicier, but I think it has more to do with the warming weather of the season as the plants mature. The seeds are edible too but are much smaller than commercial mustard seeds and are difficult to harvest.
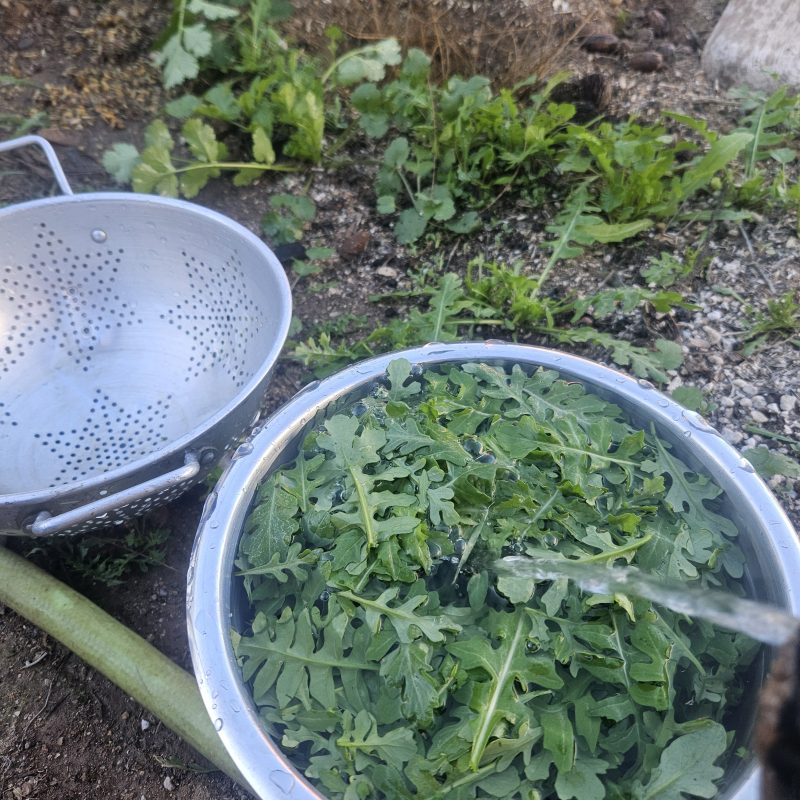
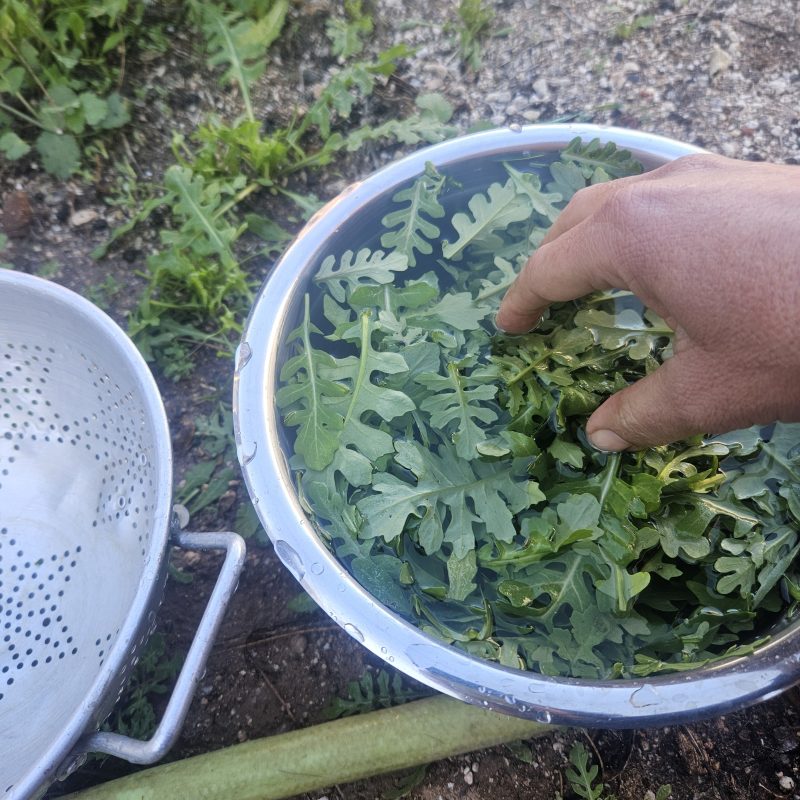
Instead of triple washing, I like to wash once really well, where the wash water going to the garden. After swirling in plenty of water, I lift the leaves out of the water by hand and drain.
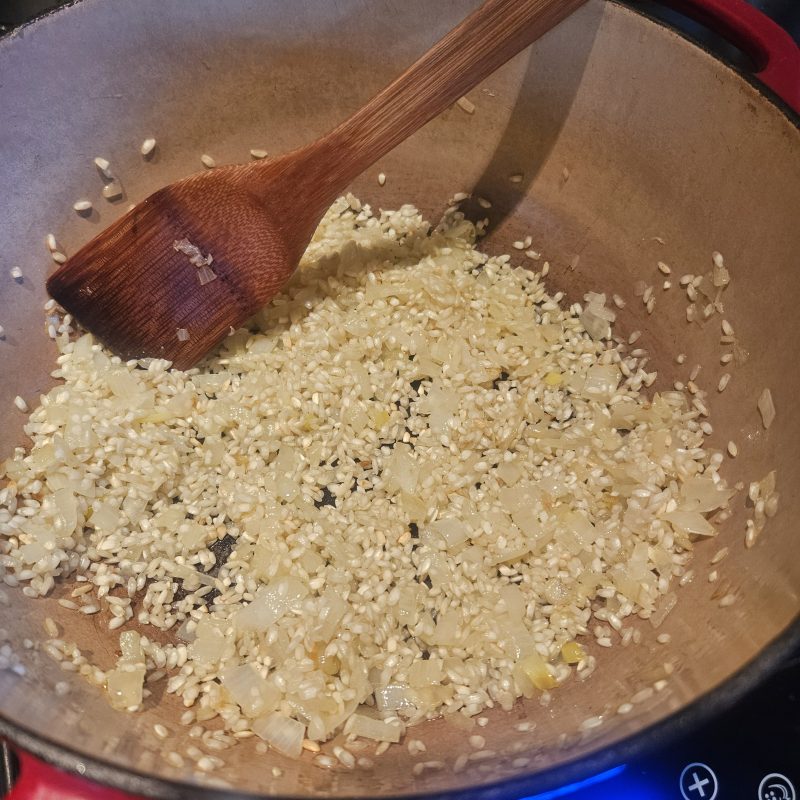
Wild rocket has countless possibilities in the kitchen. The leaves make a spicy salad or garnish on a sandwich, like arugula. My favorite way to enjoy it is wilted into a risotto. Homemade chicken broth (from the freezer) and a splash of wine make it special.
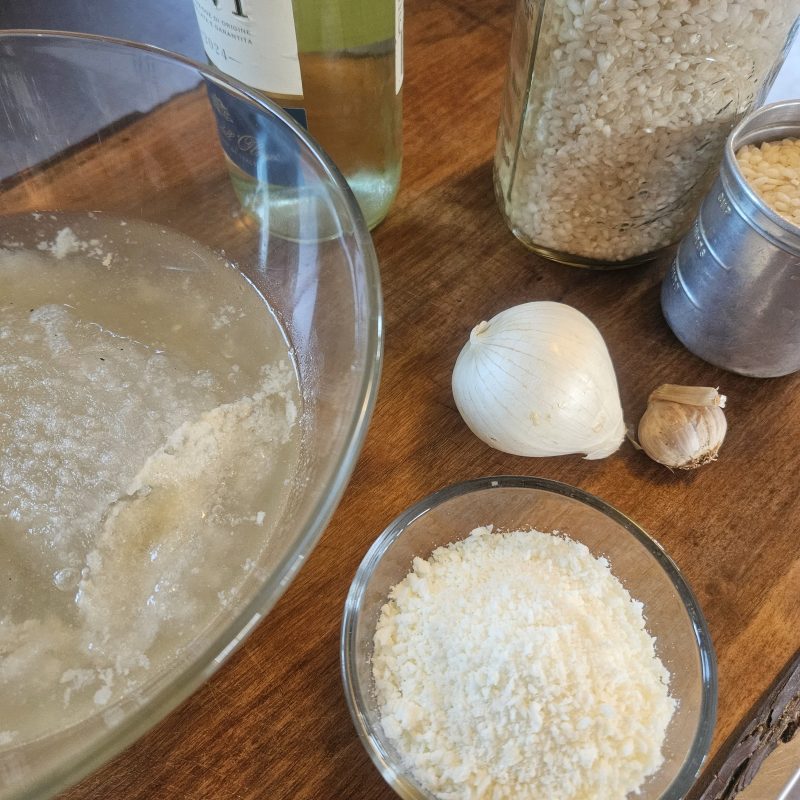
I start by browning rinsed aborio rice, onion and garlic in olive oil.
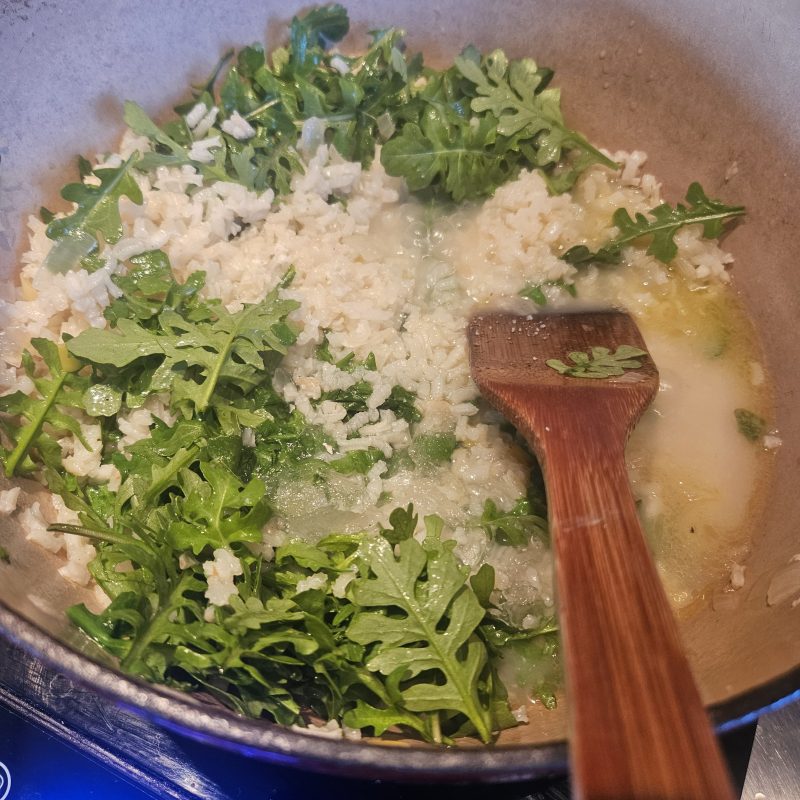
For traditional risotto with the creamiest texture, add hot broth a little at a time and stir constantly. For the easiest risotto, I just add plenty of broth and simmer slowly in a heavy pot with a lid. Three times the volume of liquid to rice is usually where I start.
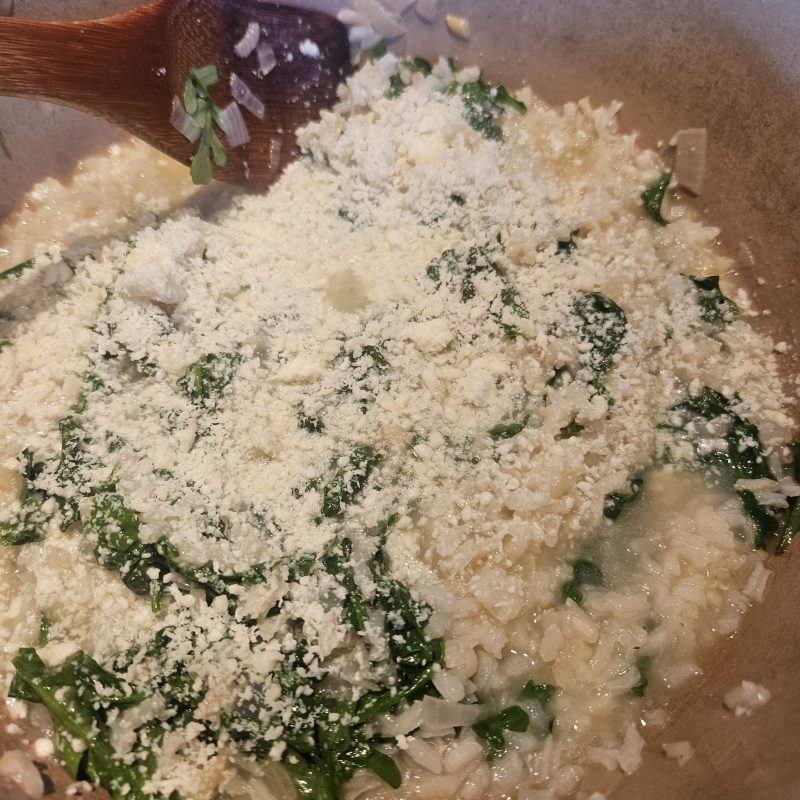
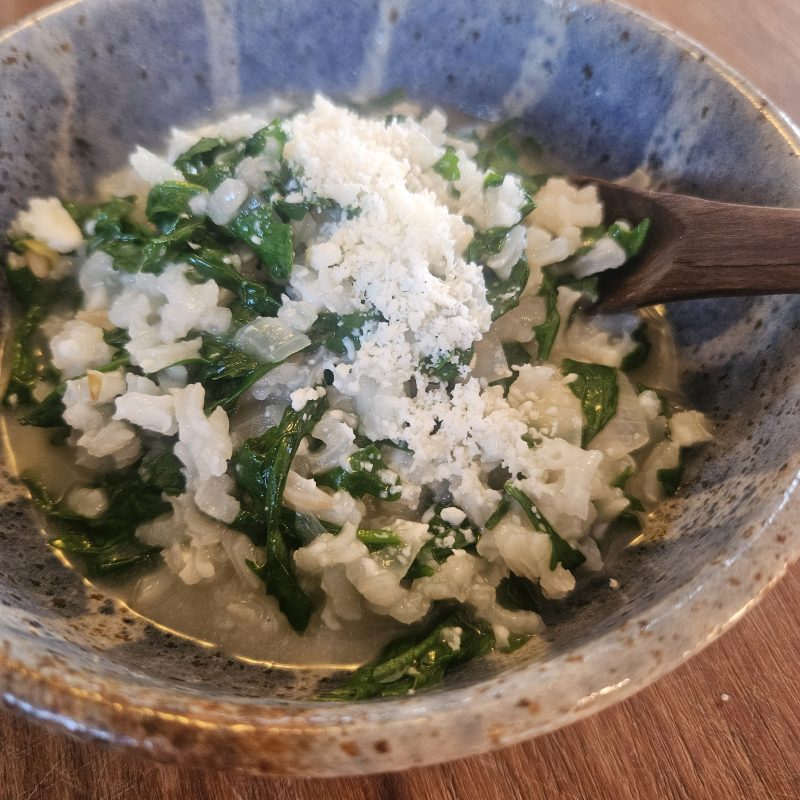
When the rice is tender, I remove the pot from the heat and fold in the whole little leaves. Sprinkle with any cheese, in this case a dry and salty fresh goat cheese. Enjoy right away or at room temperature on a picnic.
Depending on temperature and moisture, we might be eating wild rocket for a couple more months into the spring. What other dishes do you like to make with wild rocket?
Hello friends, Amy here with a baked good I made last week. I wanted to bring treats to share with my friends, something we could nibble while we passed the break table. And if no one had to wash plates, forks or spoons, that was a bonus. My people truly delight in cooking, hadn’t had anything mesquite in ages, and I wanted to impress. After considering my options for a month, I suddenly realized… that’s this afternoon!!!
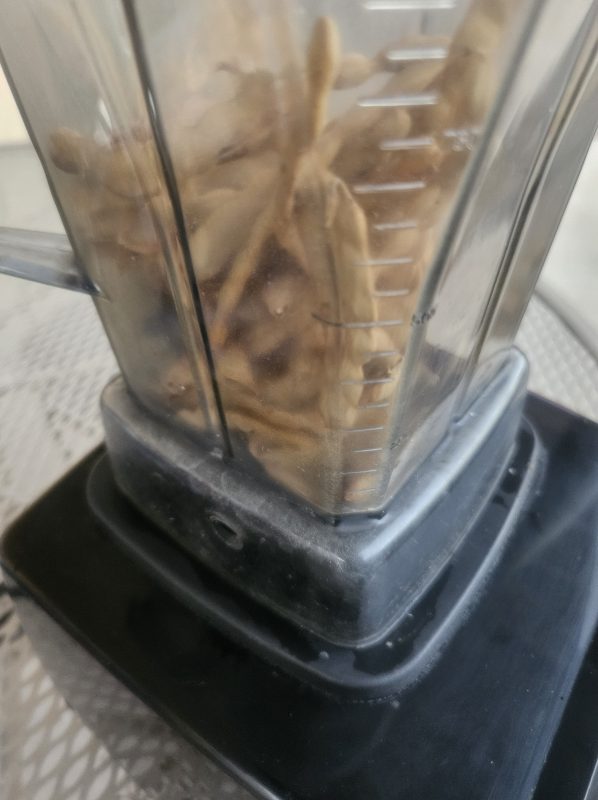
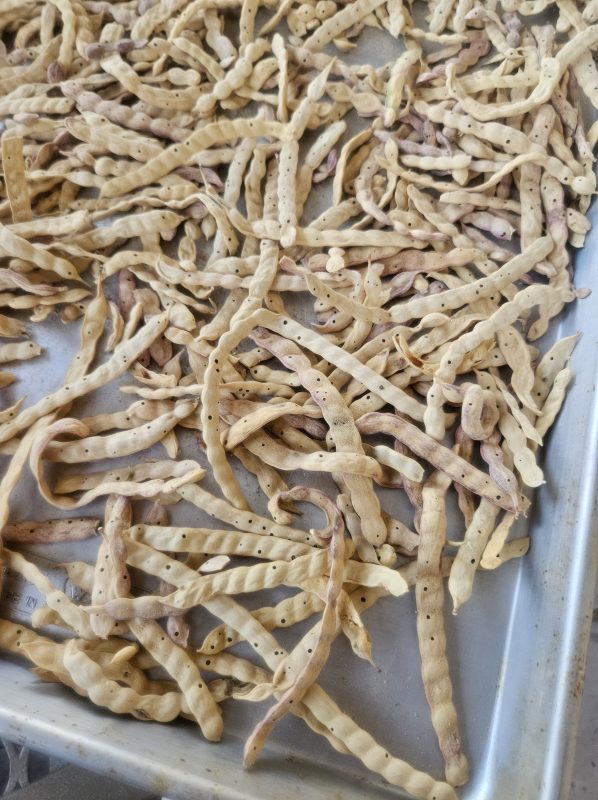
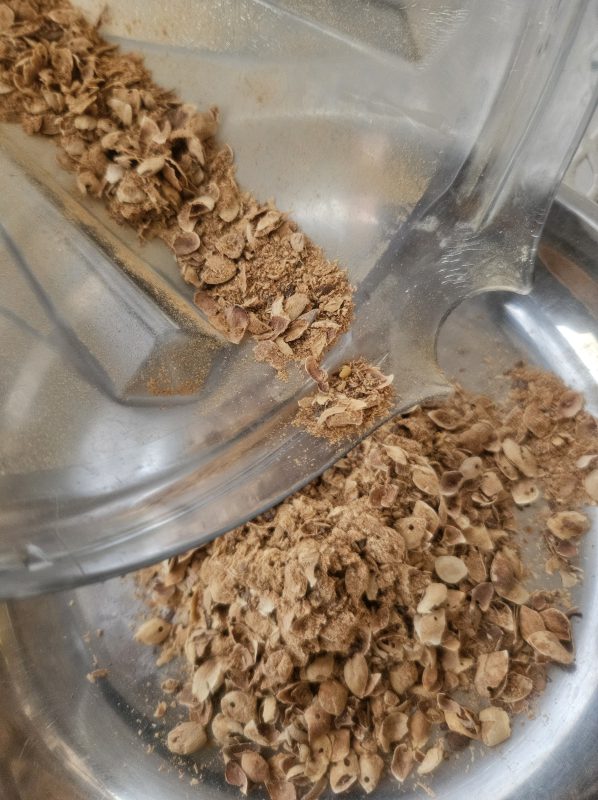
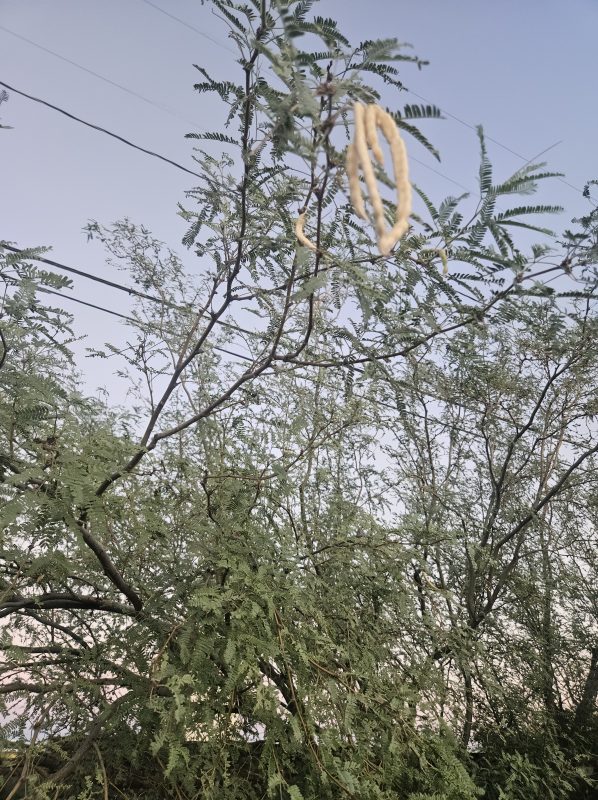
Drought makes for patchy harvesting, but I had a stash of pods. The trick to making HOME grinding work, especially in humid weather, is to toast the pods RIGHT before grinding. No community mesquite pod milling event near you? Need that mesquite meal TODAY? No problem!
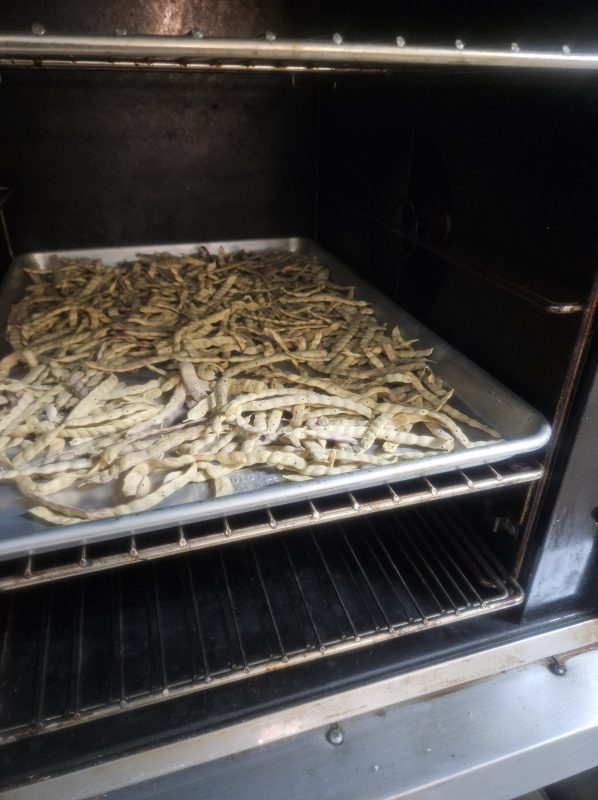
I baked in a thin layer at about 275 degrees F with convection for maybe 5 minutes. Try longer if you don’t use or have a fan. It should smell sweeeeet. I opted to not develop any golden color, but that’s an option!
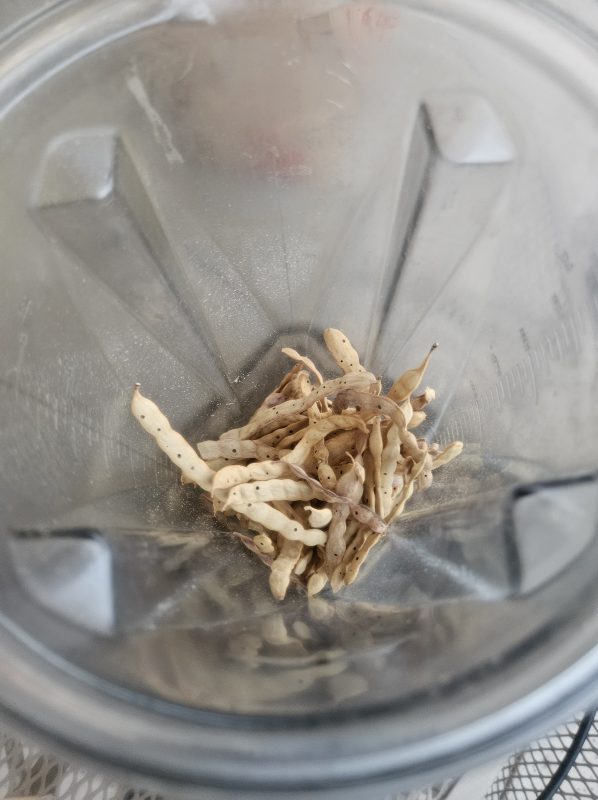
After cooling JUST enough to handle easily, I tossed the pods into a high powered blender. A regular blender or food process does not suffice. Without the last minute toasting, grinding makes a paste in there. This of course is an issue with any mesquite meal grinding method, but expecially for the blender or stone tools.
Unbelievablly, it only takes a few pulses.
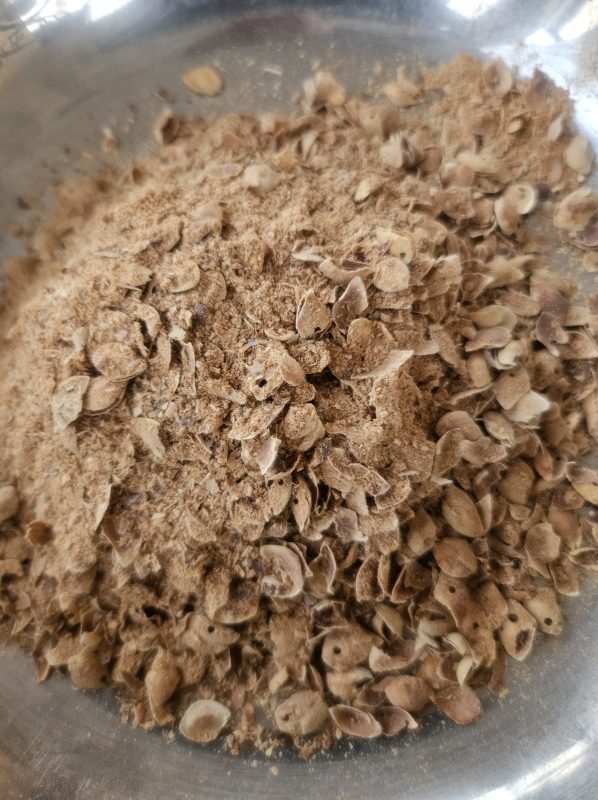
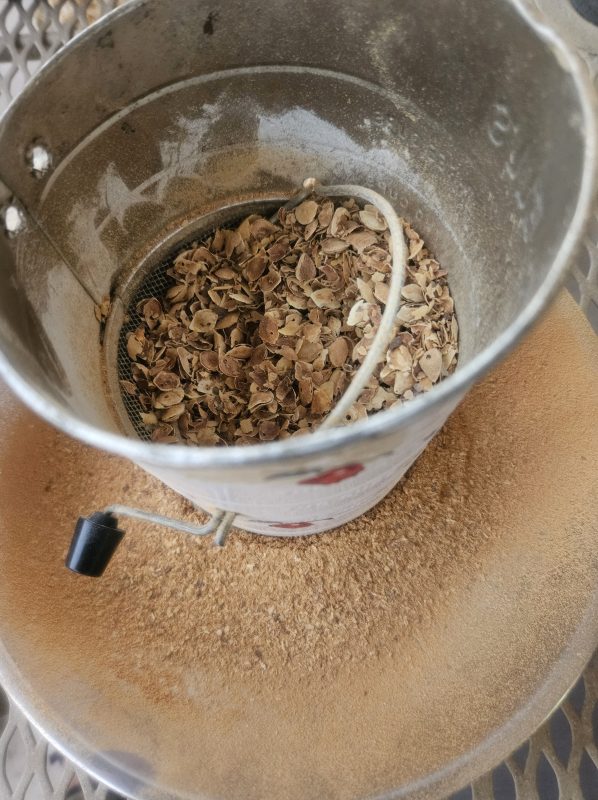
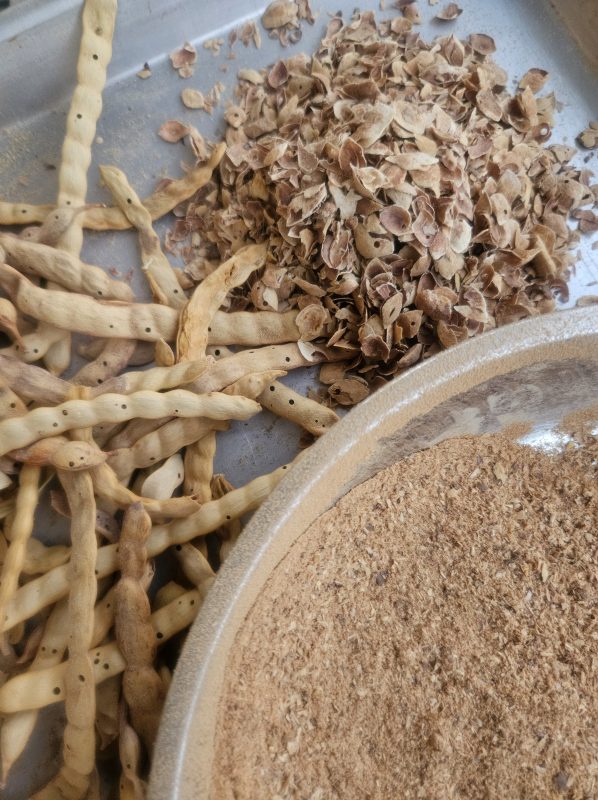
Any fine sieve or a flour sifter can remove the meal form the hard bits of unground pod and seed. Any grinding method will require this step, even hammer mills.
Sifting is even faster than grinding, depending on the size of the holes and quanity of mesquite meal needed.
To show off this flour, I impulsively chose a simple recipe from this small out of print book. However, you can purchase the huge current edition!
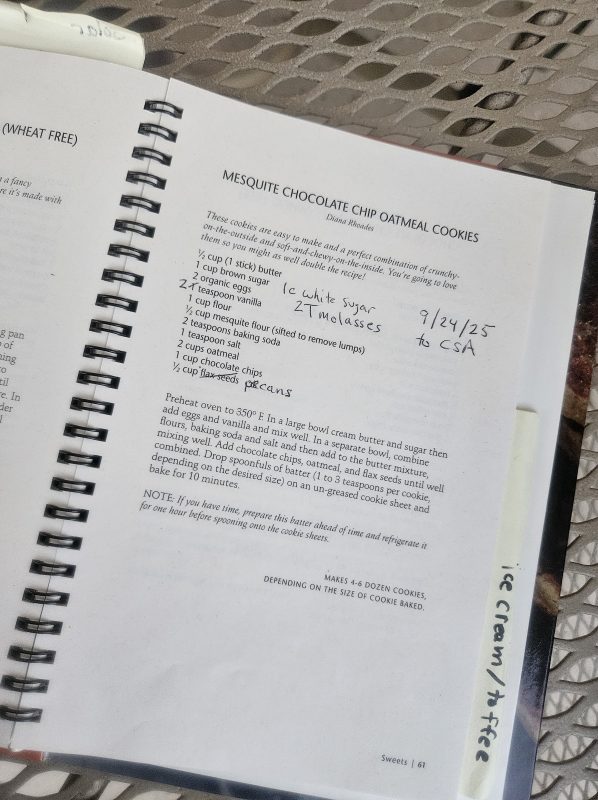
Chocolate chip cookies! I had a half bag of chocolate chips and pecans on hand, and chocolate with mesquite is classic. In case my butter spent too much time in the freezer, I doubled the vanilla. No brown sugar in sight, but a gallon of mollassas to use up.
I love making my notes in hard copy cookbooks, and reading the kitchen culture from long gone relatives in their books. And the bookmarks that are labels from my friends’ gifted food creations are my kind of treasures.
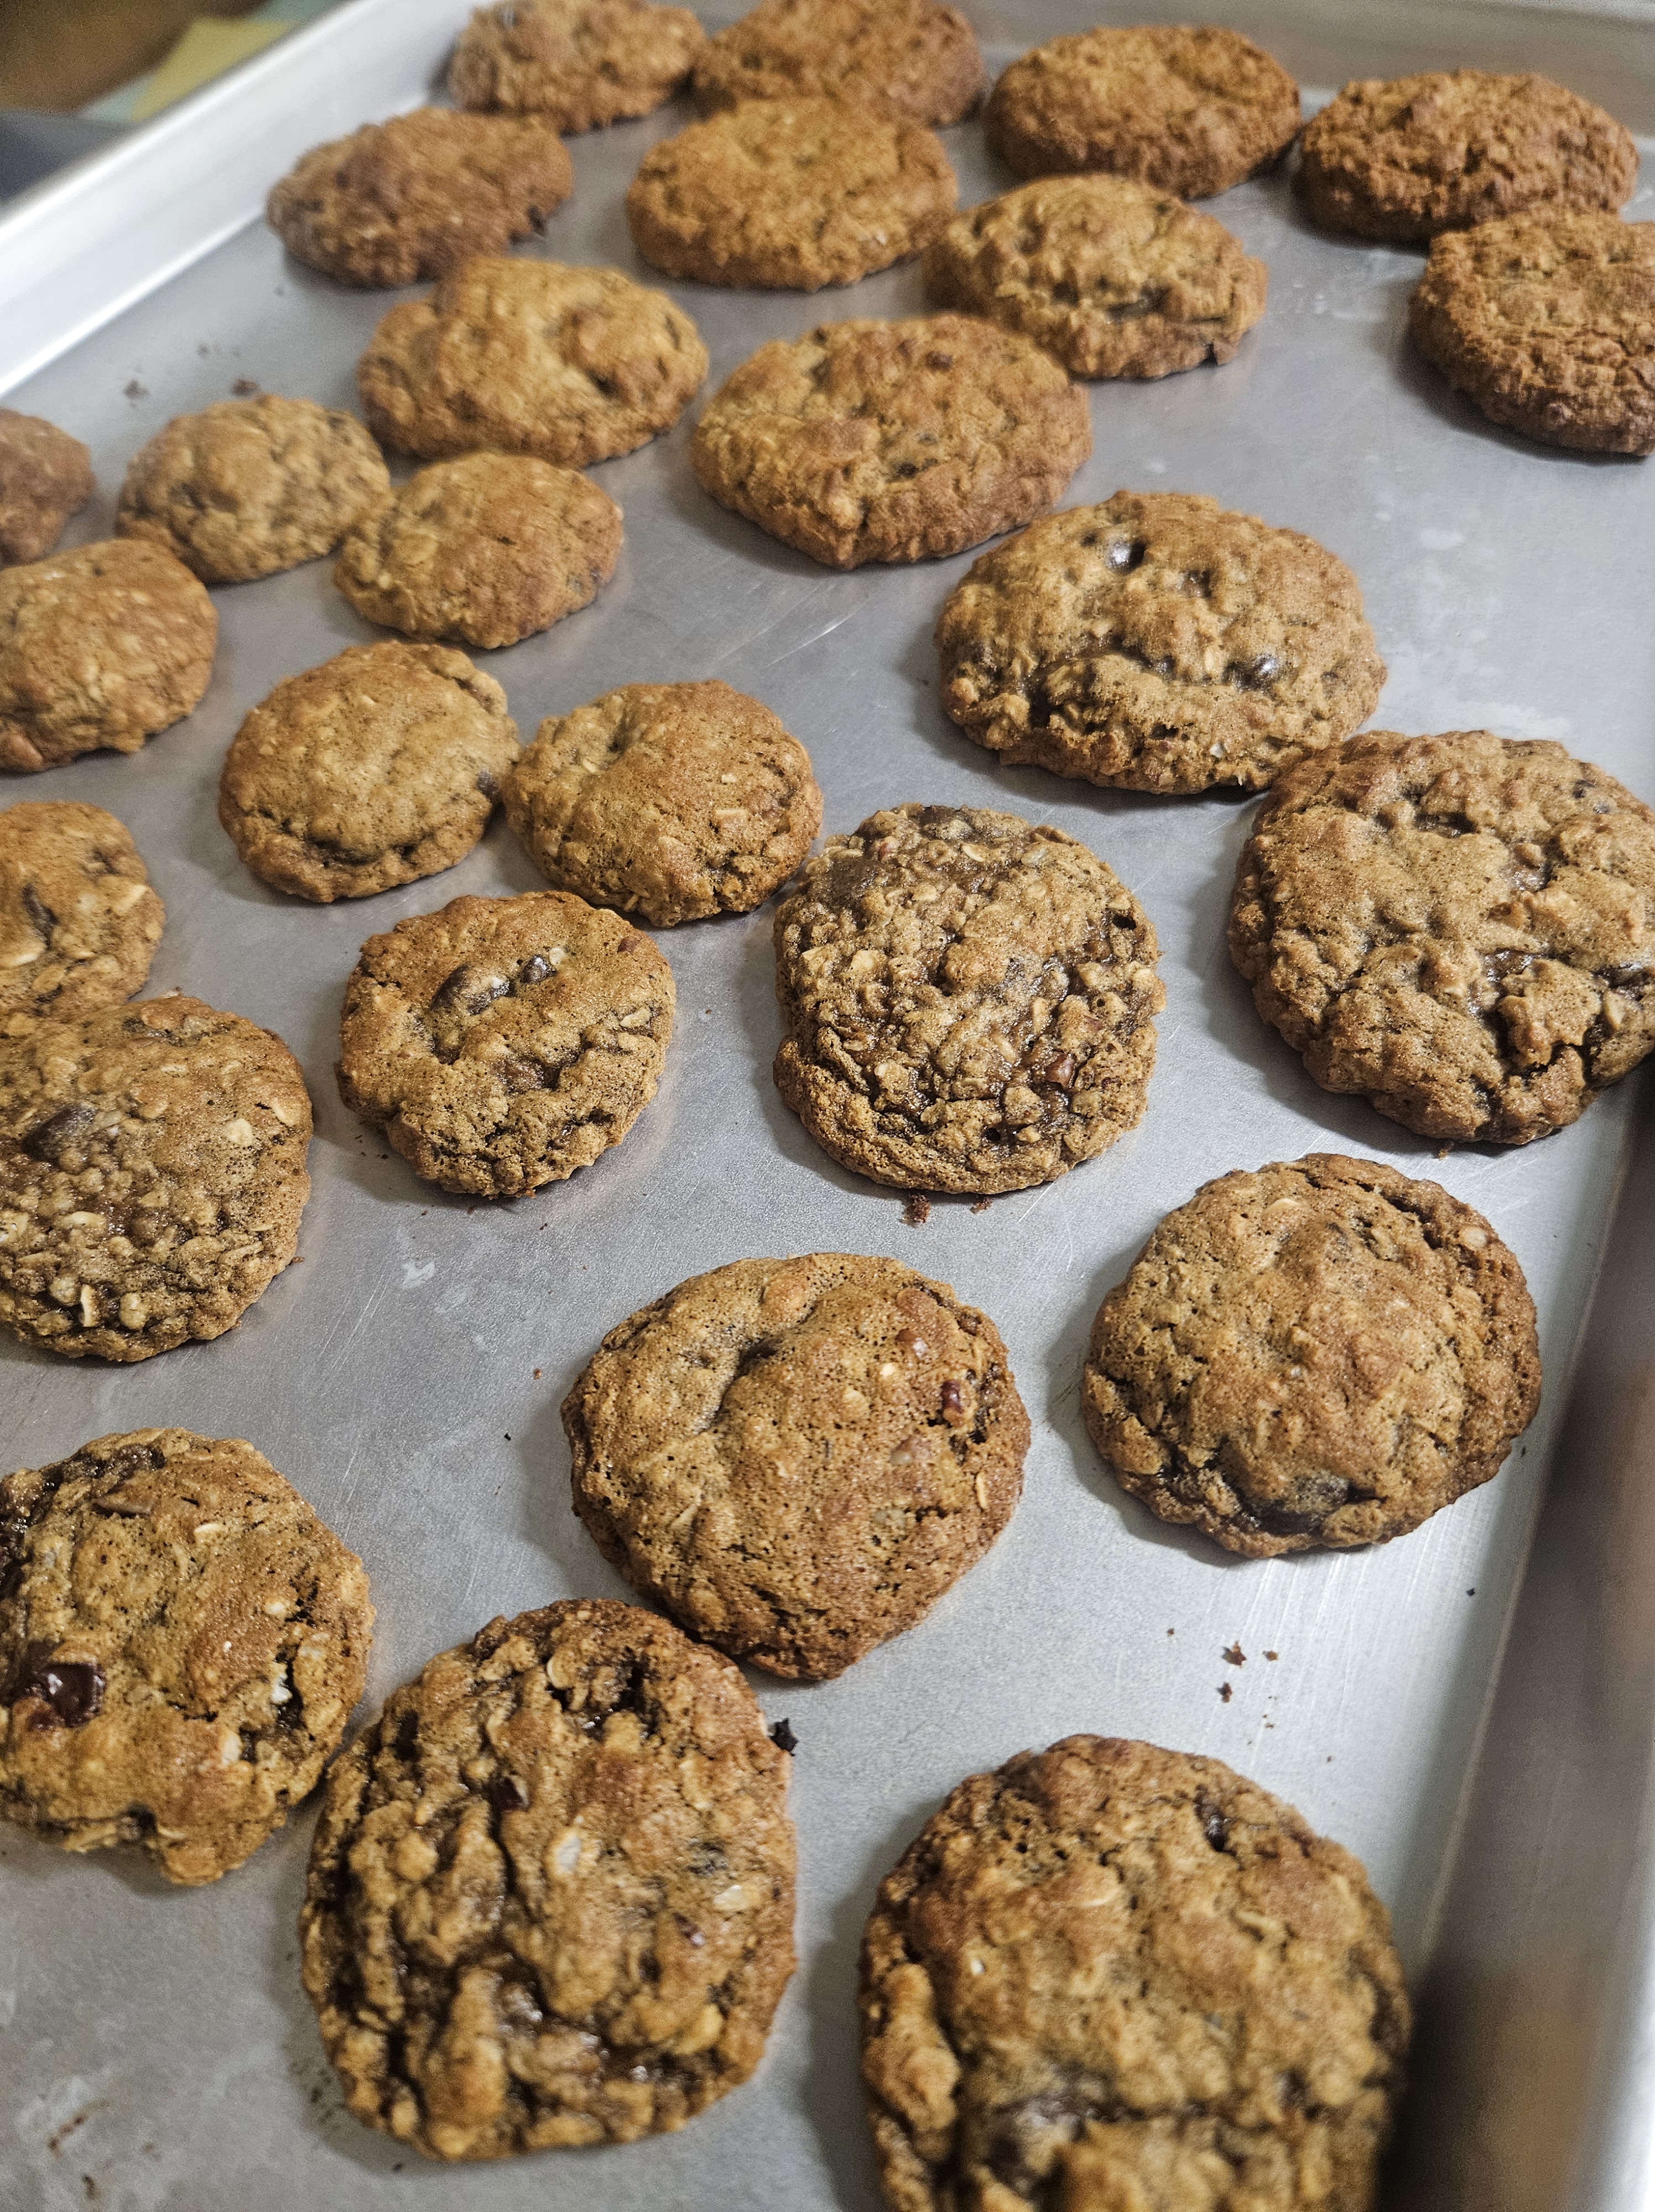
I baked these chocolate chip oatmeal mesquite pecan cookies until just barely set, let them finish cooling in transit, and served them chewy with the chocolate still melted. I’m sure they would not tolerate stacking. Some were full sized, the others bit sized. None were leftover.
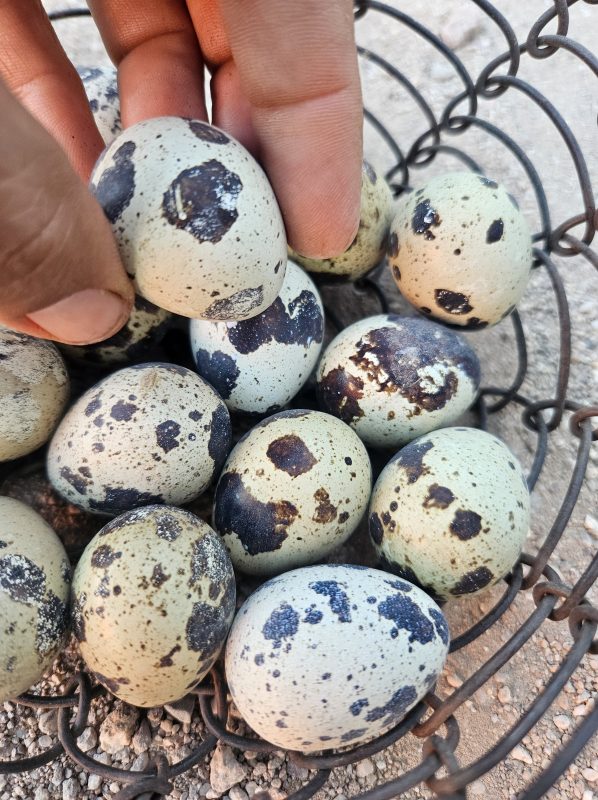
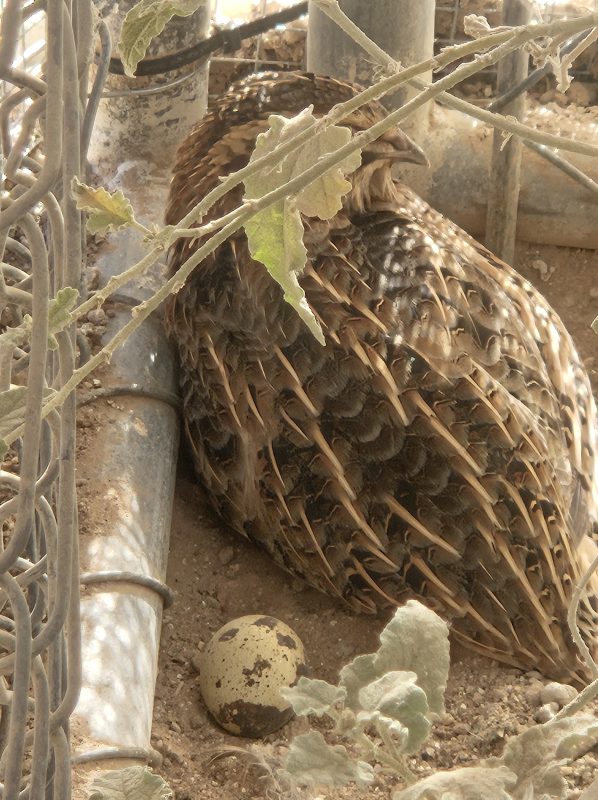
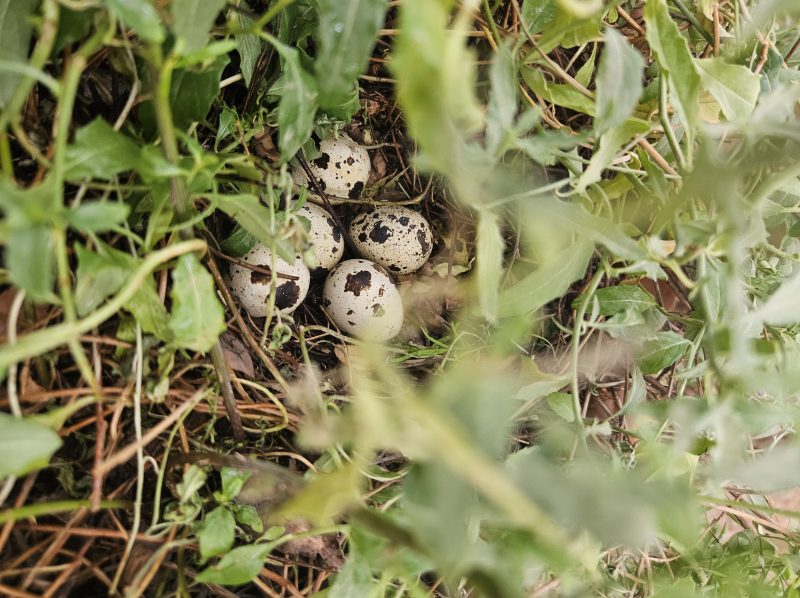
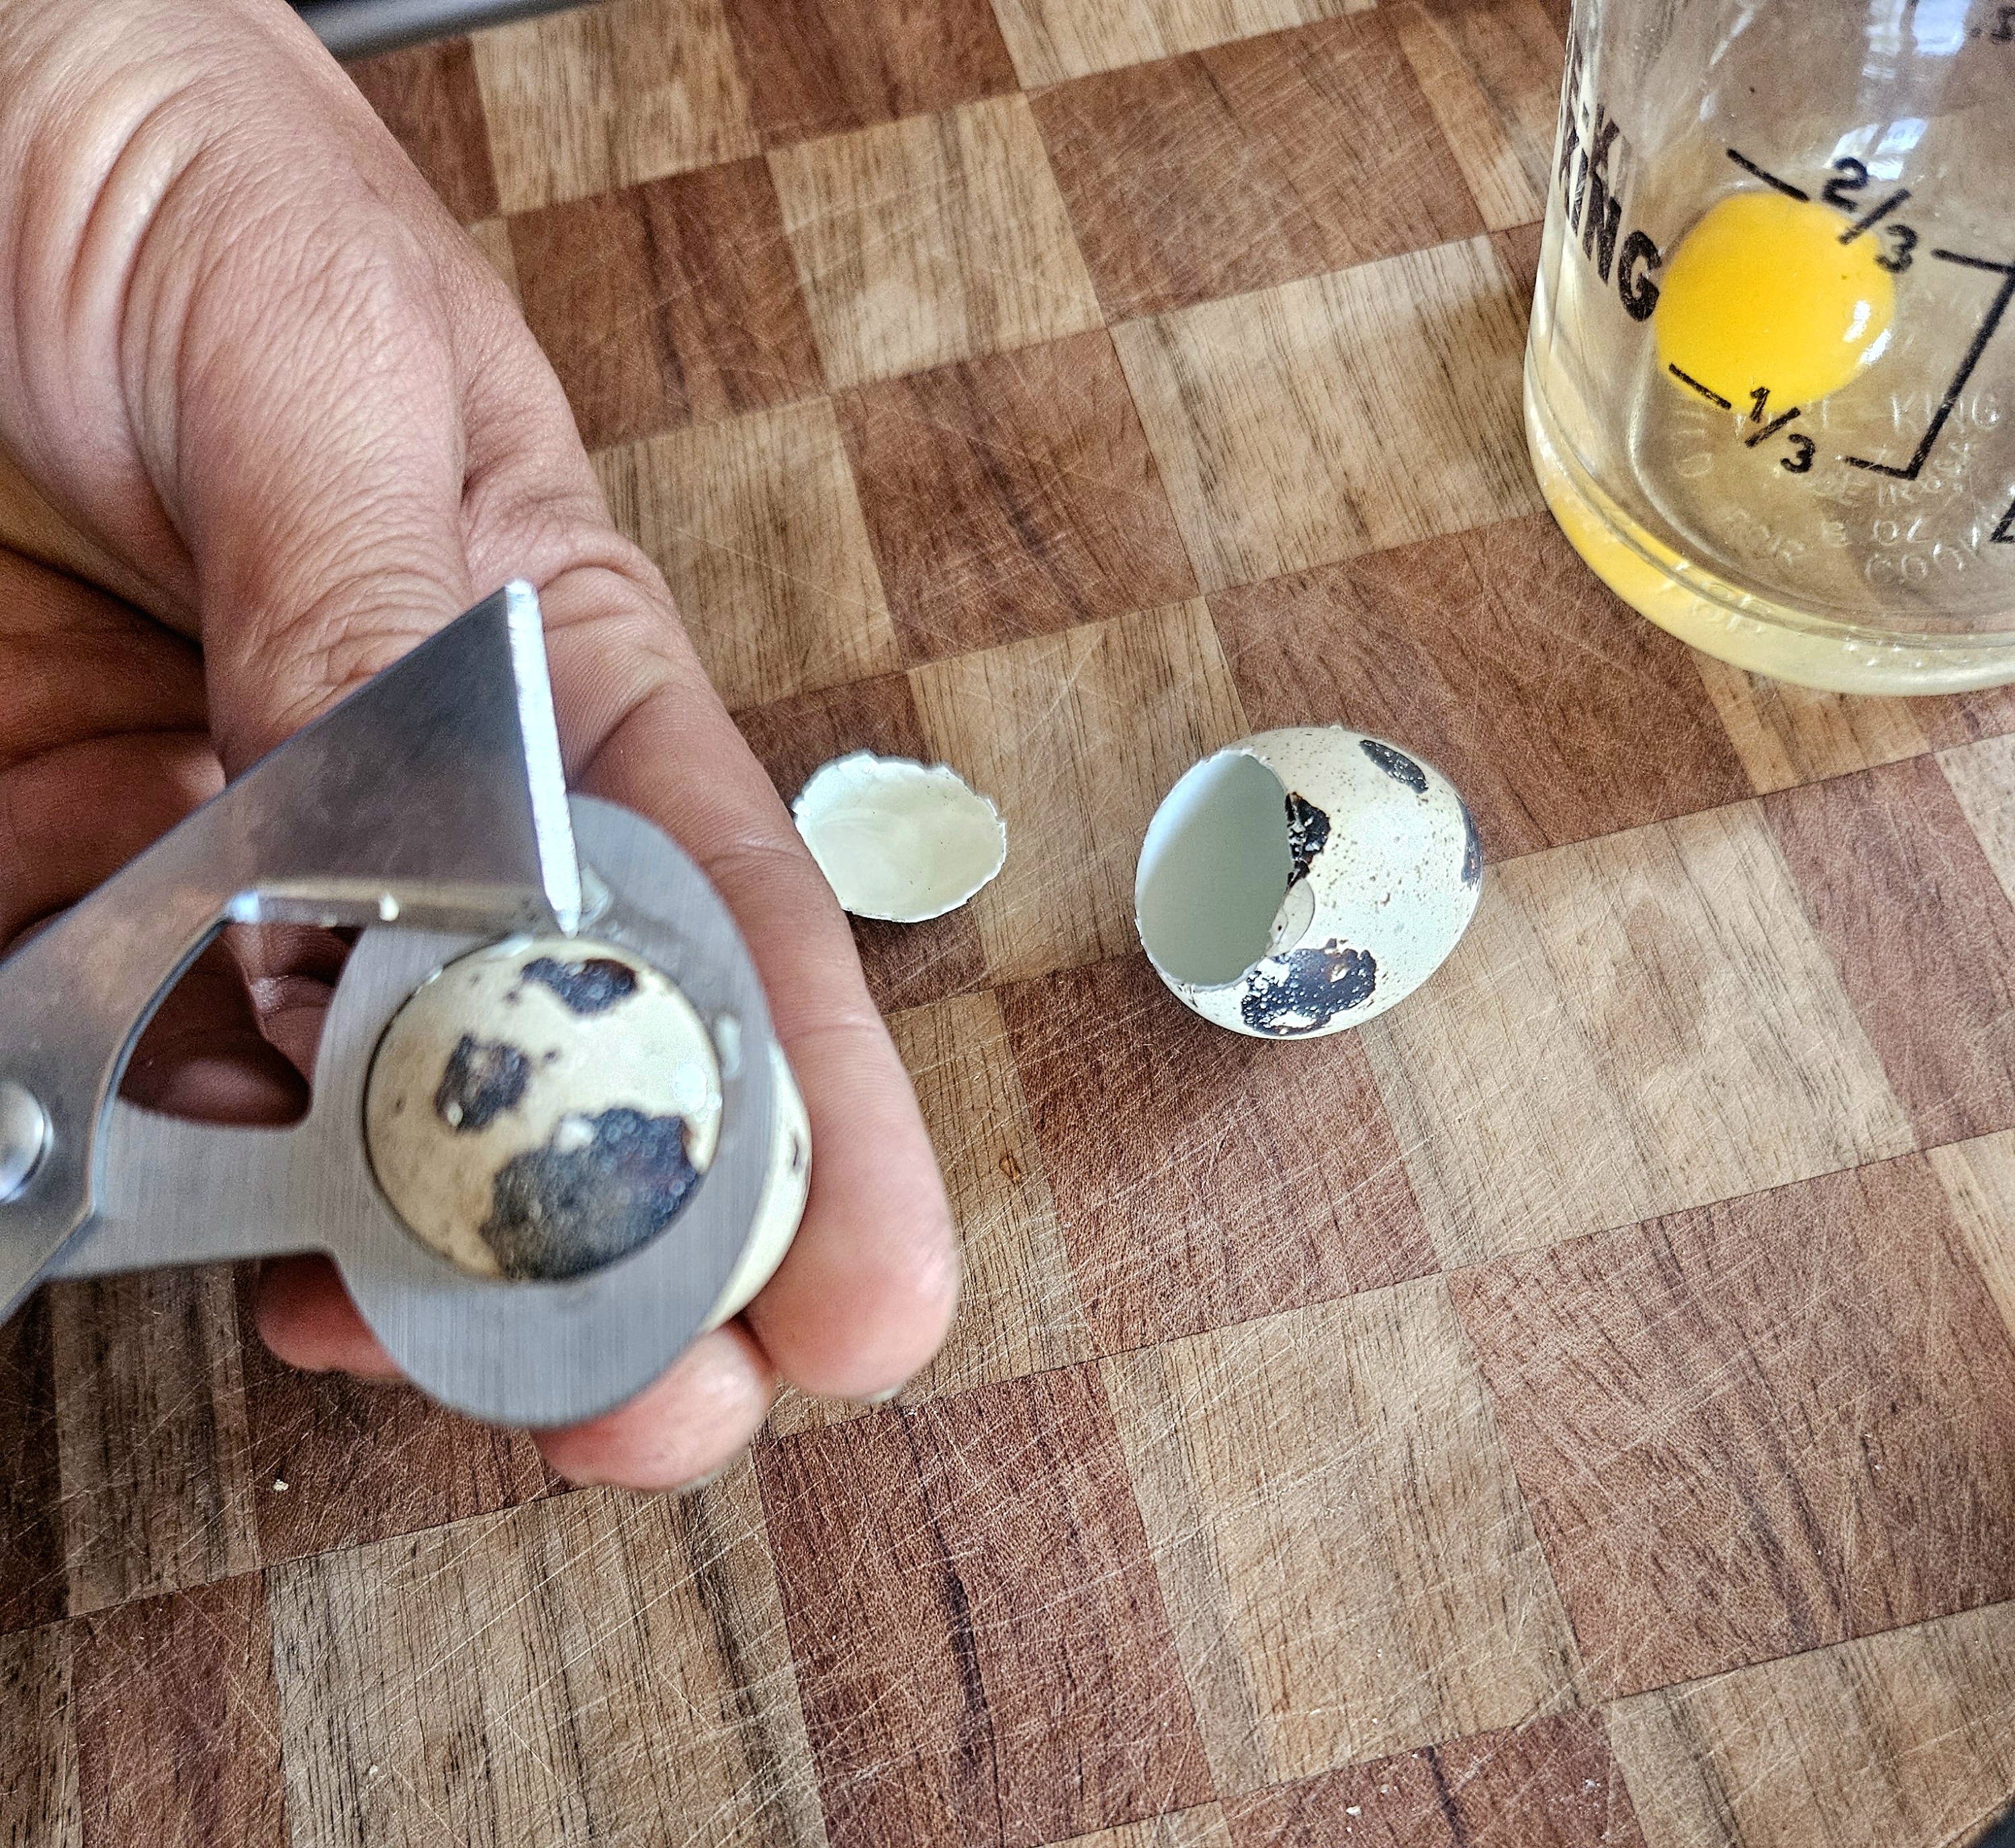
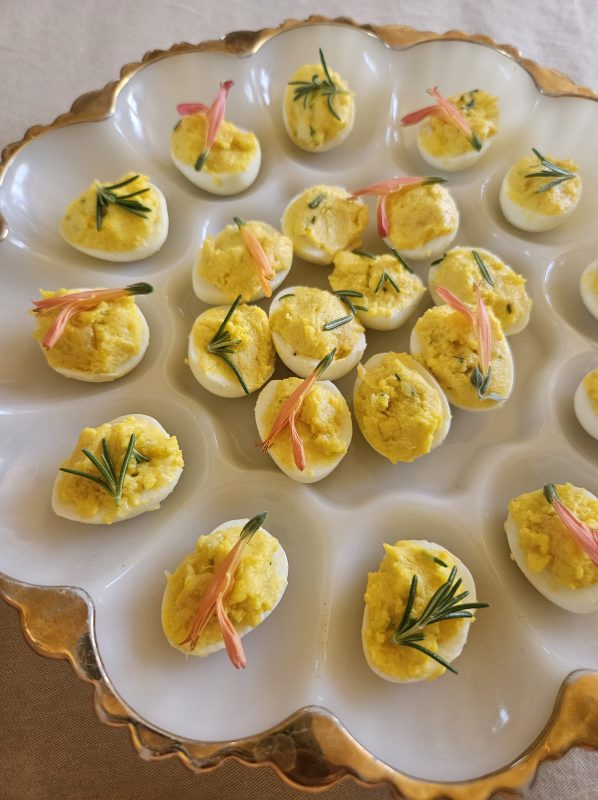
Hi friends, Amy here. Years ago, chickens free ranged my entire backyard and roosted in the trees. However, my current neighborhood has red tailed hawks and striped skunks so I knew any domesticated birds here would need a fortress. Instead of making an enormous chicken enclosure, I opted to try smaller birds that wouldn’t feel so cramped in an aviary. Coturnix quail, Eurasian domesticated birds, are often raised for eggs and meat in tiny cages like rabbit hutches. So in my 100 square foot and six foot tall enclosure, a dozen of them scurry under plants, bathe in the dust and fly as well as they can. Also, since the rooster’s crow is not very loud, they don’t bother sleeping human neighbors. City dwelling roosters!
I started in late winter/early spring with two week old chicks raised locally. When the days grew long enough (almost 14 hours) at 11 weeks old, they stated laying.
Just like with free range chickens, every day is an egg hunt.
The shells are brittle but the membrane below is very tough. Quail egg scissors help make a clean break and keep frustrating fragments out of the dish.
About 4 quail eggs equal a large chicken egg.
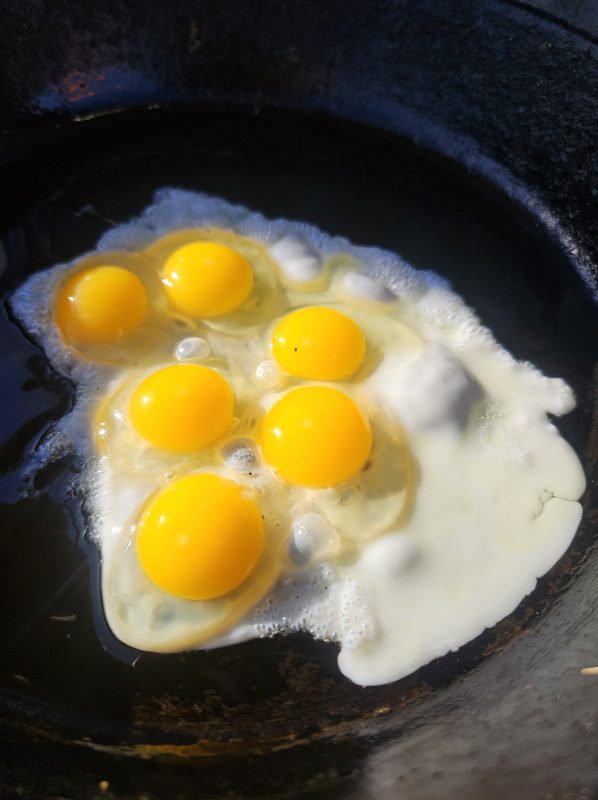
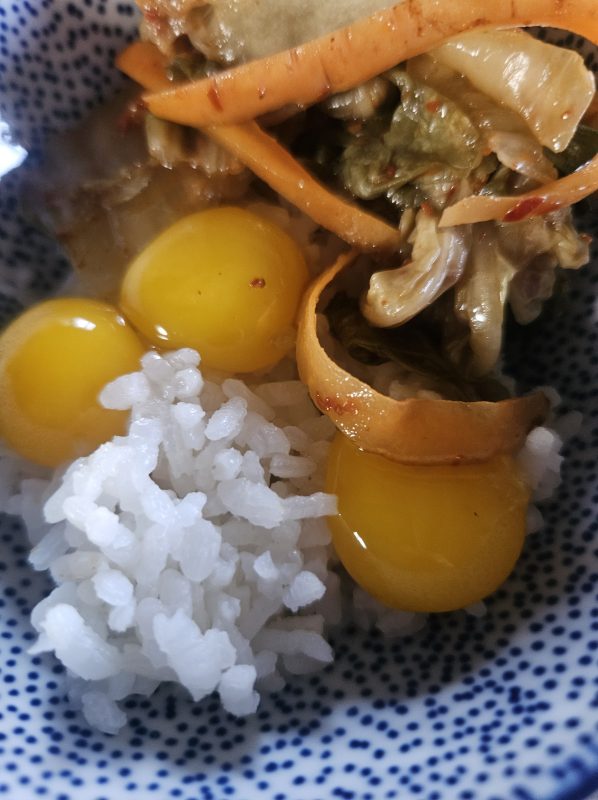
They taste the same but definitely have more yolk to white than a chicken egg. Sometimes I enjoy the raw yolks with homemade kimchi and rice.
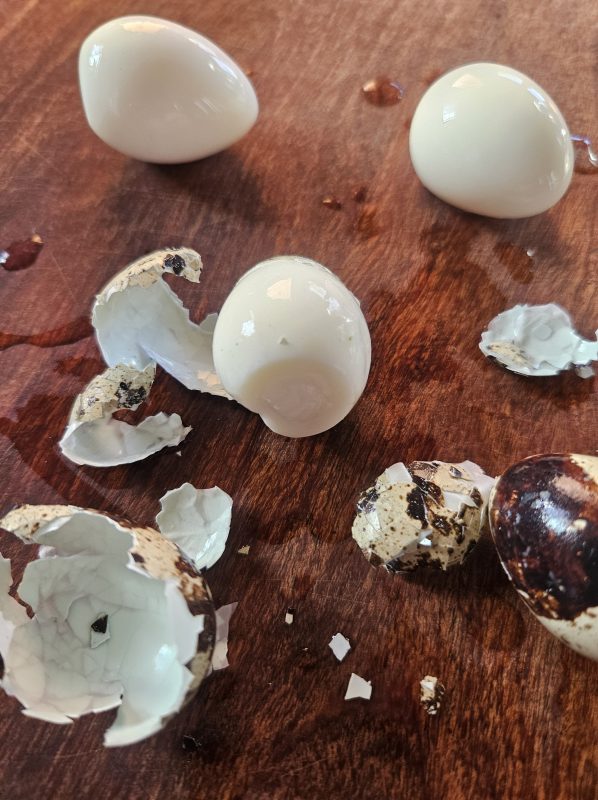
Hard boiling only takes 4 minutes!
That tough membrane under the shell makes them easy to peel.
These deviled eggs are topped with rosemary leaves and chuparosa (Justicia californica) flowers. I don’t bother to make mayonnaise, I just mix the yolks with olive oil, Dijon mustard, and salty preserved lemon.
Raising these birds was a long time coming for me. Here’s hoping some of your dreams come true!
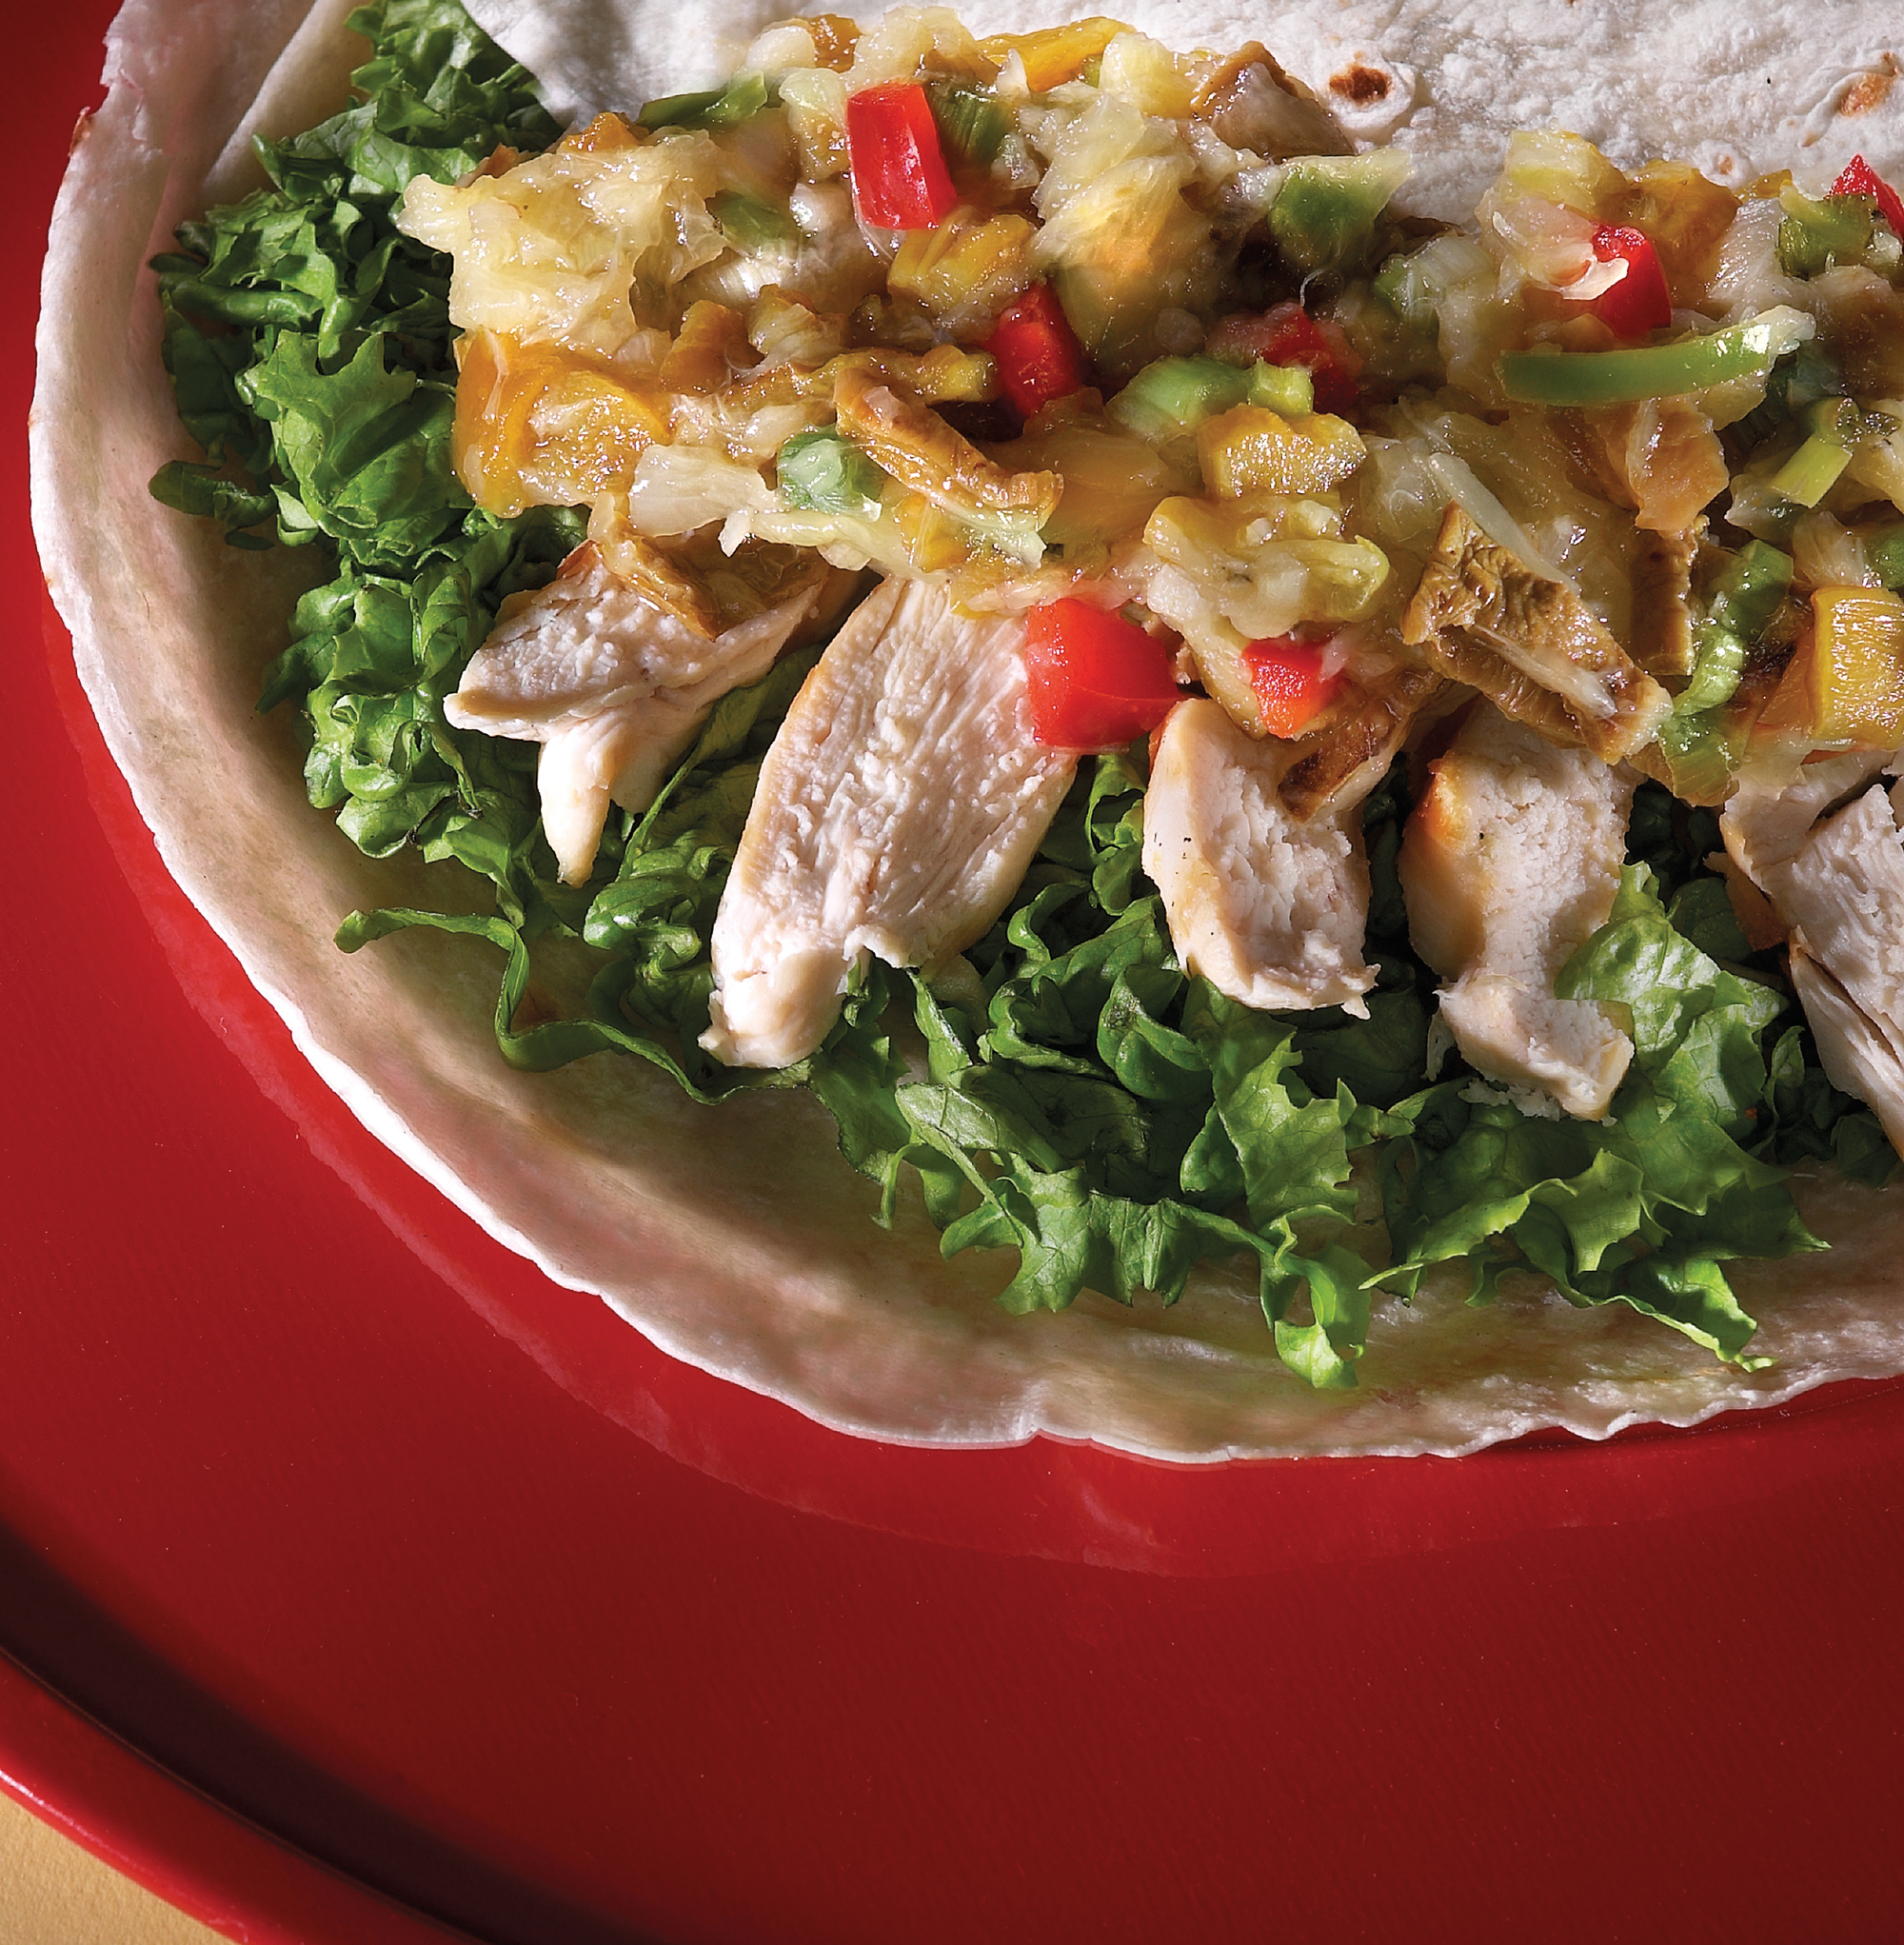
Grilled Chicken with Nopalito and Pineapple Salsa (from The Prickly Pear Cookbook)
(Note: I will be teaching a class on cooking with nopales at the Presidio of Tucson on April 3. You can sign up on their website.)
The new prickly pear pads (nopales) that we cook and use for nopalitos are usually ready in from March to early May. It’s Carolyn here today tempting you with two recipes for a delicious salsas made with nopalitos. (Definition of nopalito: a nopal, or cactus pad, cut into little pieces).
Why bother to learn how to use prickly pear pads? For hundreds of years, both the fruit and pads were considered folk medicine in Mexico and early research showed that the fibers in nopales were helpful in curbing blood sugar. Today, researchers in the US and Europe are using sophisticated laboratory techniques and specially bred mouse models (that would be transgenic mice, not transgender mice) to investigate prickly pear fruits, pads, flowers, and seeds as a cure for a wide array variety of ills.
Investigators are looking into prickly pear compounds as antioxidant, antiviral, anti tumor, anti diabetic, and antiparasite. It may be useful in combating a range of cancers including leukemia, lung, gastric, colon, and ovarian. Studies have considered its use in the treatment of ulcers and alcoholism and a possible role in boosting memory and energy metabolism. Many research labs are investigating prickly pear for cancer prevention.
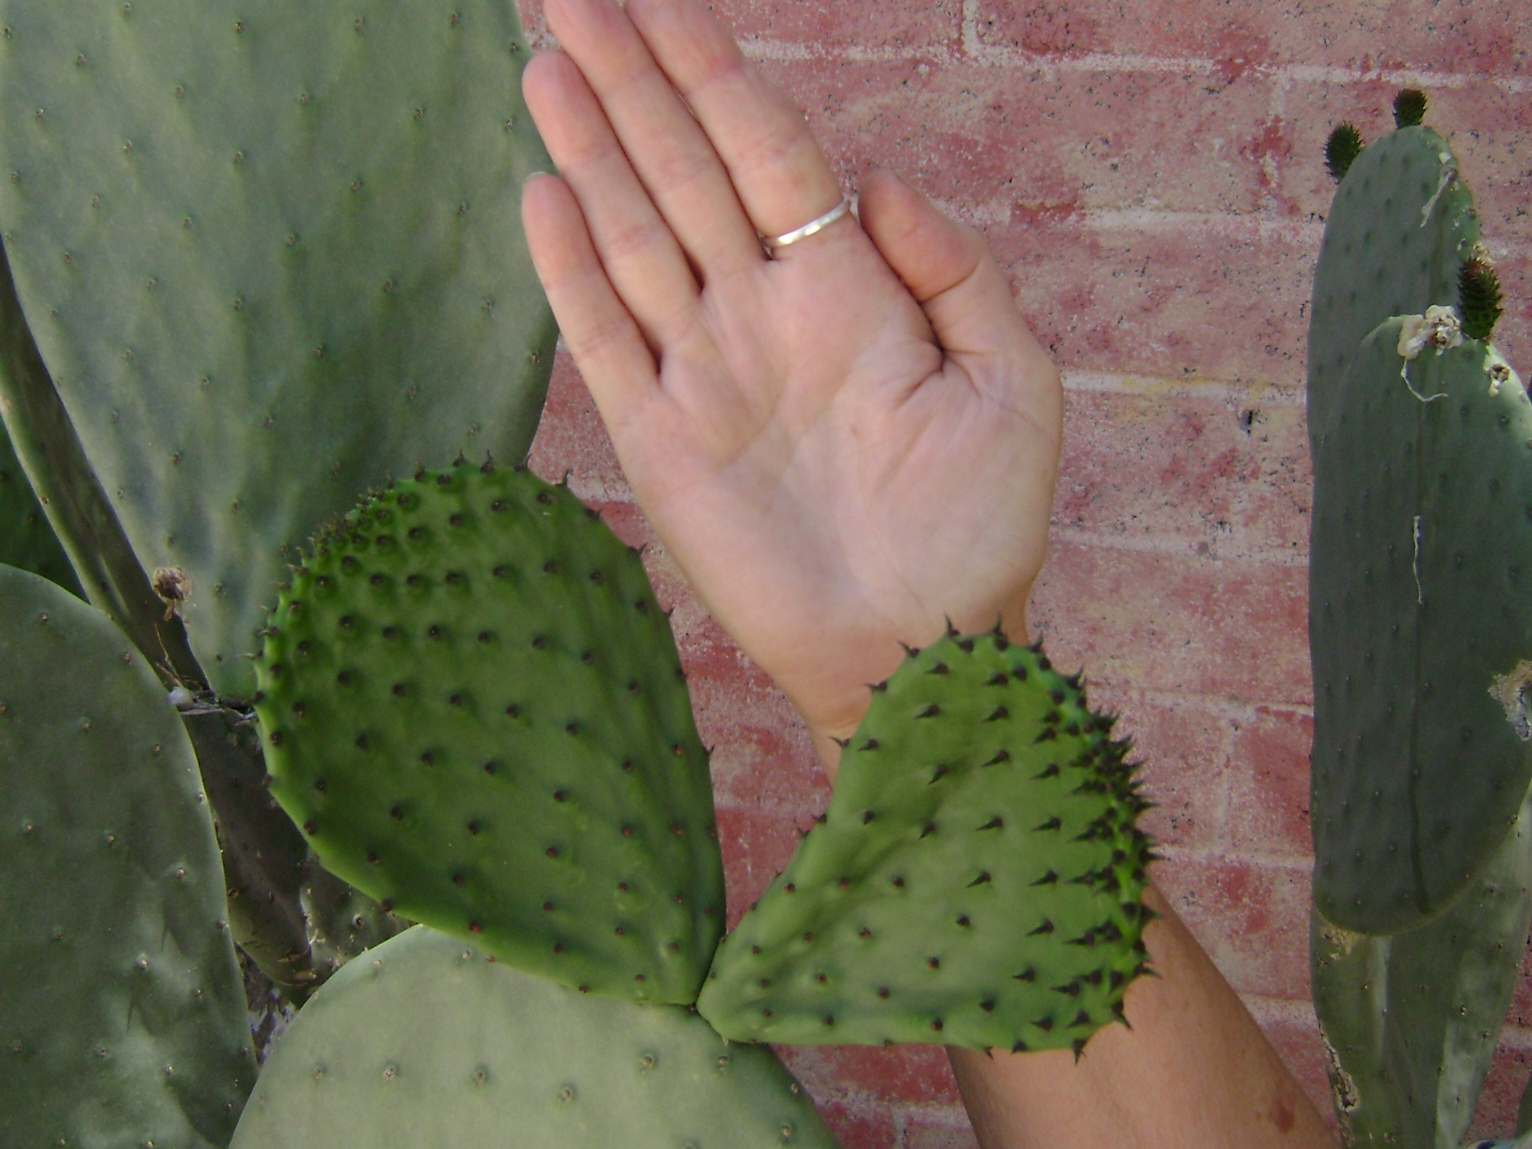
The many varieties of prickly pear put out their new growth when the spring warms up. All prickly pear pads are edible (meaning they not only won’t kill you but in this case are very nutritious), but they are only appropriate for food when they are new. After about six weeks, they develop a fibrous infrastructure. The easiest kind of pads to prepare are those from the large Mexican variety of prickly pear that do not grow wild north of Mexico. You can grow them in your yard if your winter doesn’t bring much freezing. Or you can get them at a Mexican grocery story. They are called Ficus indica or sometimes Burbank because Luther Burbank did some breeding work on them. The wild cactus pads are also delicious, but harder to prepare because of the abundance of spines.
You can do a rough estimate of when a pad is ready to pick if it is about the size of your hand. The nopales available in Mexican grocery stores are grown by farmers who know how to manipulate the plant to keep fresh pads coming year ’round.
Pick nopales in the spring when the size of your hand.
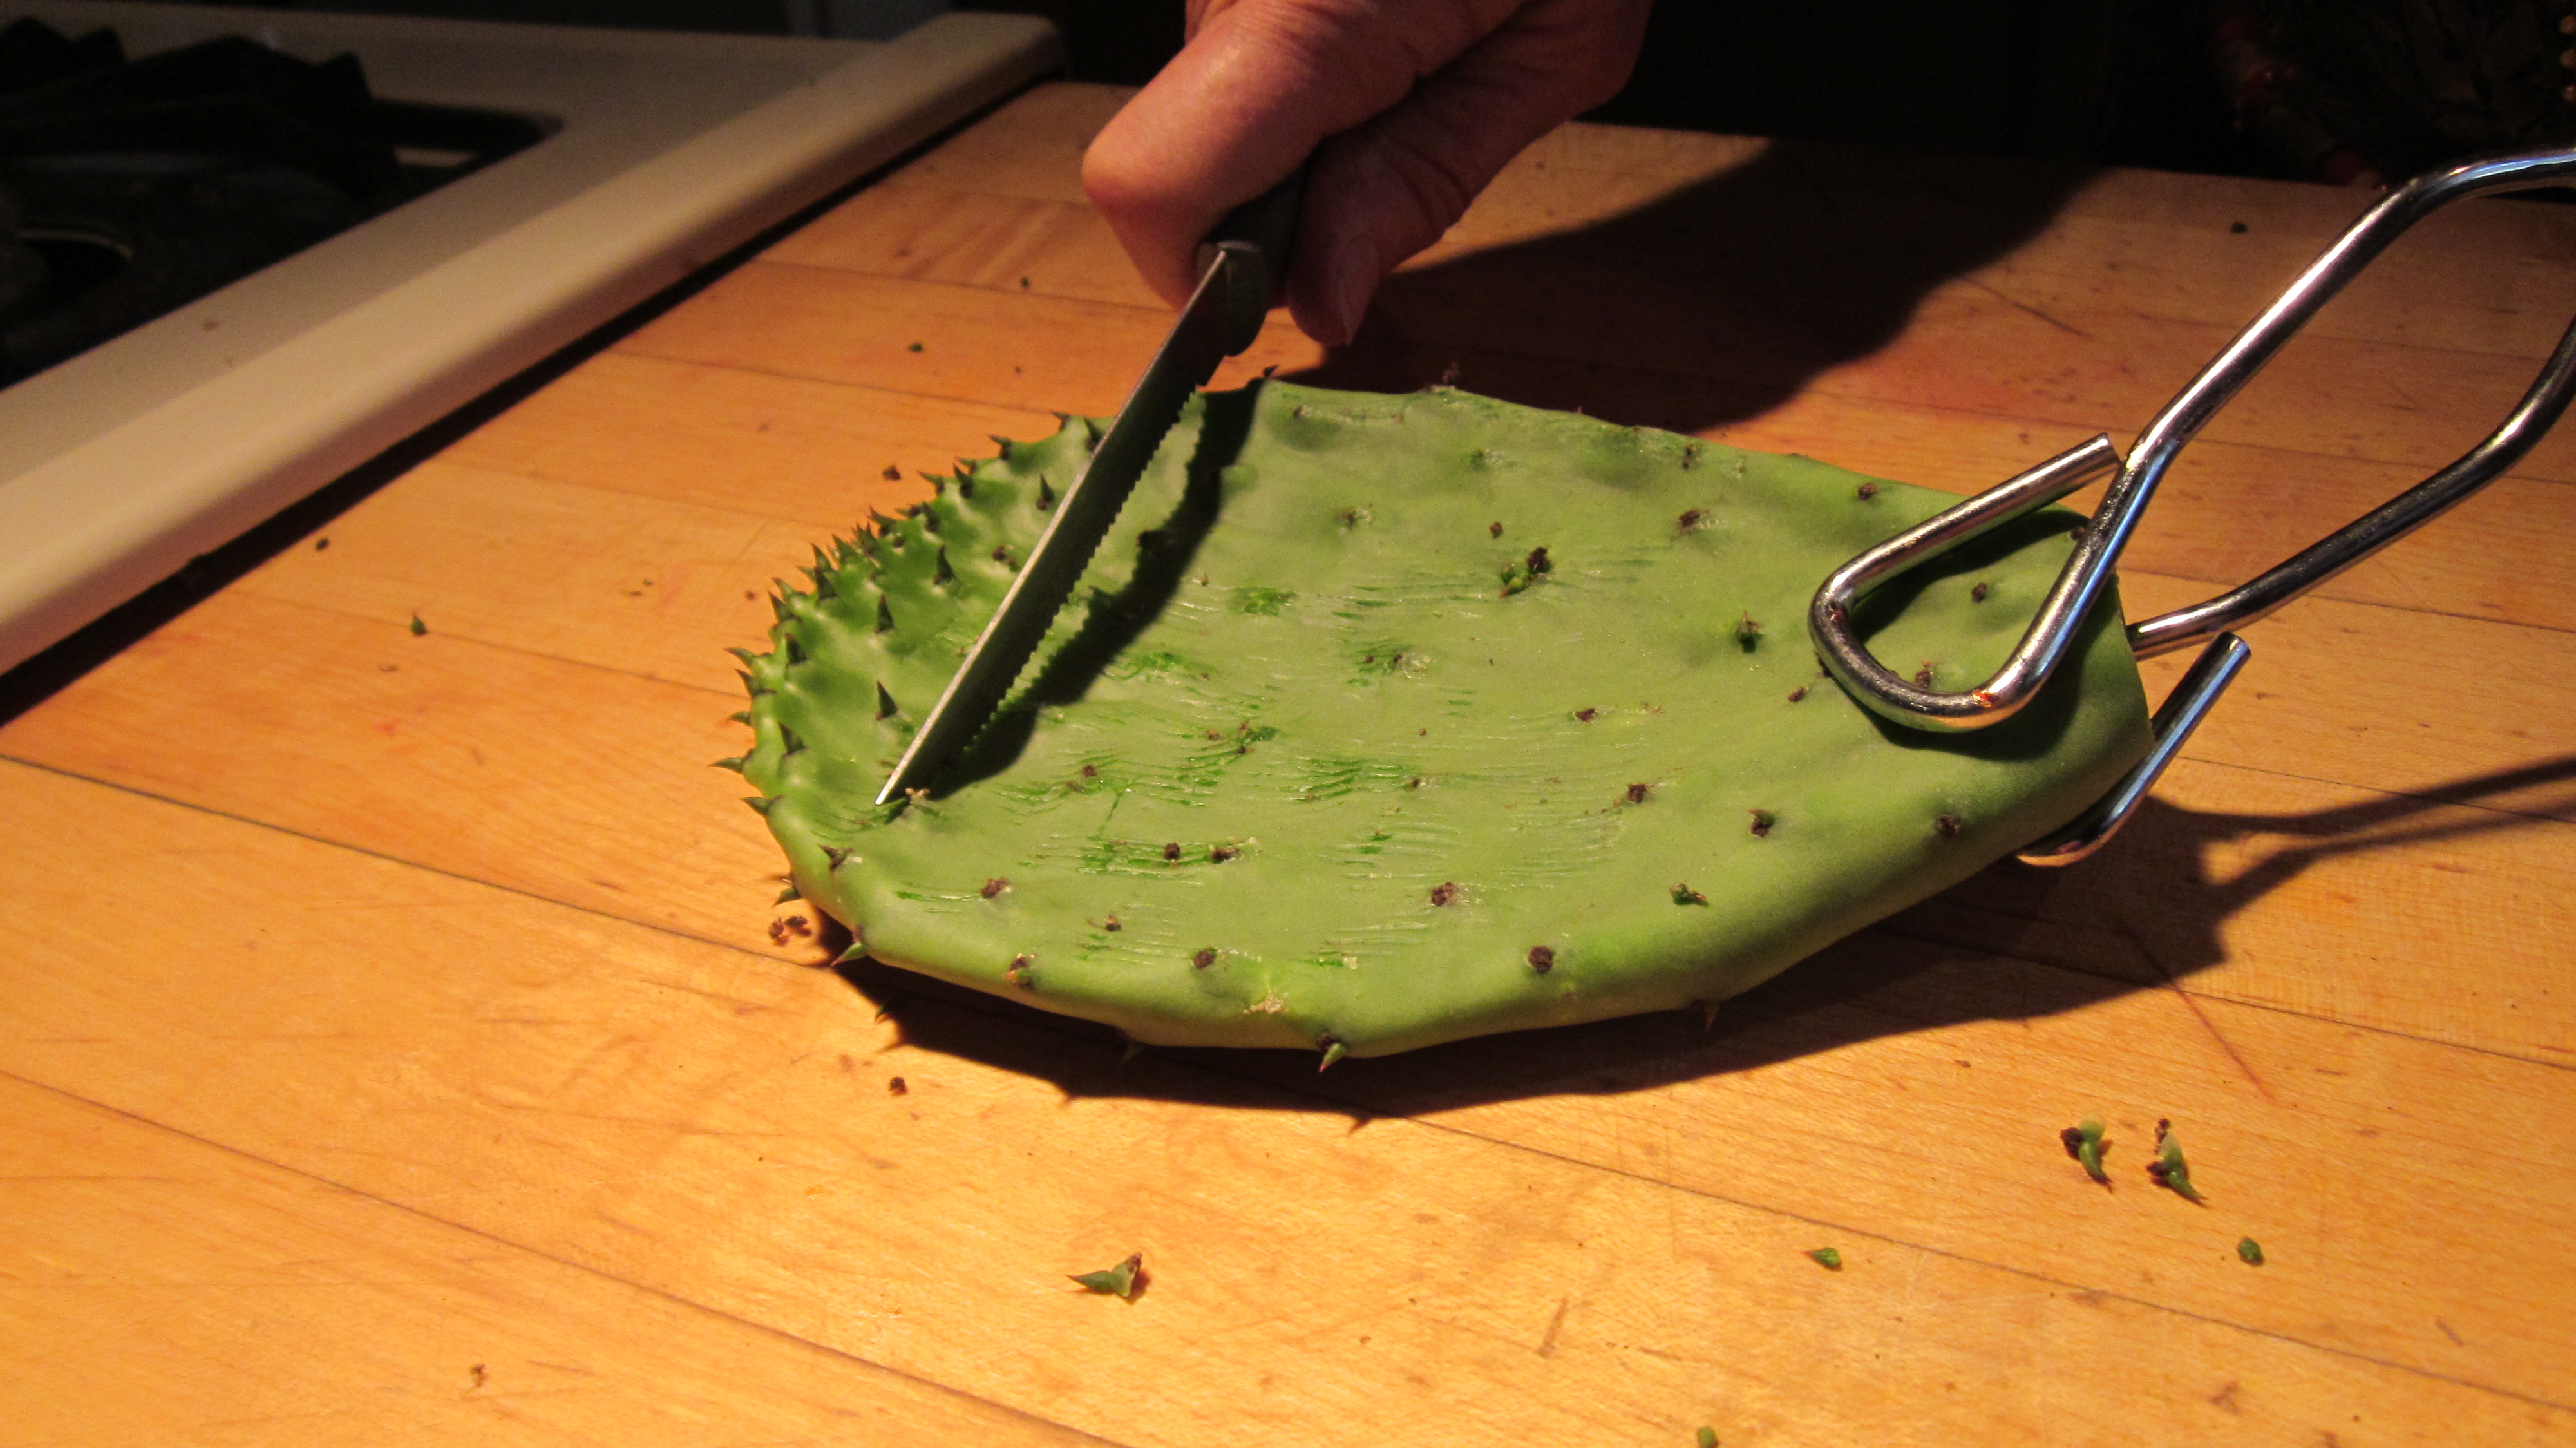
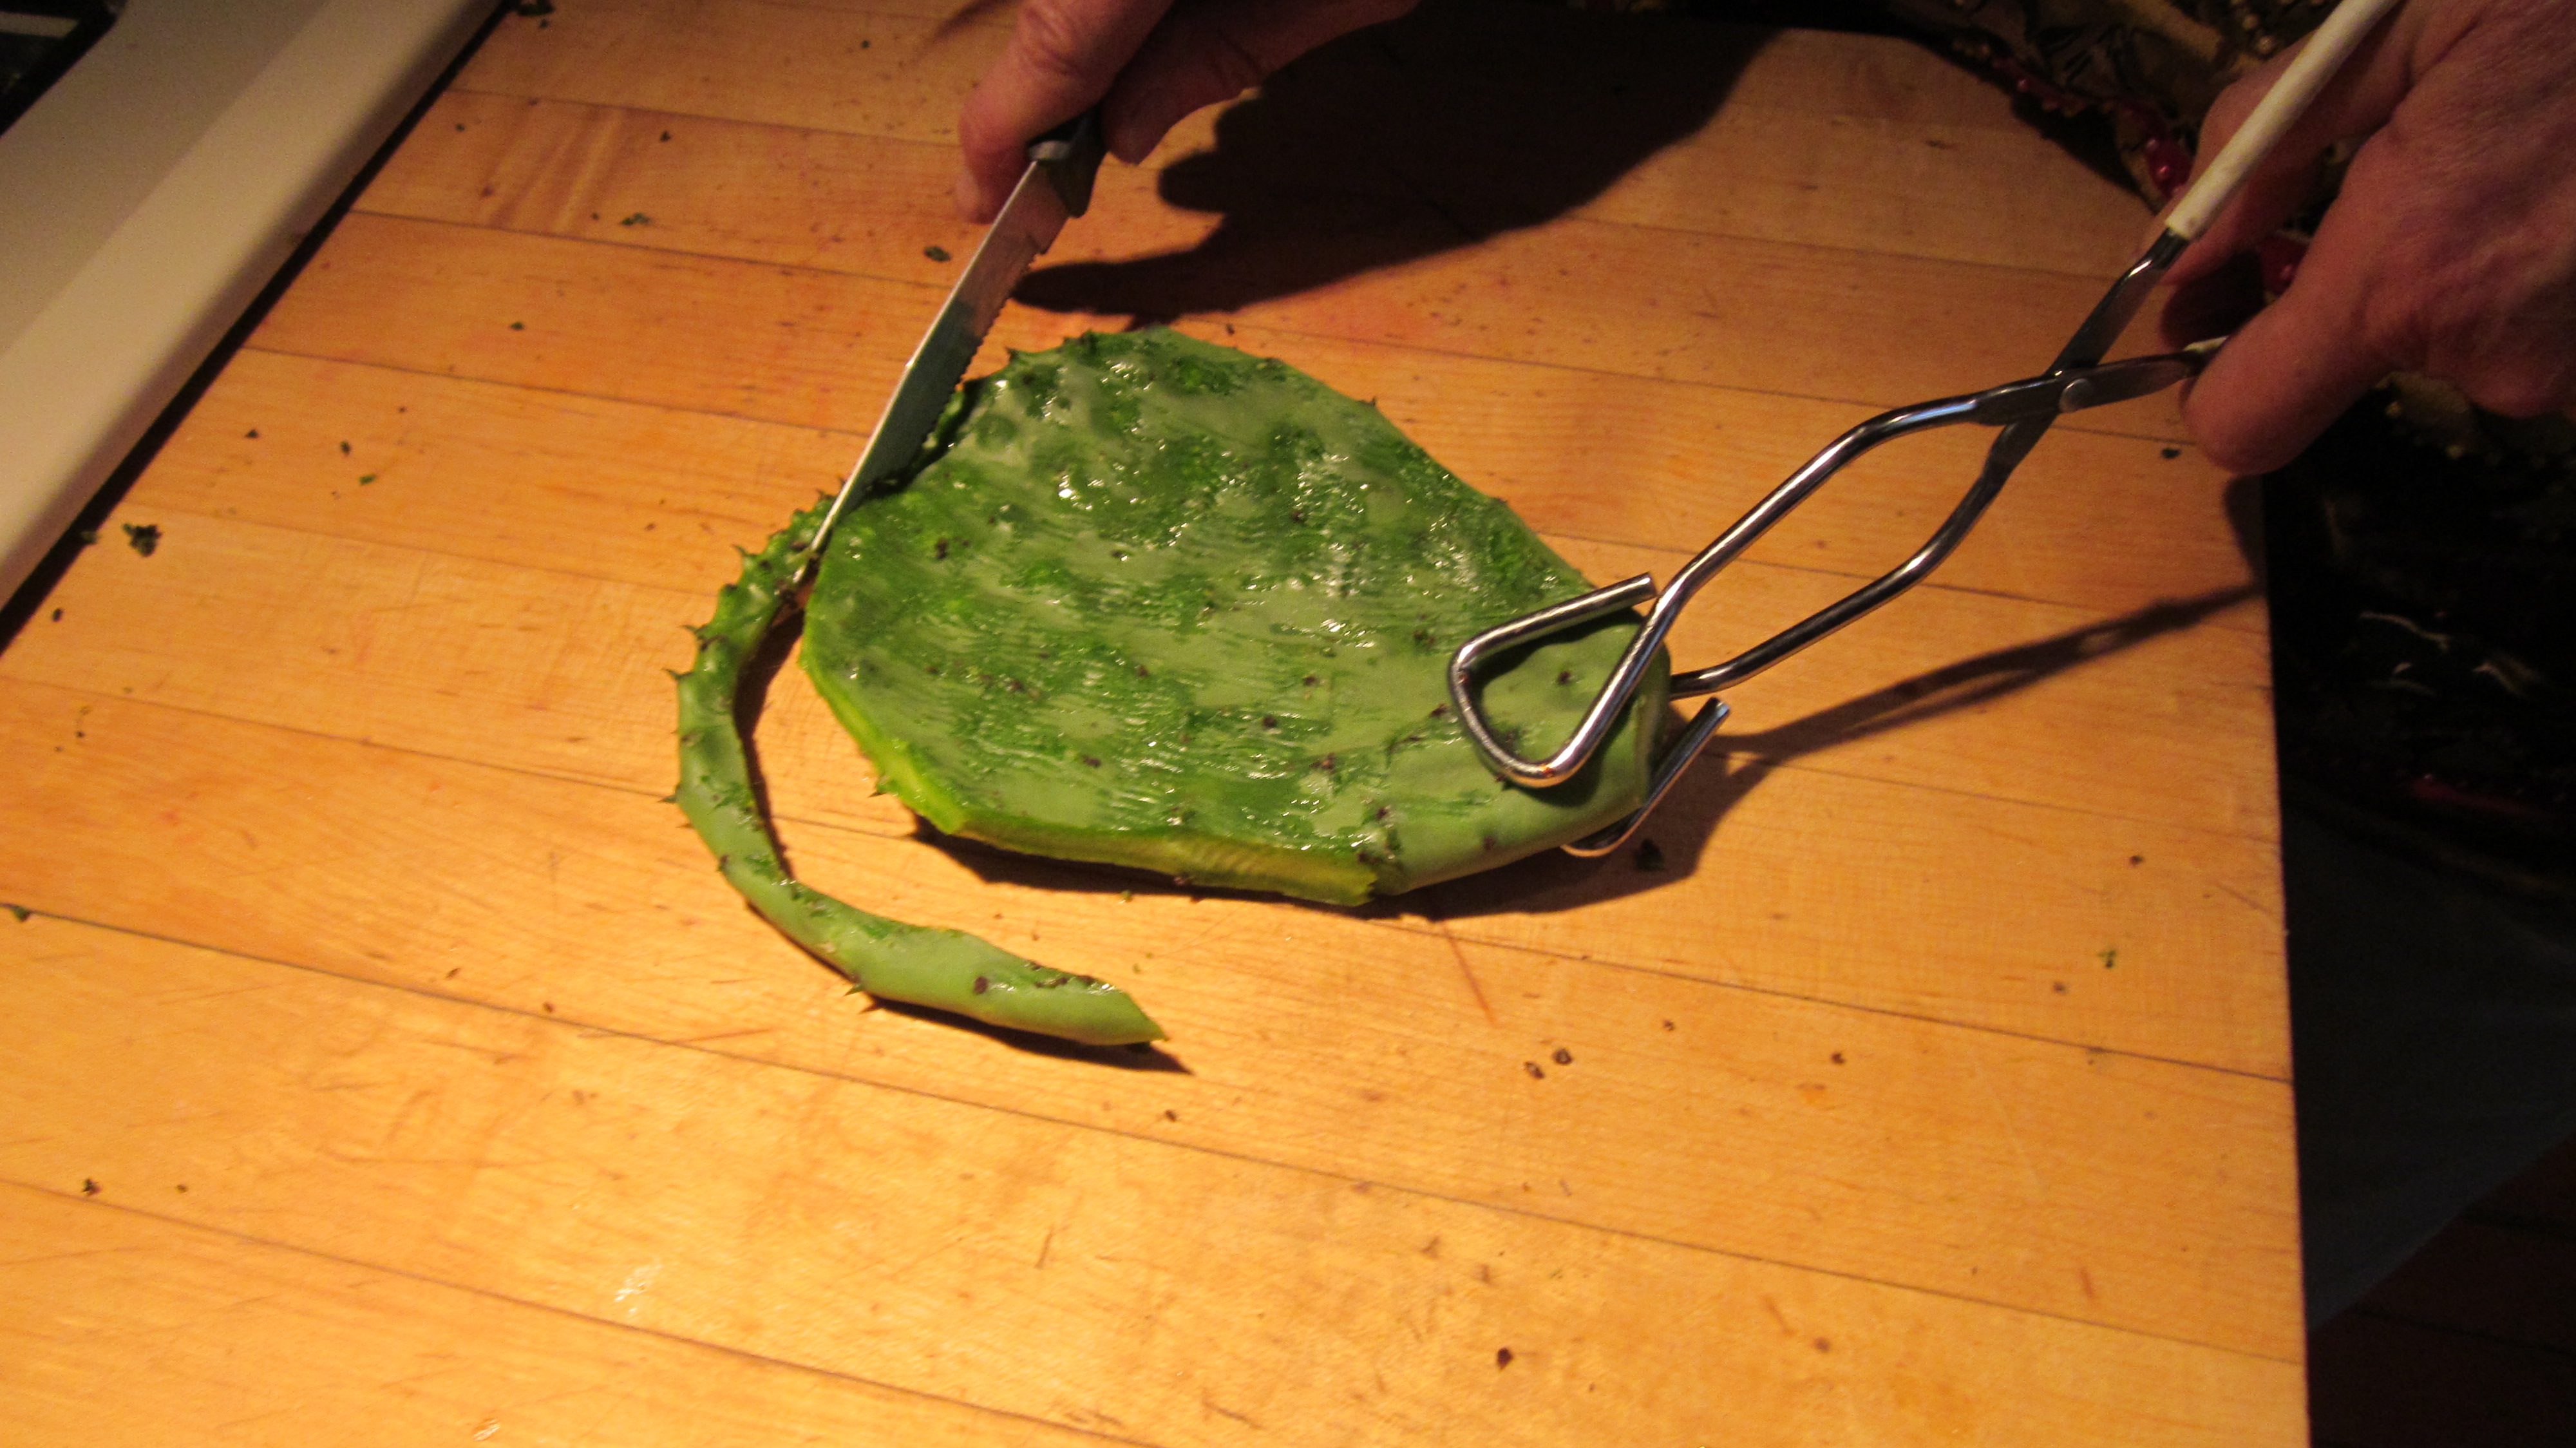
To prepare the nopales, you’ll use tongs, of course, and then don rubber kitchen gloves to protect your hands as you get rid of the stickers. You don’t need industrial strength gloves, just good quality ones from the grocery store will do. Using a common steak knife, scrape vigorously against the growth (from outer edge to stem) to remove the stickers.
Scrape the thorns vigorously in the direction of the stem.
The edge has lots of stickers so just trim it off.
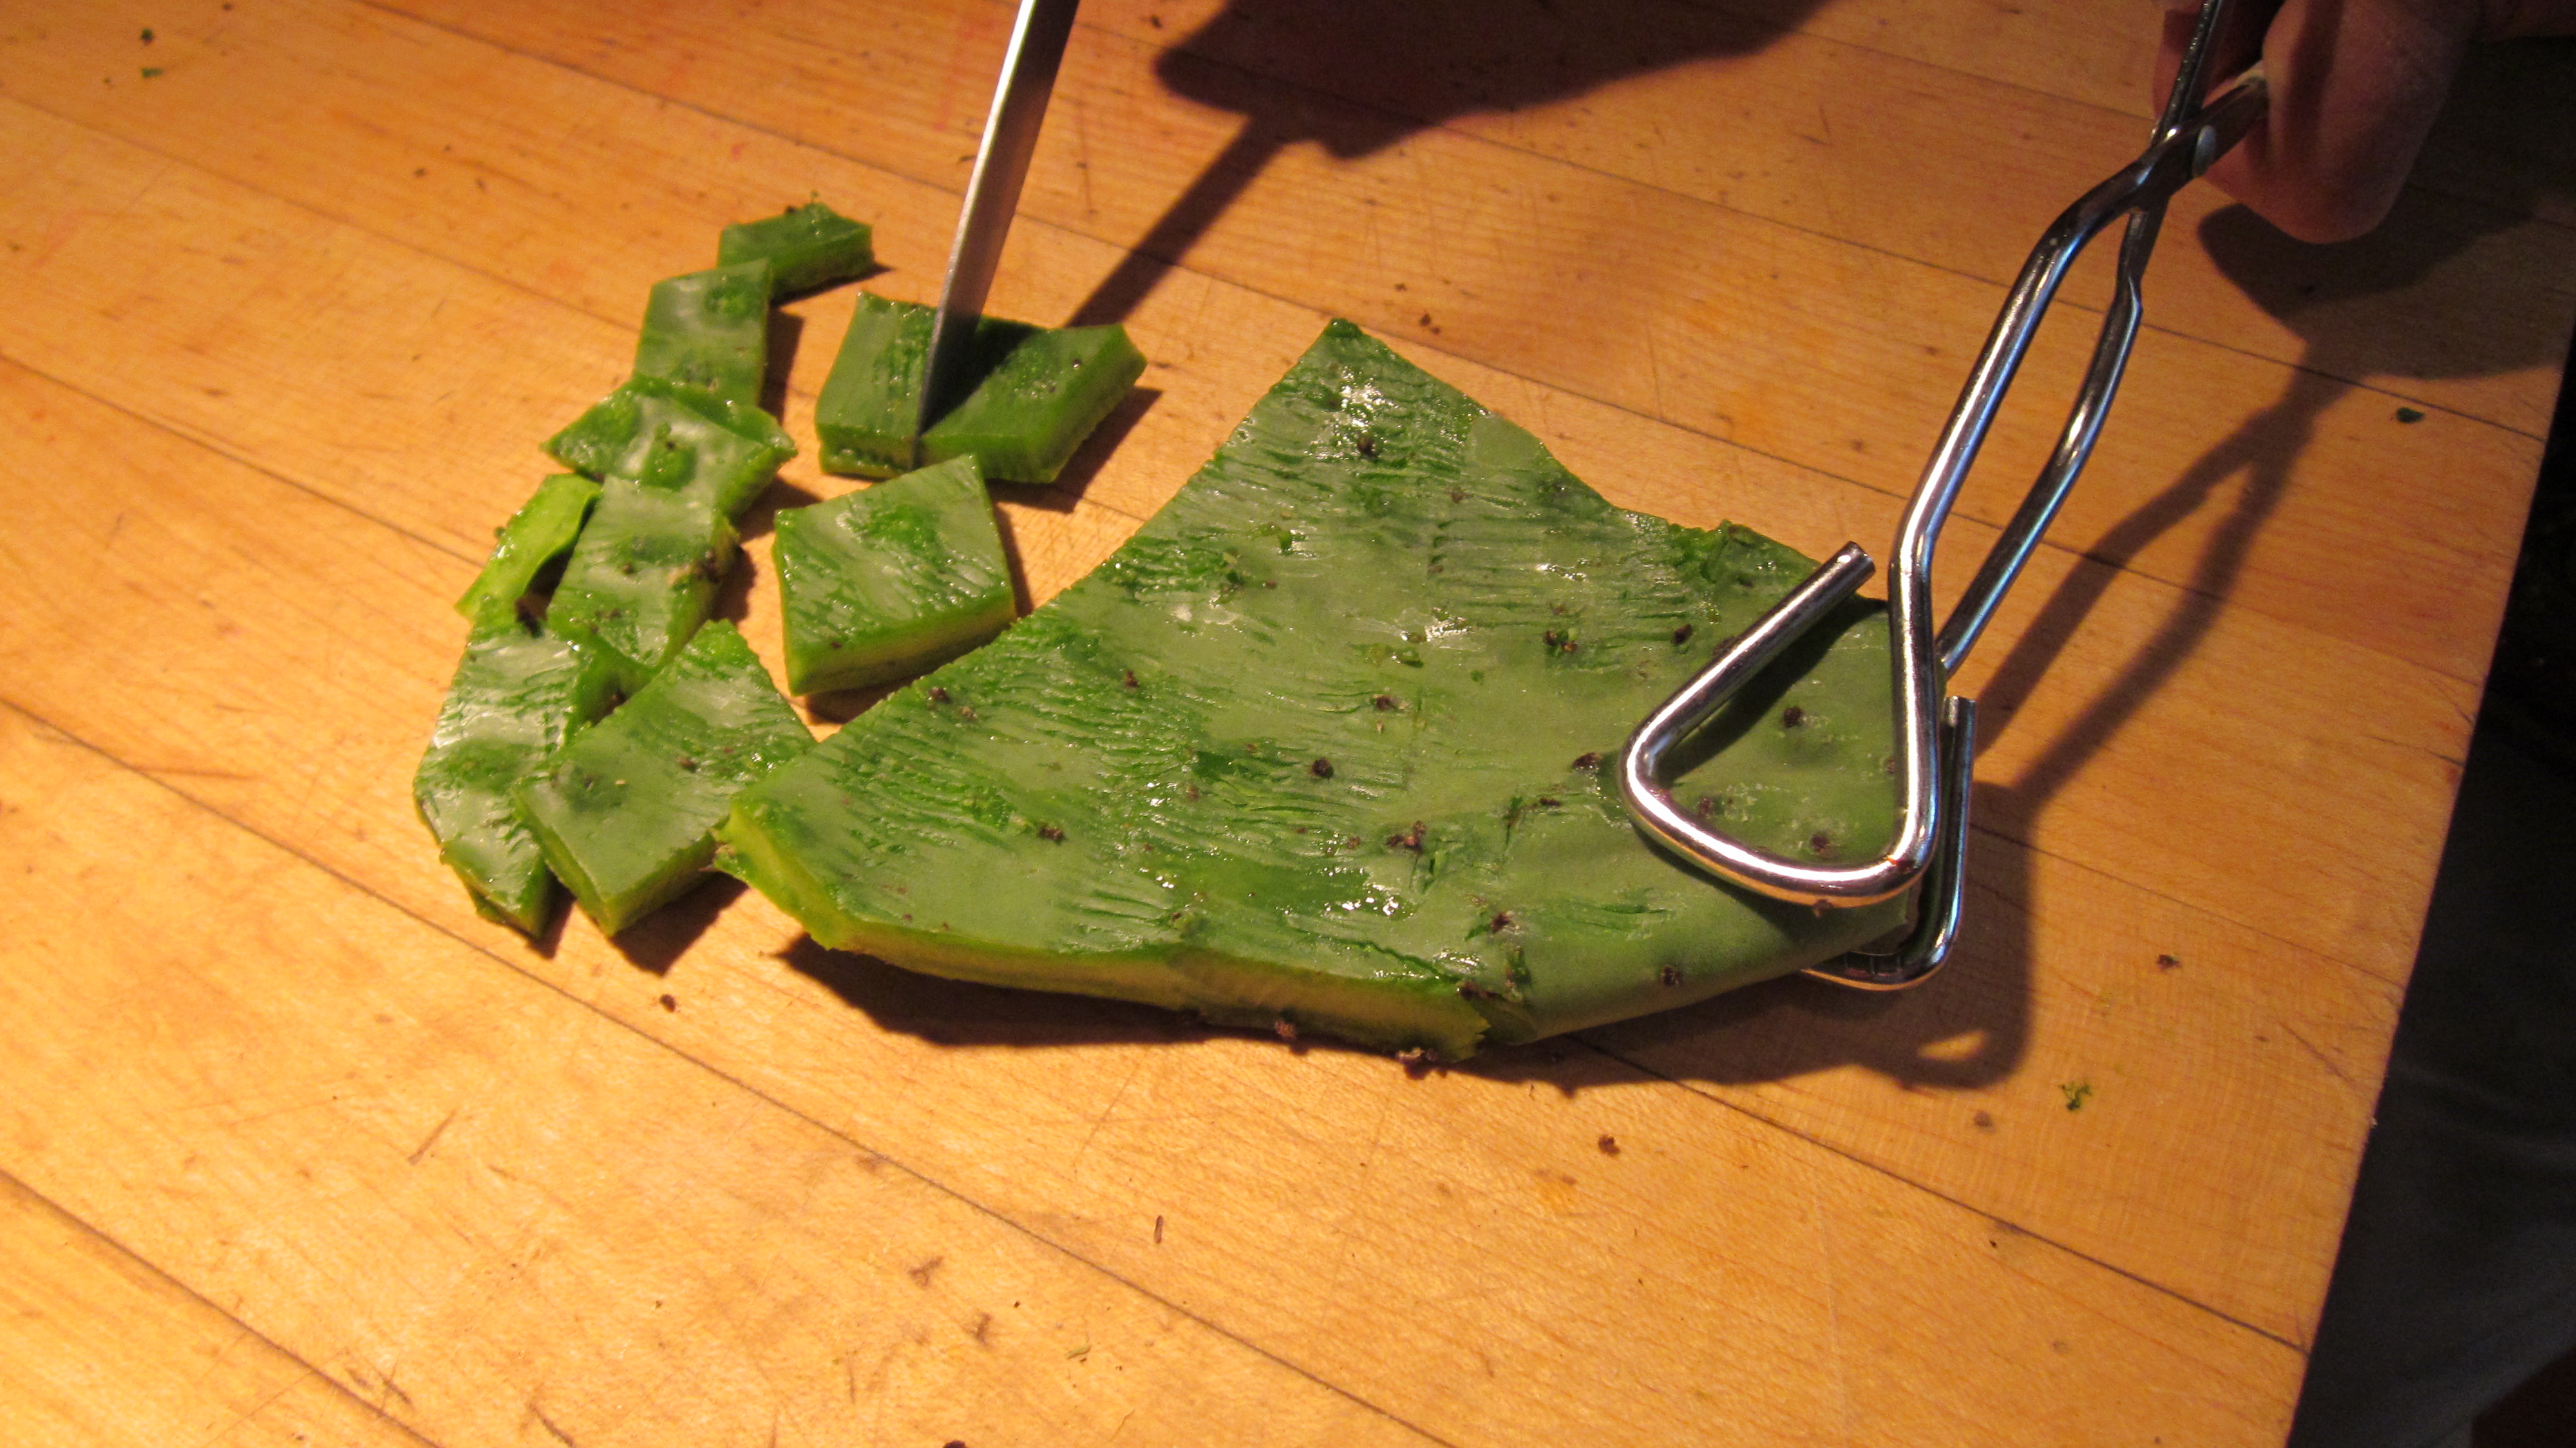
At this point, you can cut it into small pieces to cook or leave it whole and cut it up later. You can cook them in a frying pan filmed with oil, or use the Rick Bayless method (of TV show fame) and toss them with a little oil, sprinkle with sale, put on a cookie sheet and roast in a 375 degree oven for 20 minutes. In any case, you should check them and turn them over as they cook.
Cut into small pieces to cook.
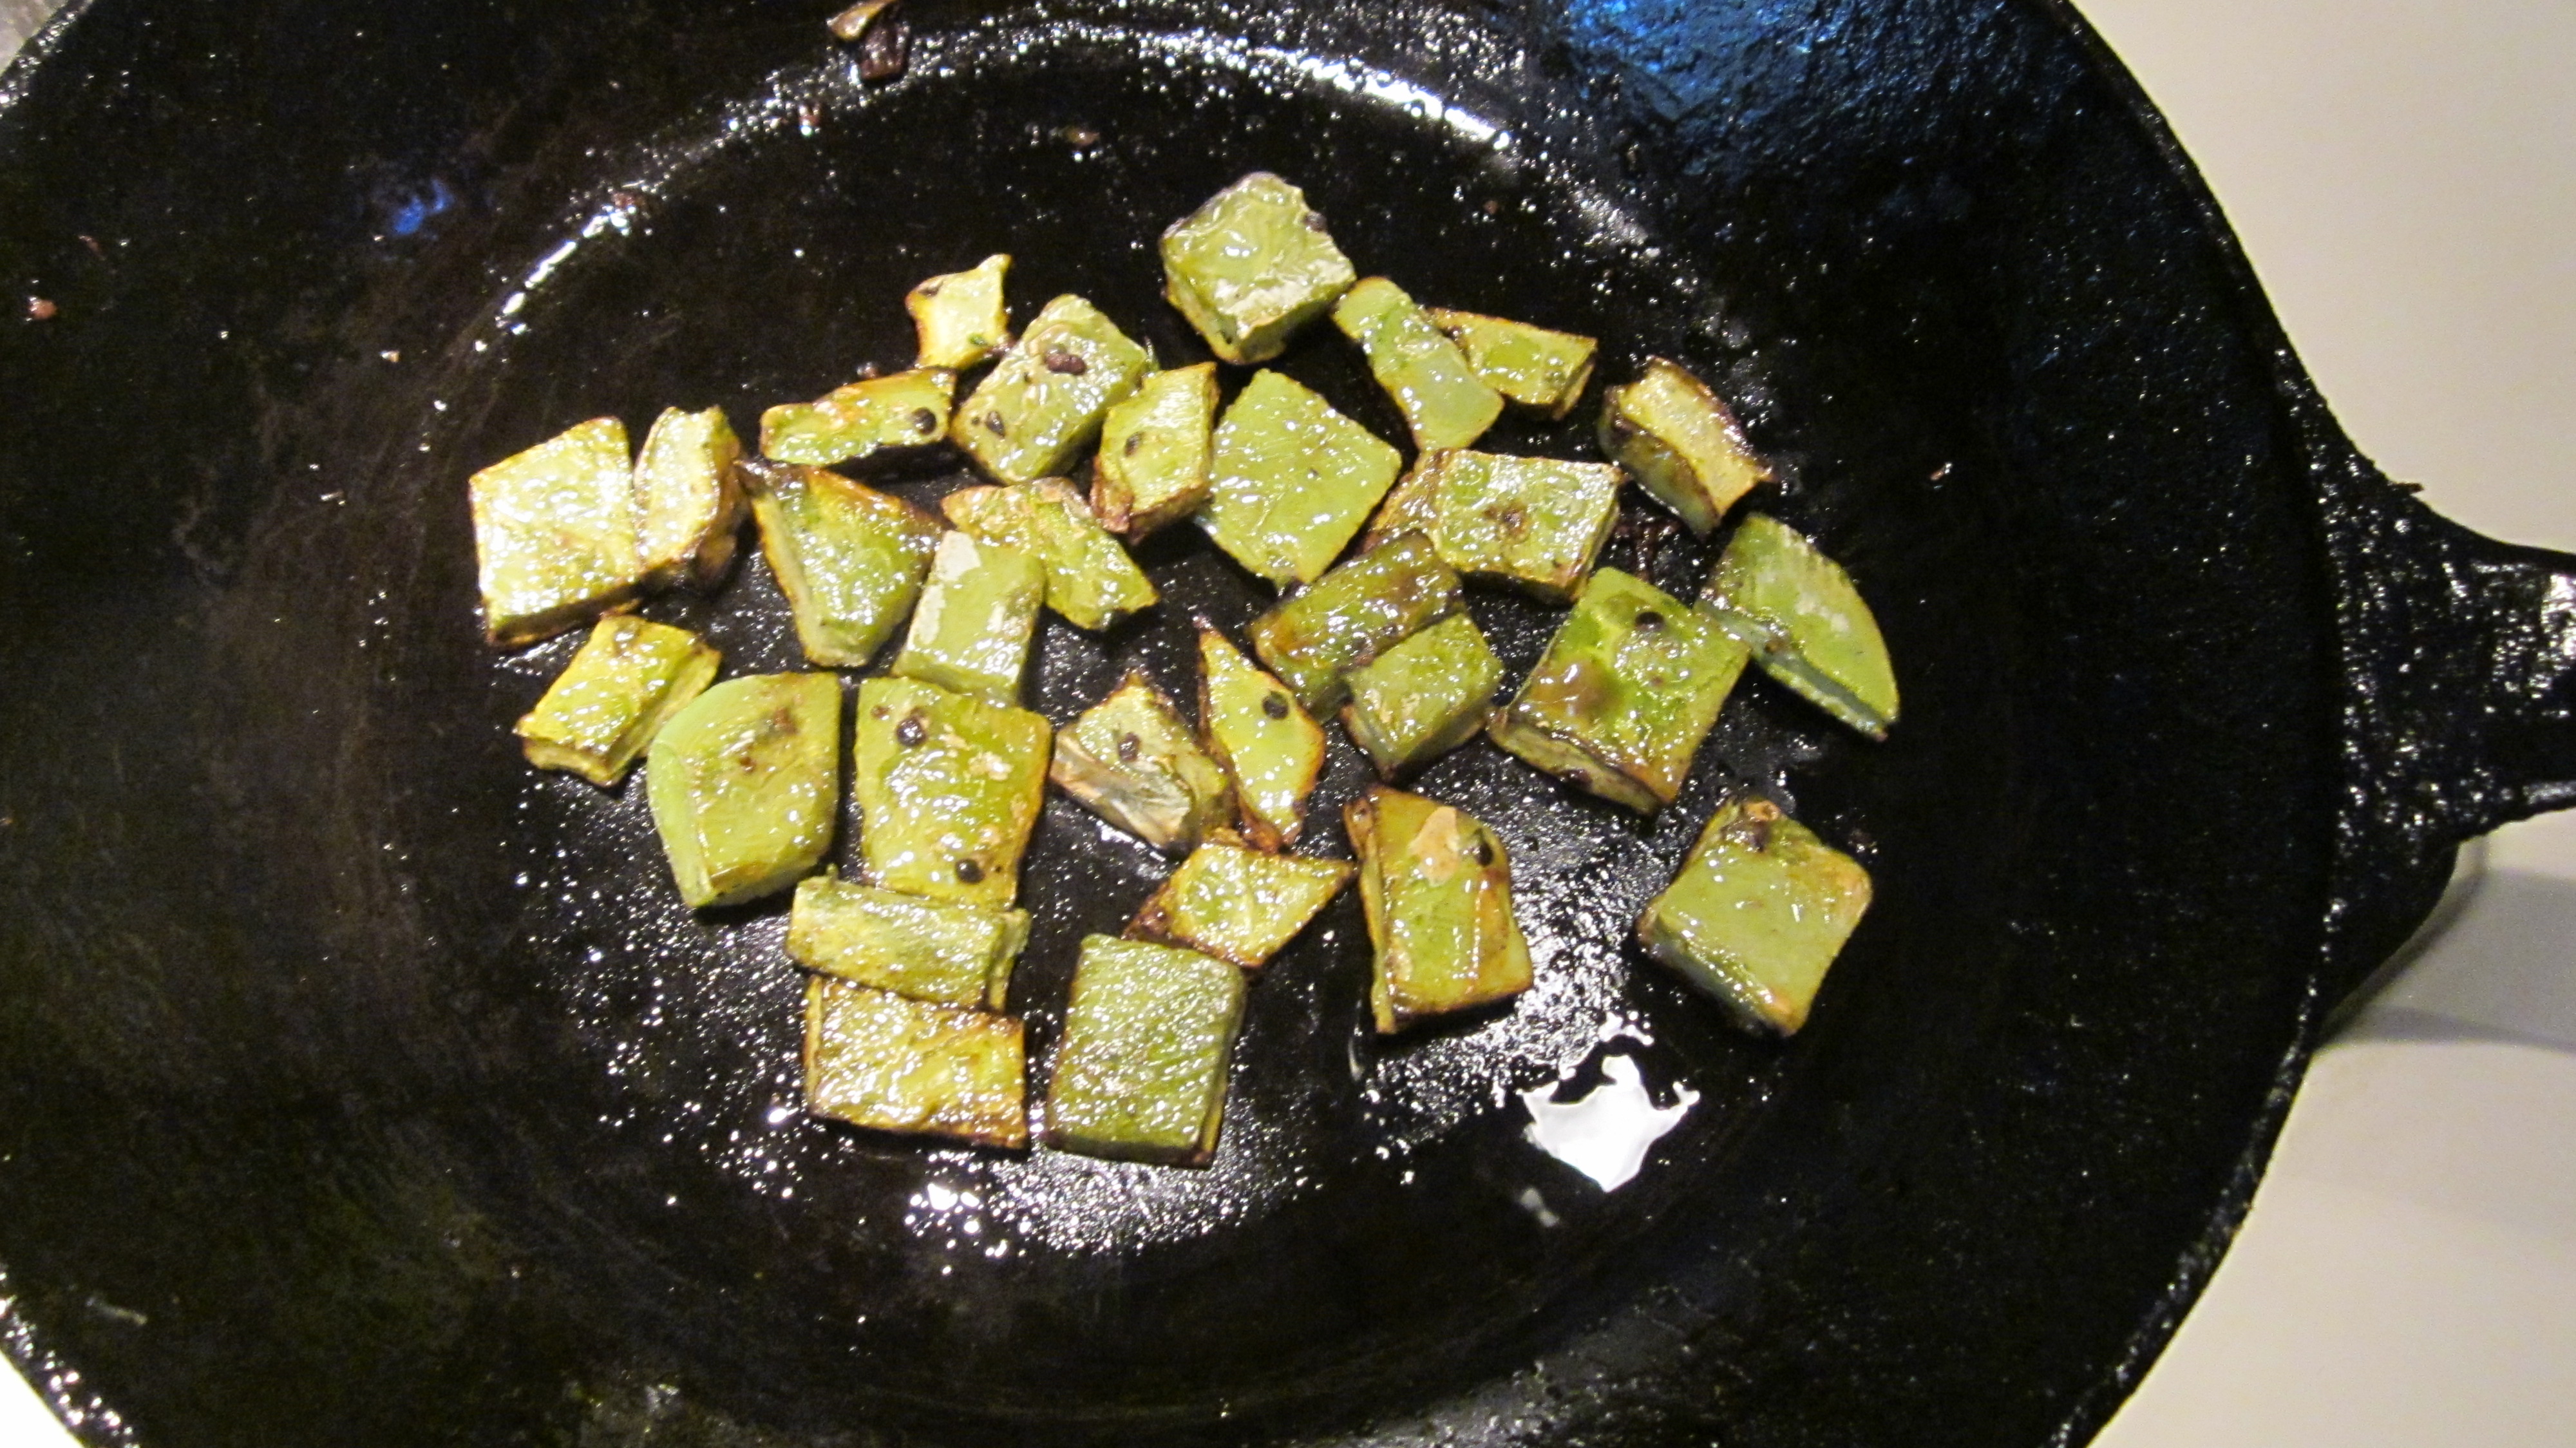
The nopales will turn from bright green to a more olive color as they cook. The gummy sap that some people find objectionable will dry up and become less noticeable.
The cooked nopalitos turn from bright green to olive.
You can also cook nopales on the barbecue alongside some chicken to make a delicious taco.
Here’s the recipe for the sauce in the picture at the top of the blog:
Nopalito and Pineapple Salsa
1 raw, cleaned prickly pear pad
1 tablespoon vegetable oil
1 cup canned crushed pineapple packed in it’s own juice
¼ cup finely chopped red bell pepper
¼ cup thinly sliced green onions, including some tops
1 tablespoon canned green chiles
1 finely minced serrano chile (optional)
½ teaspoon finely minced garlic
2 tablespoons lime juice
¼ teaspoon salt
1 tablespoon finely minced cilantro (optional)
Cut prickly pear pad in 1 ½ inch squares. Film a heavy frying pan with the oil and add the prickly pear pads. Cook over low heat, turning occasionally, until pieces have given up much of their juice and are slightly brown. Remove from pan, cool, and chop into pieces as wide as a matchstick and about ¼-inch long.
Transfer to medium bowl. Add remaining ingredients, stir to combine and set aside for flavors to mingle.
Nopalito and Bean Salsa
Here’s an even easier recipe and you might have everything except the nopales in your pantry.
1 1/2 cups commercial red salsa
1/2 cup canned black beans, rinsed
1/2 cup cooked nopalitos
1 tablespoon lime juice
1-2 tablespoons chopped cilantro
Combine all ingredients in a bowl. Serve with chips.
______________________
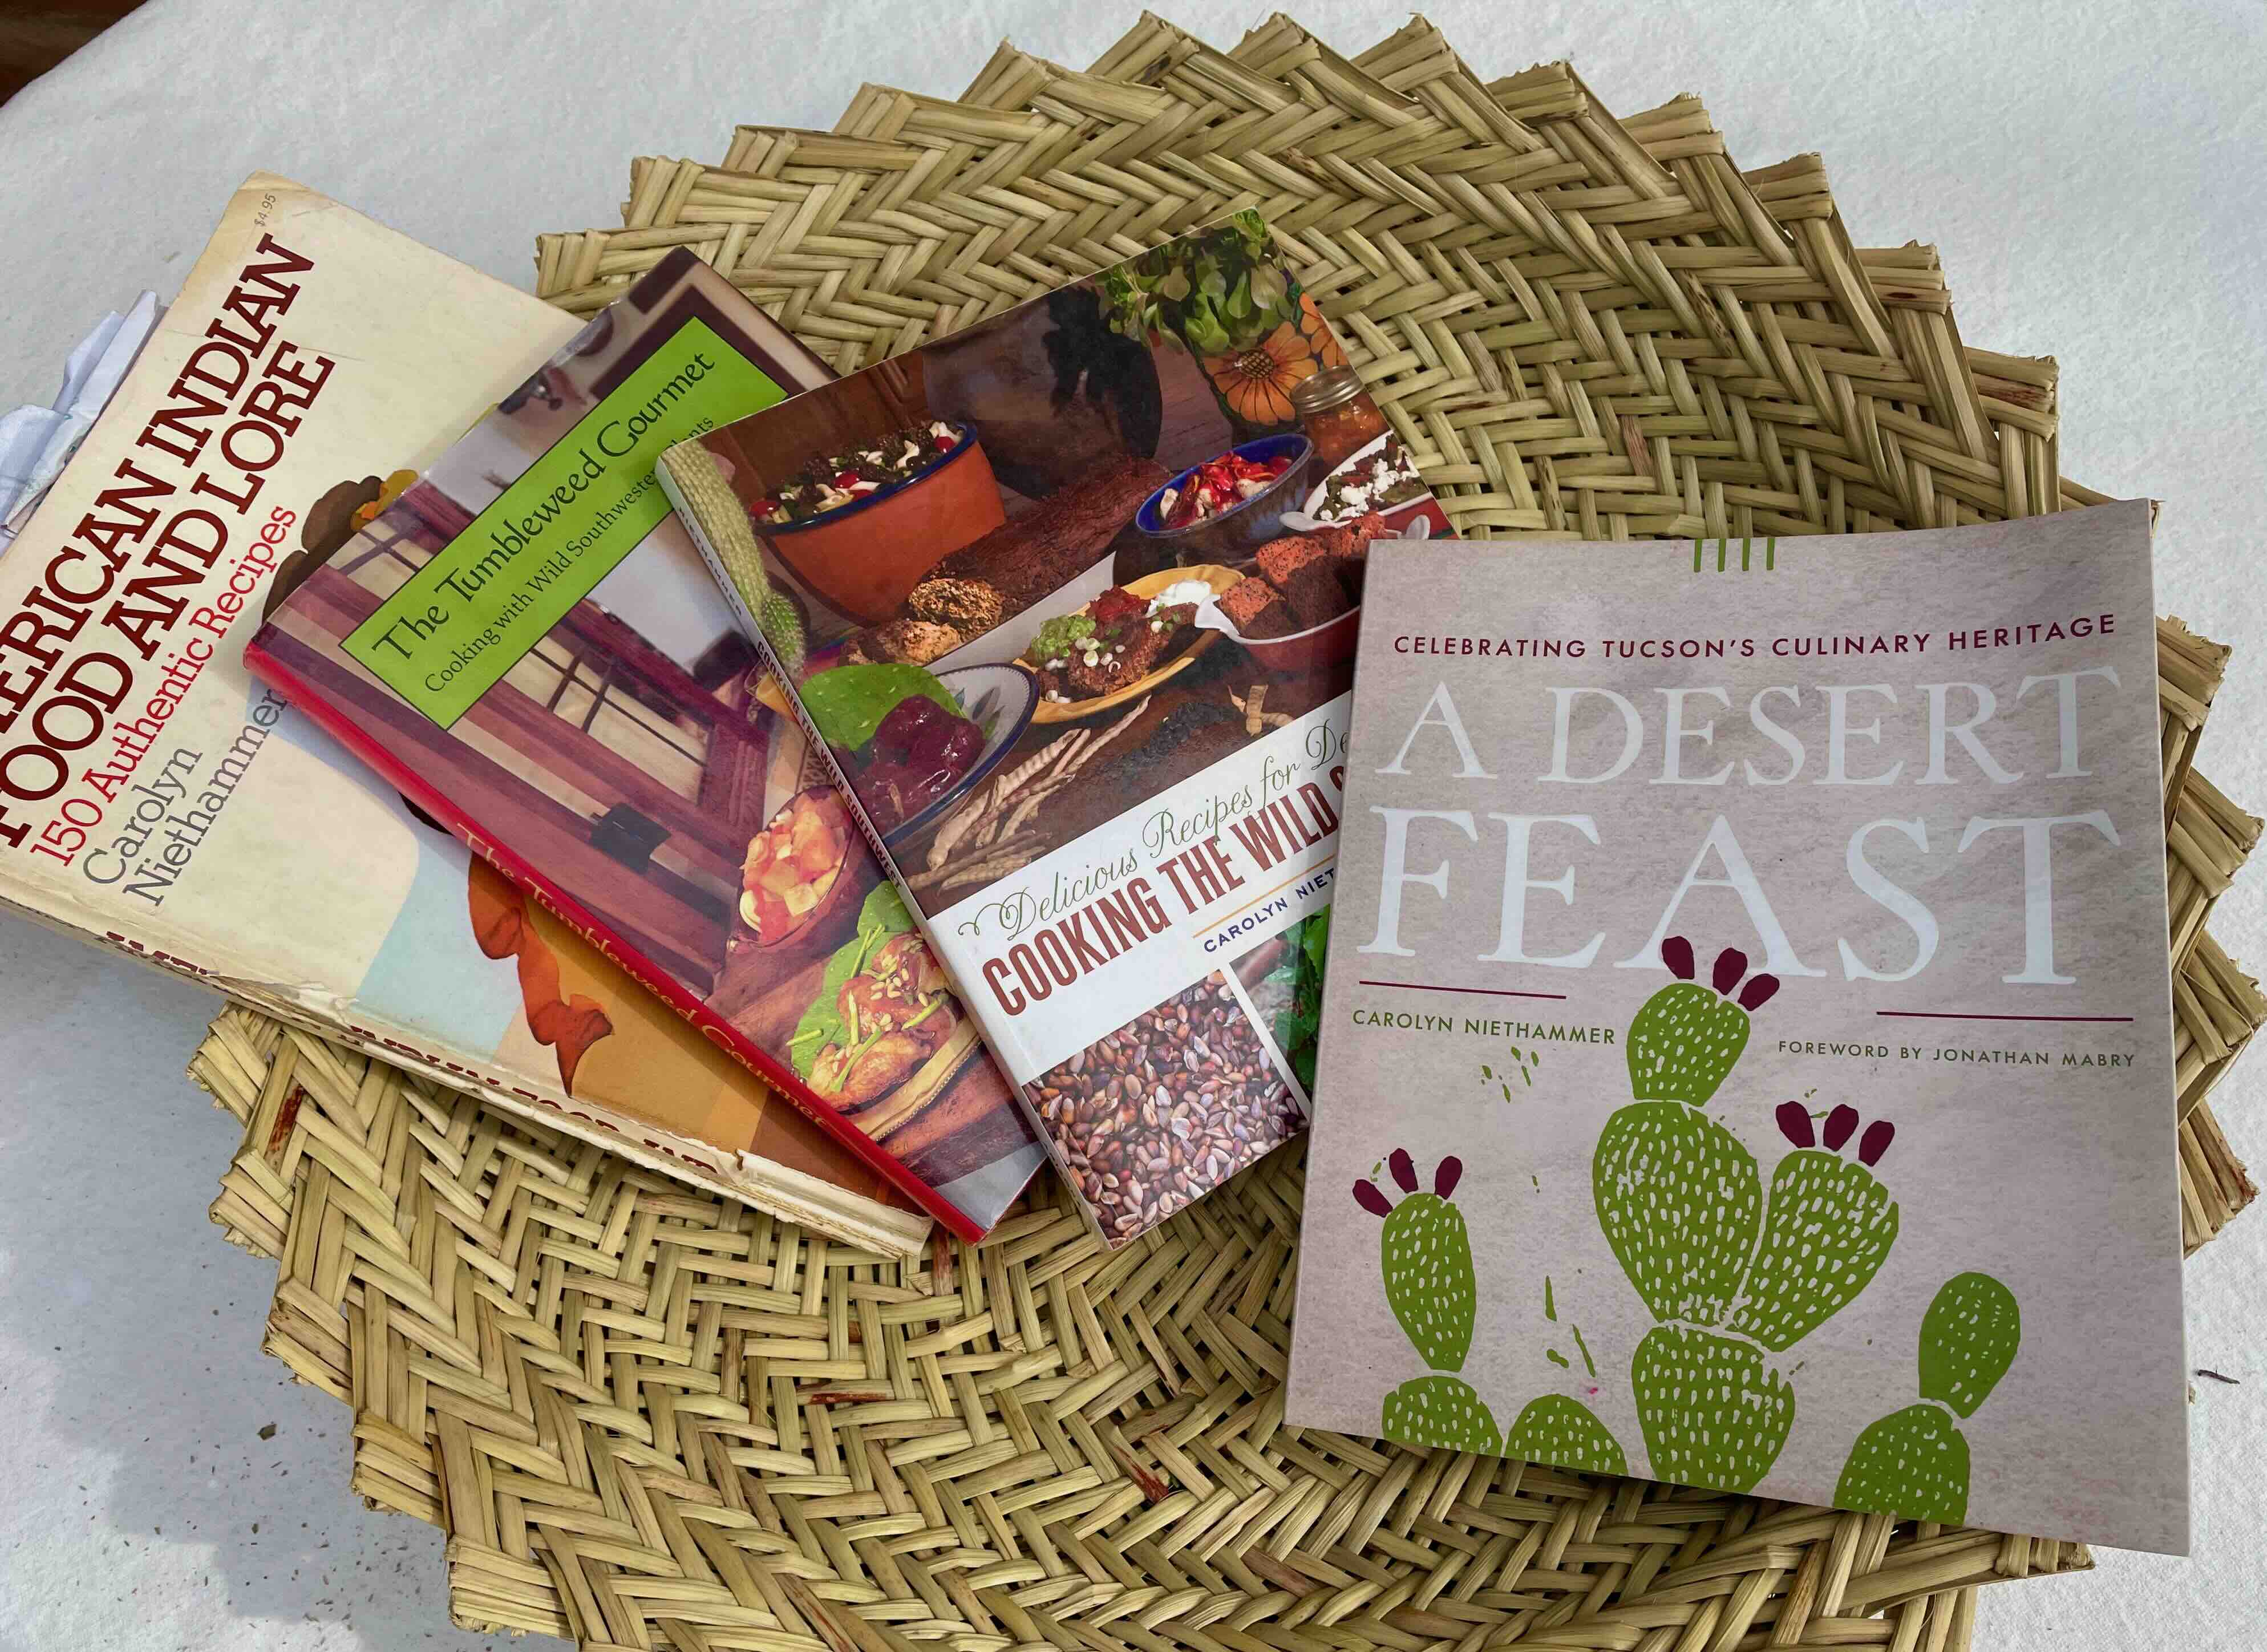
You can learn more about the history of food in Southern Arizona in my latest book A Desert Feast, the story of the last 4,000 years of food in the Sonoran Desert. Want more recipes using foods of the Southwest? You’d find ideas for collecting and using 23 easily recognized and gathered desert foods in Cooking the Wild Southwest: Delicious Recipes for Desert Foods. . Recipes from top Southwest chefs are collected in The New Southwest Cookbook. Just click on the titles for more information. You can learn more about me on my website.
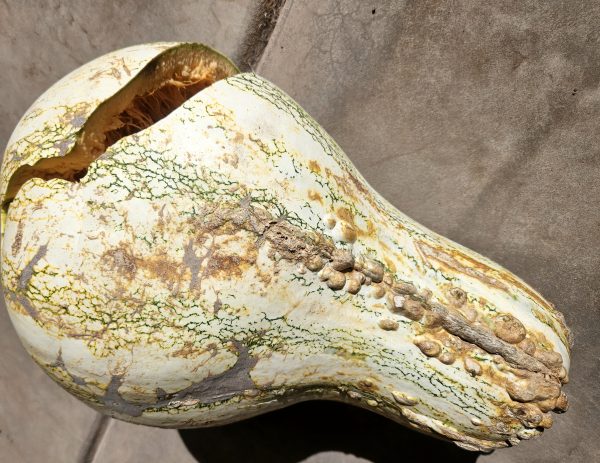
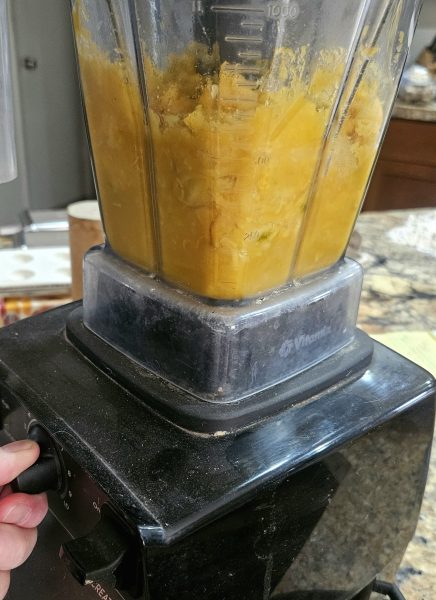
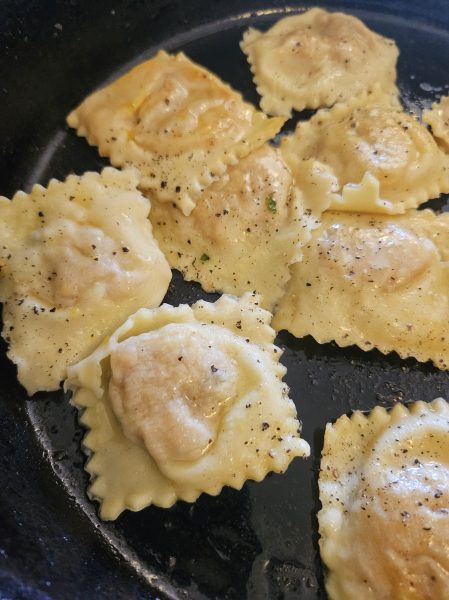
Hello friends, Amy here, with a BIG cushaw winter squash. For starters, it’s beautiful. Farmer Frank of Crooked Sky Farms has been sending Tucson CSA huge and tiny pumpkins and winter squashes for 20 years. People often ask us what to do with them. Well, twelve months a year I always have frozen winter squash in the freezer, ready for soup, pie, pumpkin bread and now ravioli.
Start by dropping on the patio until it cracks open. Big ones break more easily but sometimes little ones need to be slammed. This is much safer and easier than taking a cleaver to it.
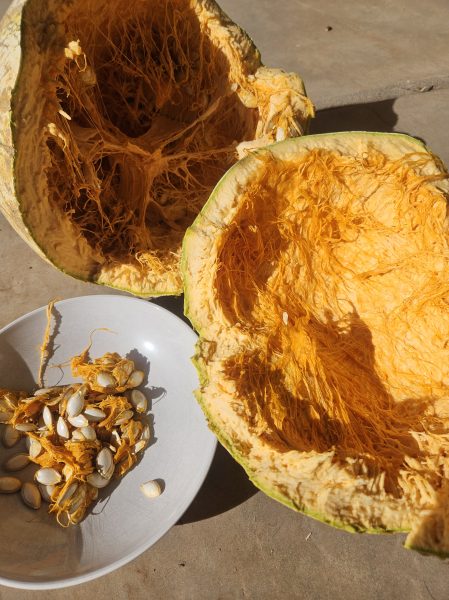
Then I pry it open with my hands and scoop out the seeds, saving them for planting or eating.
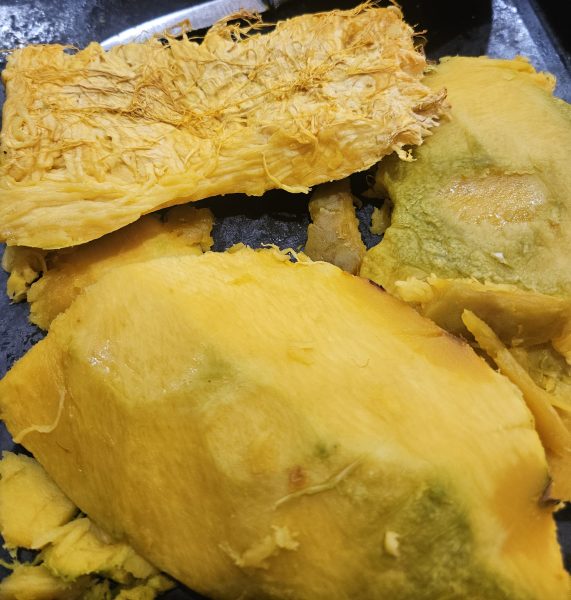
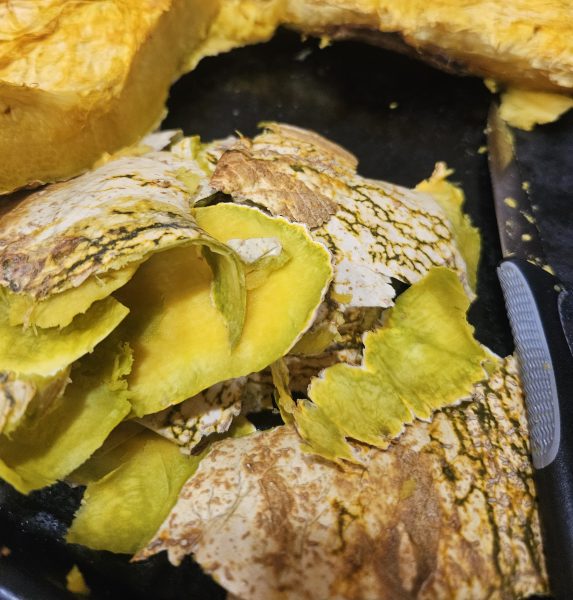
Place the pieces on a cookie sheet and bake uncovered at 350 F until a fork pierces the flesh easily and some of the moisture in the fruit evaporates. The flesh can be scooped out of the hard skin varieties with a big spoon or the skin can sometimes be trimmed off with a knife.
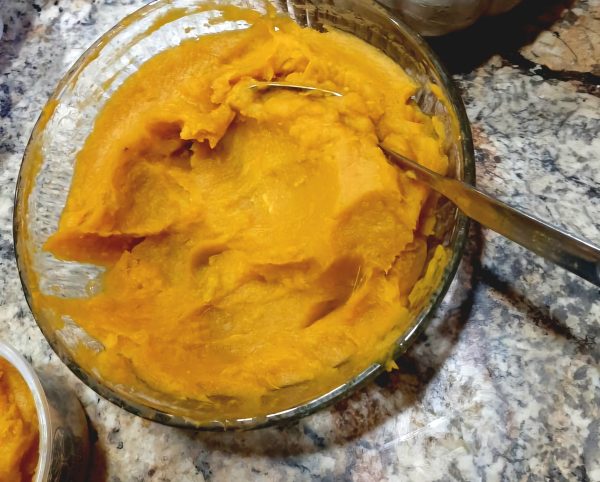
The flesh whizzed in a food processor or blender is pleasantly smooth. If I want texture, I add nuts to sweet creations or sautéed onion to savory concoctions. Stringy mashed squash turns many people away from the “mushy” vegetable entirely.
This cushaw squash was SO sweet and flavorful! If it wasn’t, I’d add a bit of sugar and salt to taste. This squash puree was thicker than normal, so I did not need to drain it. (It is critical to drain squash destined for pie or empanadas. Squash is very perishable, so I place the colander full of puree and bowl catching the liquid in the refrigerator. Don’t toss the liquid! It’s so good in a squash or vegetable soup.)
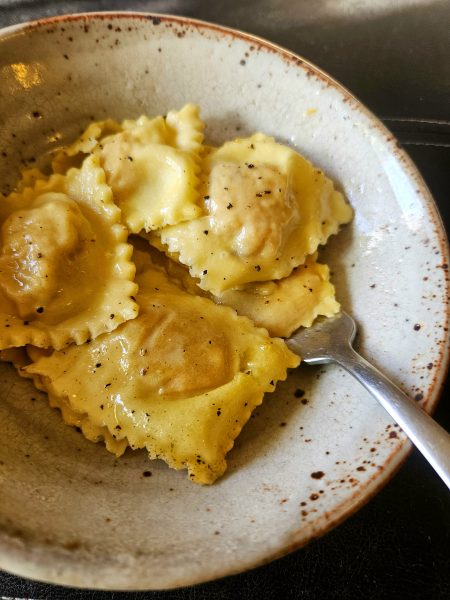
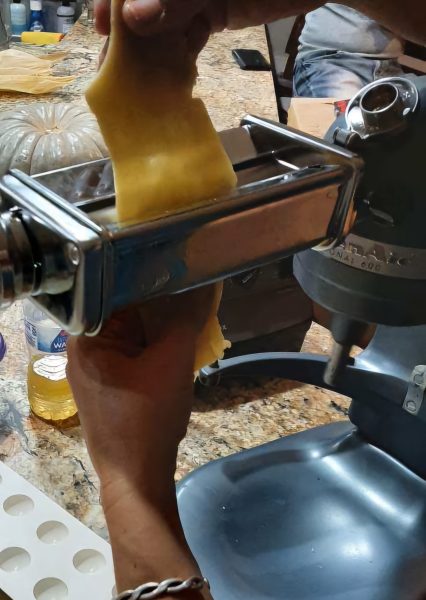
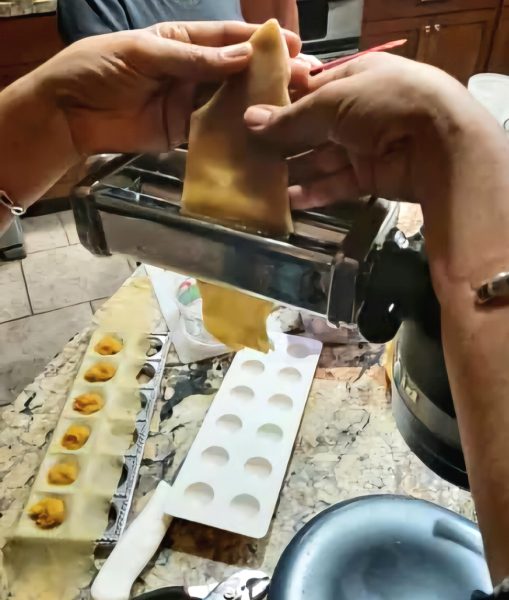
My uncle recently gave me a pasta roller attachment for the stand mixer and a ravioli press. I already own a hand crank roller that requires 3 hands to operate, and hasn’t been used in years. But inspired by the new toys, I wanted to put sweet, plentiful winter squash puree in ravioli.
Plus, I love food cooked in tiny edible parcels, like empanadas, stuffed grape leaves, cabbage rolls, spring rolls, pot stickers, samosas and floutas (taquitos)… What are your favorites?
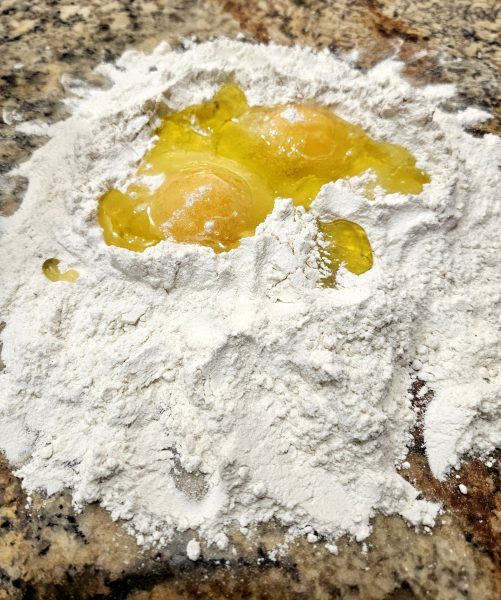
I tried different ravioli dough recipes with varying amounts of egg, water and olive oil, and everything I tried worked. It’s forgiving! But I liked the logic in this one, using a cup of all purpose flour, half a teaspoon salt, and egg and two yolks. I worked it on the countertop by hand and after an hour rest, I started to roll.
Apparently some home cooks use a machine to knead the dough, and some roll it out by hand. It’s forgiving! Basically, start the thickest roller setting and roll the dough through a few times before adjusting the setting a notch thinner.
This is easy but not fast!
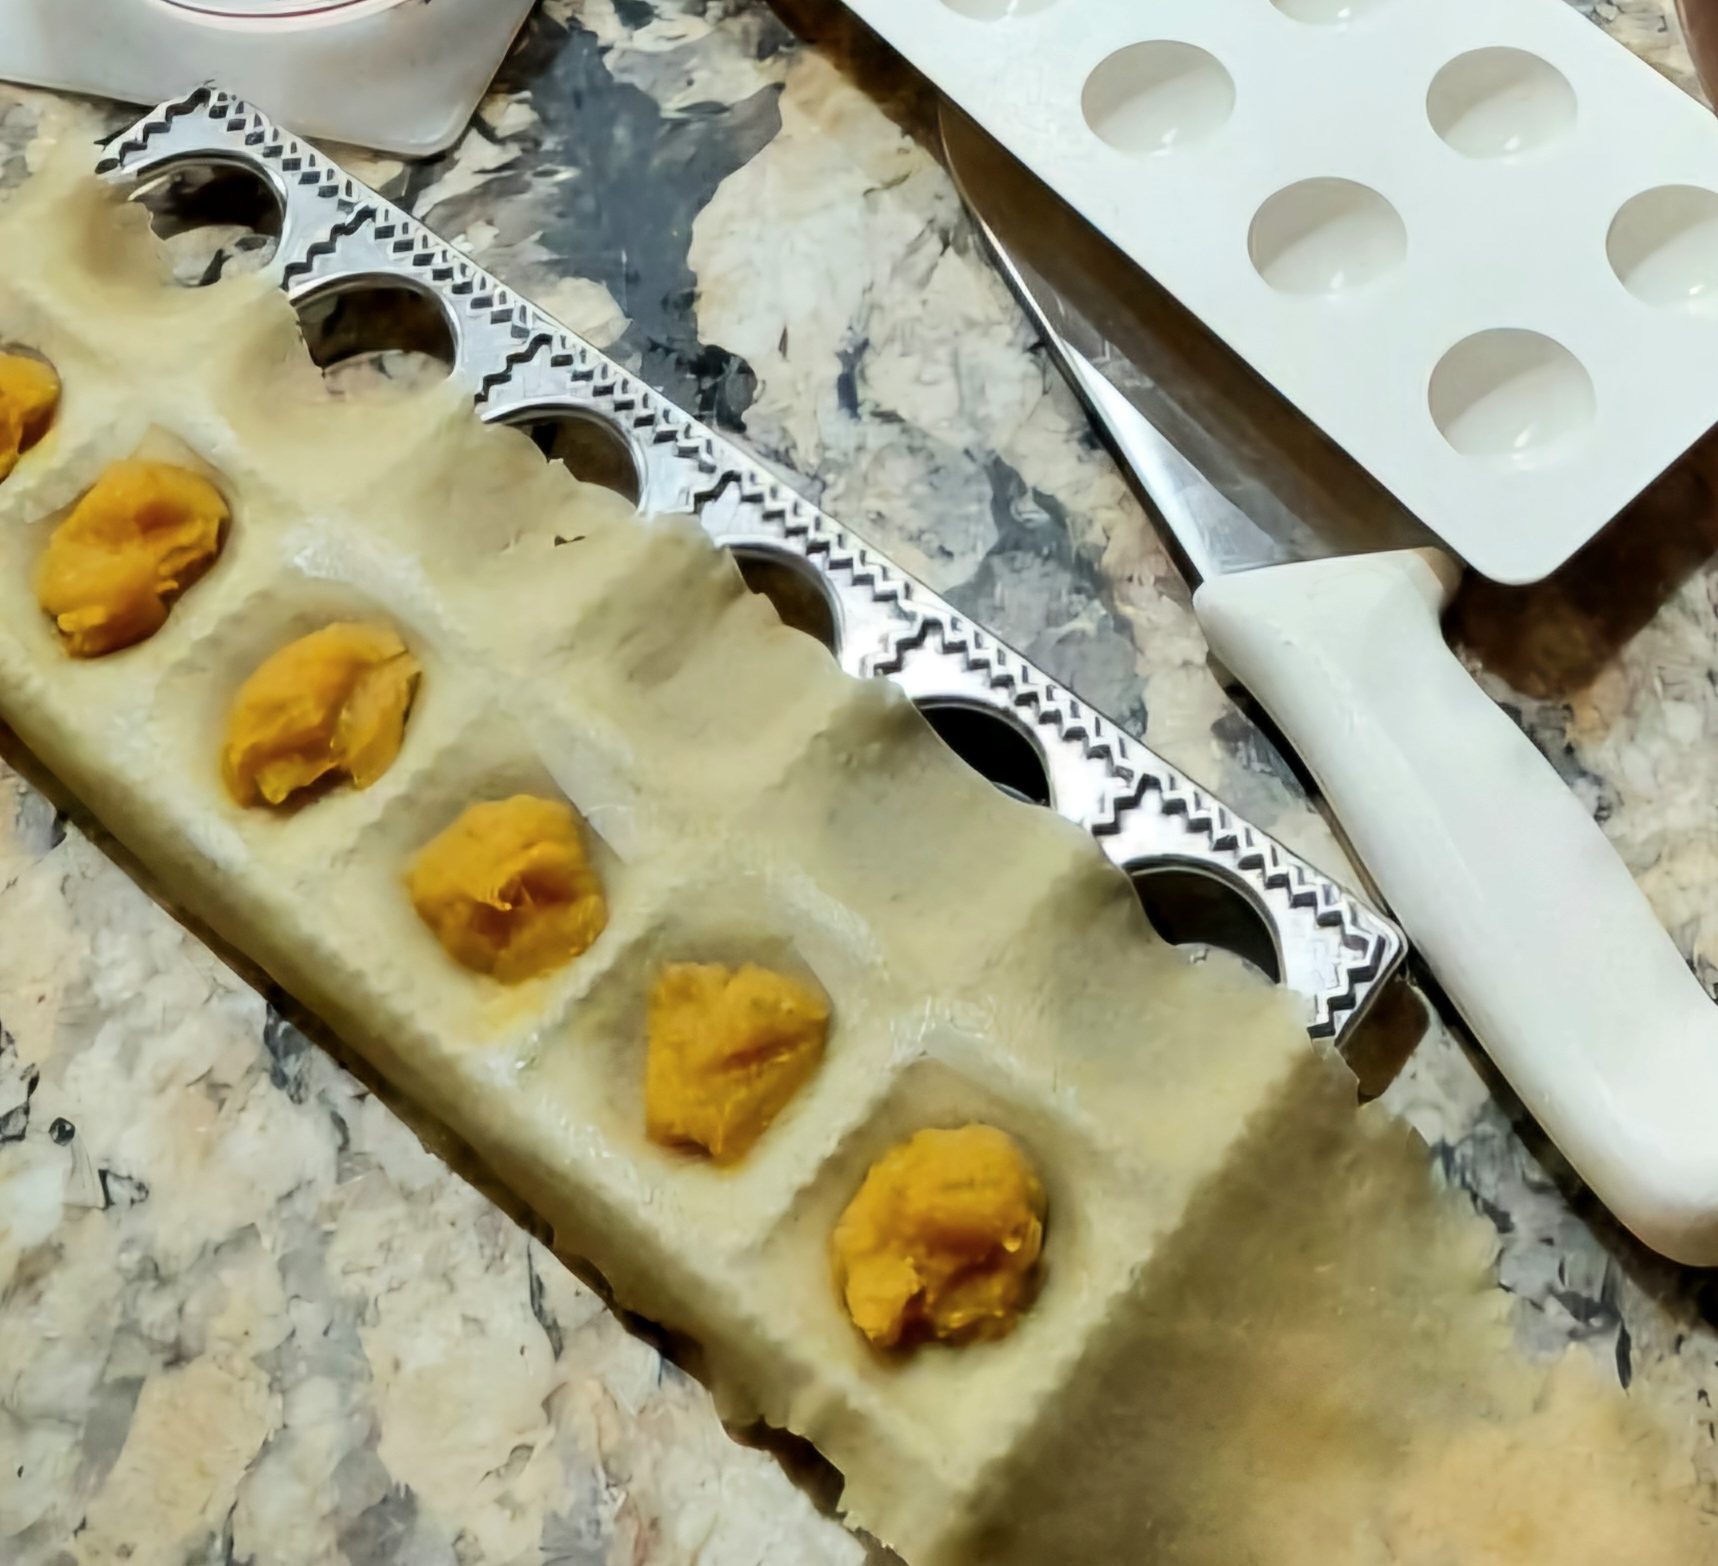
The form presses the thin dough into wells to hold a tablespoon of filling. I dabbed water along the seams to encourage better sealing, just in case. With the top sheet of dough covering the filling, it was easy to seal and perforate by using a rolling pin over the top.
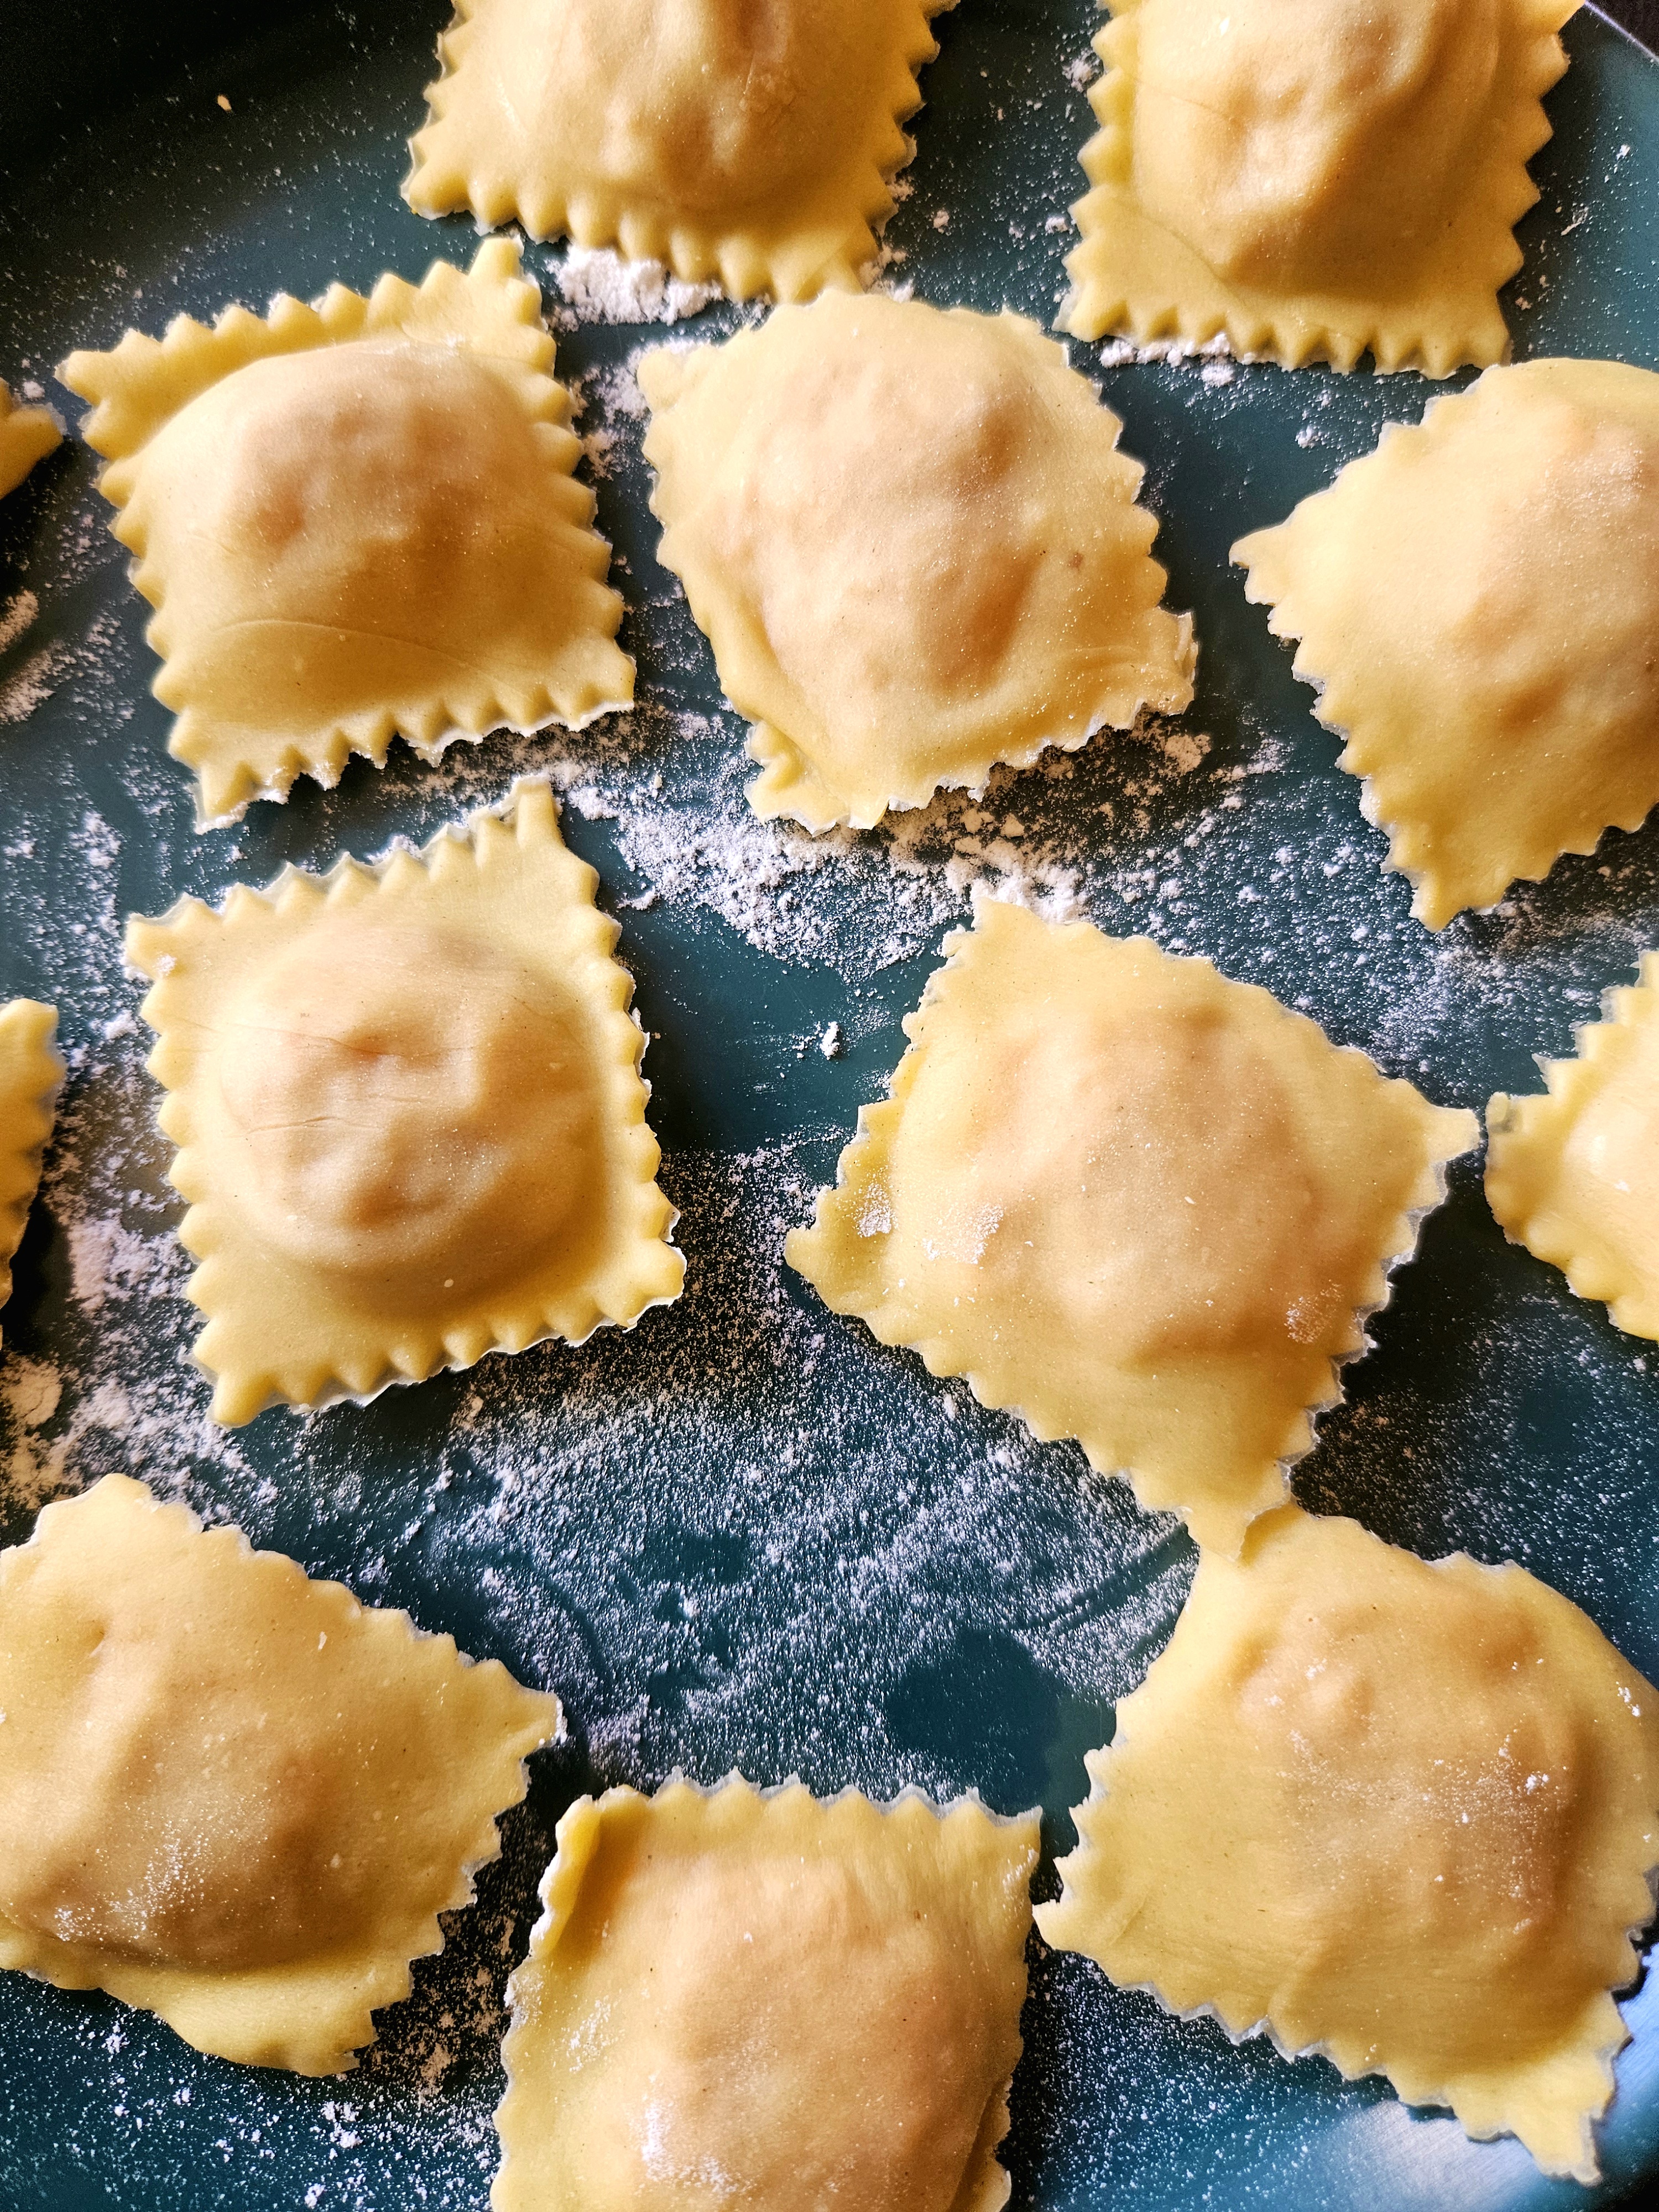
This gimmicky looking tool is efficient! Dusted with flour and resting in a single layer, they are tidy, symmetrical and well sealed.
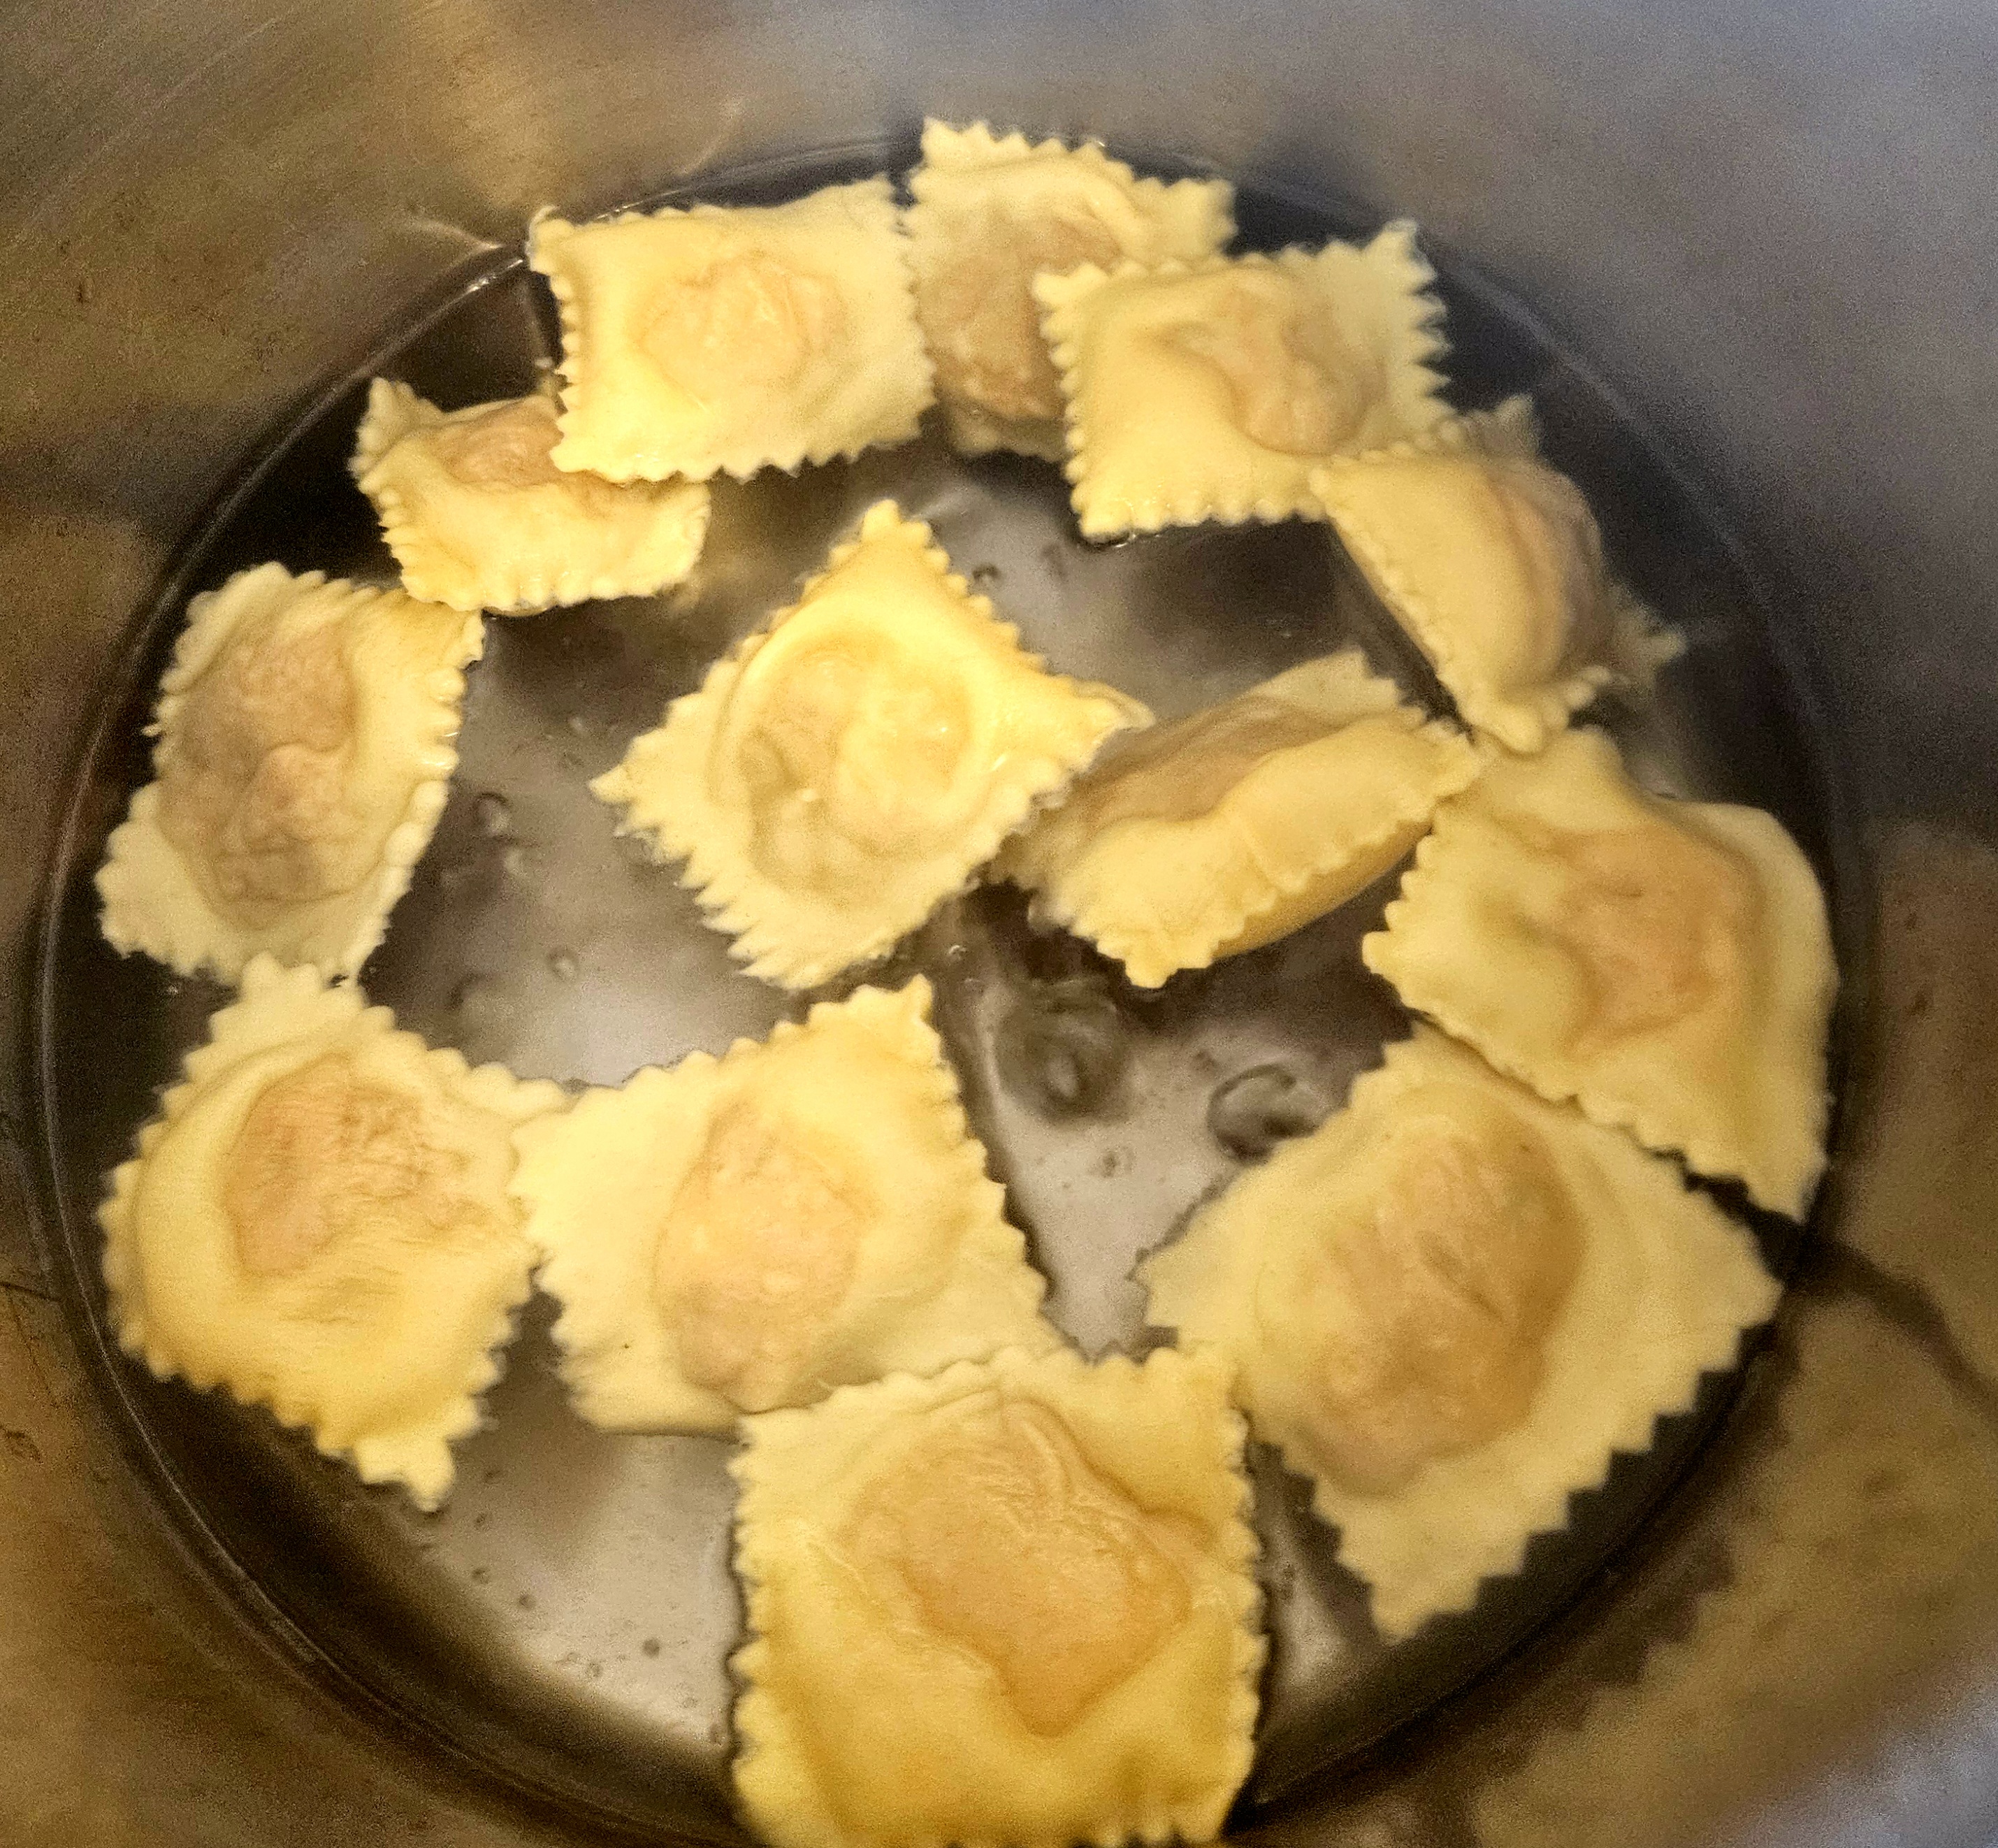
Cooking for three minutes in gently boiling water, it’s amazing they stay sealed.
With the filling of unadorned sweet cushaw squash, dressing the finished product in various combinations of butter, olive oil, garlic, thyme, black pepper and hard cheese was delicious. My aunt fried some with tons of garlic until browned… oh my.
But my favorite way was just butter, salt and pepper, letting the sweet cushaw shine.
(The Savor the Southwest guest poster today is Barbara Rose. She has lived and worked at Bean Tree Farm since 1985. She is an enthusiastic expert in all things Sonoran Desert and has taught hundreds of students how to live in and appreciate this fragile and glorious ecosystem. We thank her for her knowledge and years of inspiration.)
My grandma Evie was born in Brooklyn in 1900 to Ukrainian immigrants, and she moved to southwest Florida in the 1920s. Her back yard was a forest of avocado and citrus trees, and her kitchen was fragrant with crocks of garlicky green tomatoes, cucumber pickles and pots of simmering chicken soup “with the feet” (her way of saying the whole chicken). She smeared onion-infused chicken fat on slices of dense black pumpernickel, and served up bowls of cold, sweet-sour beet borscht, with a hot boiled potato and big dollop of sour cream. I am so grateful that she shared with me a treasure of food and family stories.
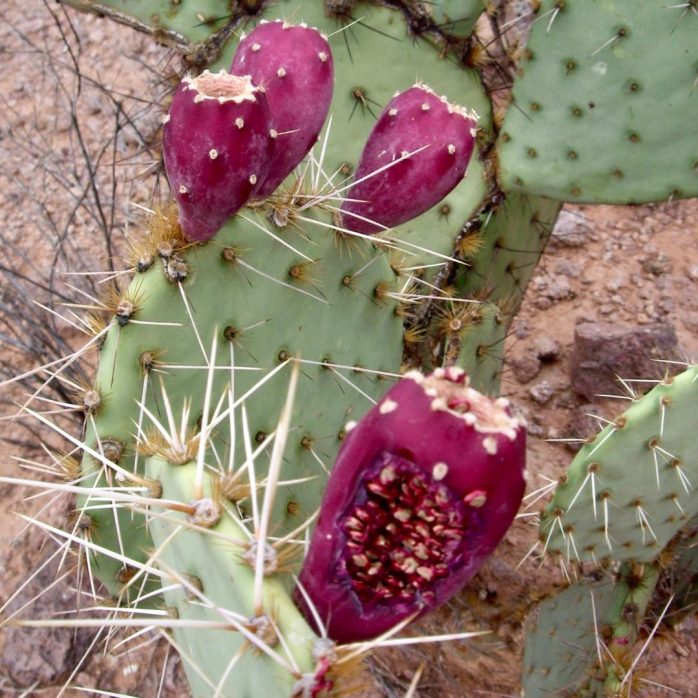
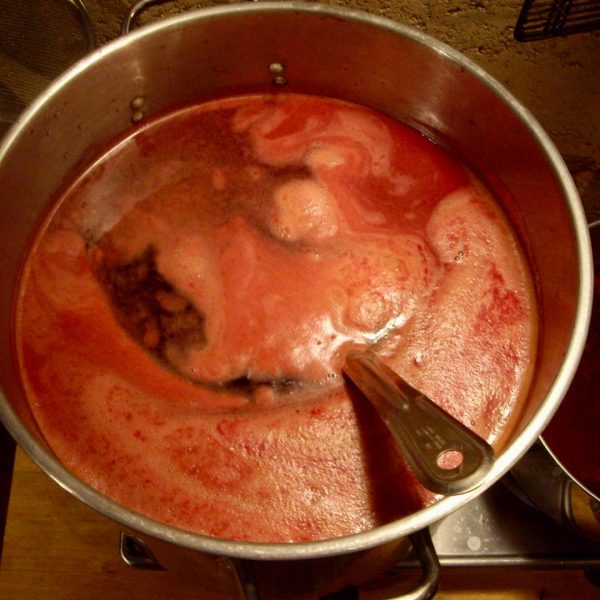
Beets have been pickled and soured by lactic acid fermentation for ages. I love beets, but I’m not so good at growing them. Prickly pear cactus thrive, and the ripe fruits are delicious, nutritious, and a gorgeous color.
The animals know when prickly pears are ripe. If they have been nibbling, it is time to pick.
I’ve developed a way to make borscht with fermented prickly pears- red desert fruits that sour nicely, have a sweet earthy flavor, and carry far away family food traditions into the desert food forest I love and care for!
I hope you enjoy the recipe, expand on it, and make it your own.
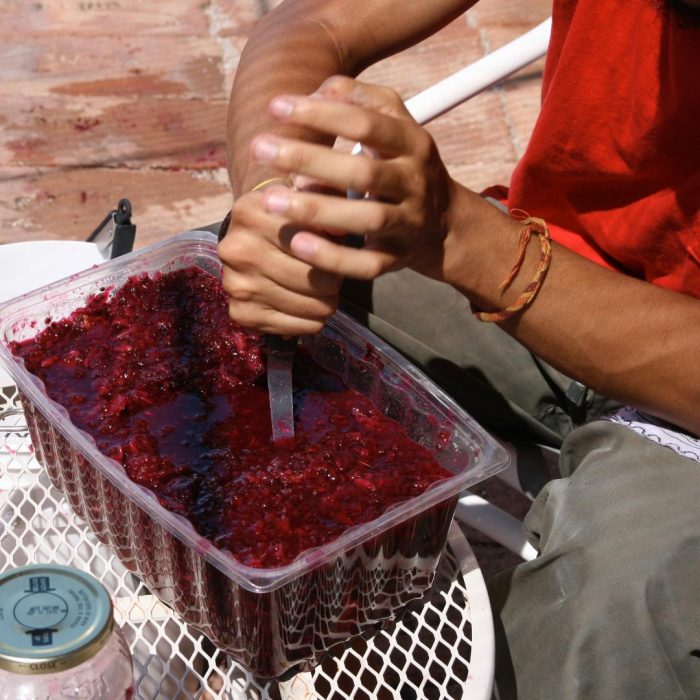
Mash the fruit. It is easier if you freeze first as this helps break down the cell walls.
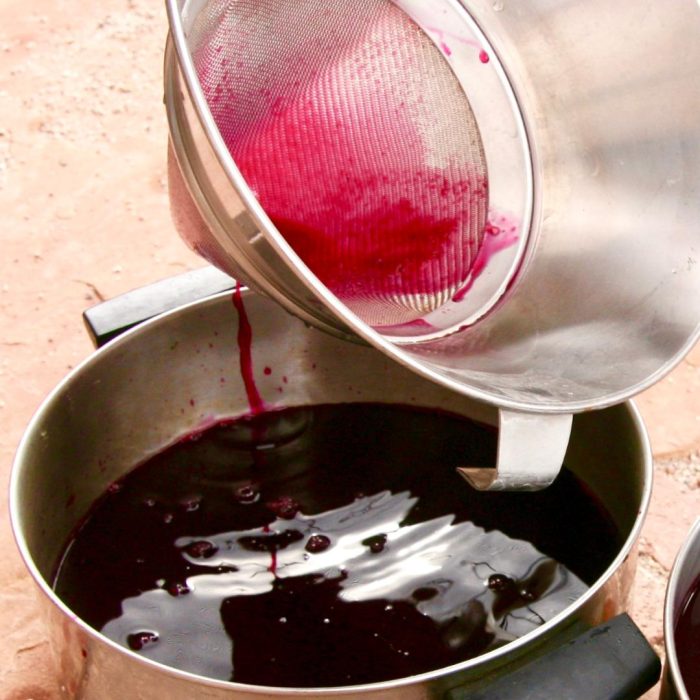
Be sure to strain the liquid through a fine mesh strainer to catch every last glochid (those are the tiny thorns).
Simmering the juice and broth helps meld the flavors.
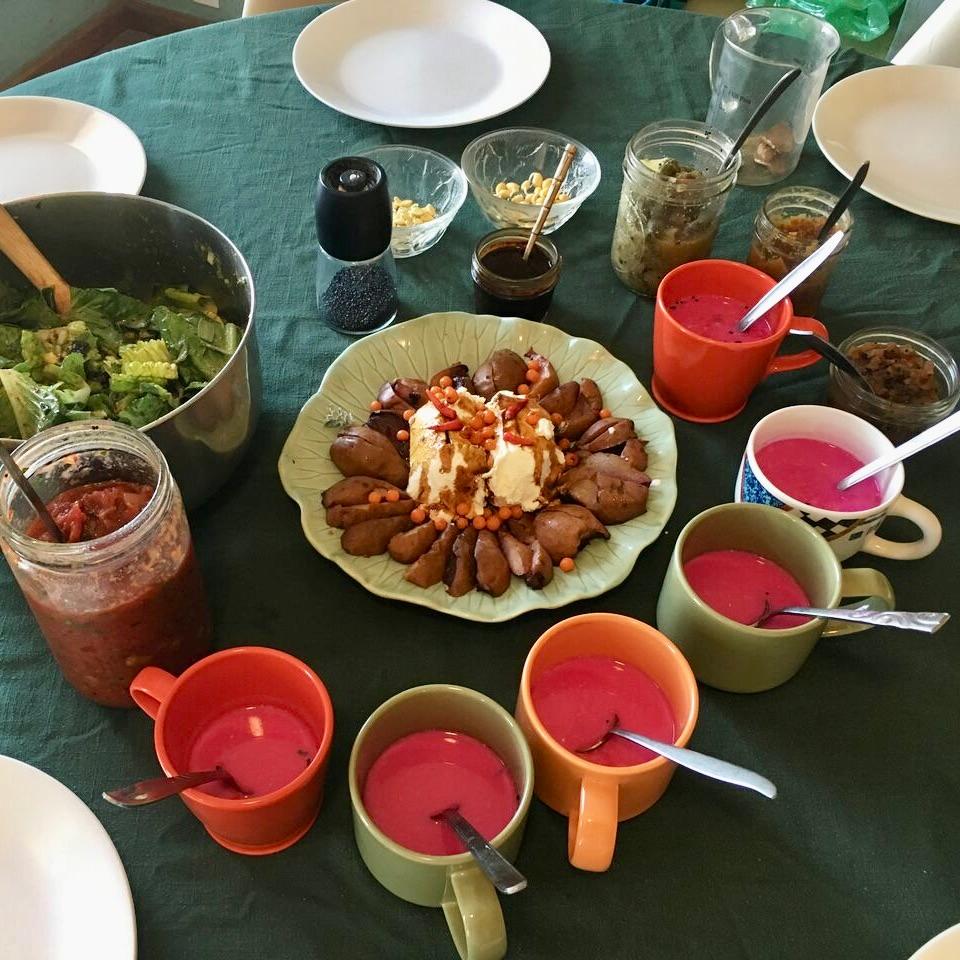
SONORAN DESERT BORSCHT
Makes 2 quarts
1 quart fermented, sweet-sour prickly pear fruit juice (see method below)
1 quart broth, strained and chilled (chicken, vegetable, bone, mesquite, or combo, flavored with herbs, alliums, chiles, or whatever you have.)
1 hot boiled potato per serving
Sour cream, crema, yogurt
Combine prickly pear mixture and broth. Simmer with salt, pepper, chile, and your choice of herbs to taste to blend flavors. Chill if serving cold.
To each bowl of borscht add a boiled potato. Garnish with sour cream, and serve with sides of hard-boiled eggs, green onion, and sliced cucumbers.. Borscht turns a gorgeous magenta-pink when the cream is stirred in. Enjoy!
How to ferment prickly pear juice:
Add 1/2 cup of kombucha or whey (liquid strained from yogurt or cheese-making) to 1 quart of prickly pear juice a day or so ahead of making your borscht. Cover with a cloth and taste on occasion. It will develop a sweet-sour flavor as it ferments. When it has that “tang” but still retains some sweetness, it’s ready to use. Sometimes I combine citrus juice with the prickly pear and ferment both. This juice will store in your fridge for some time, becoming more sour from fermentation. It can also be frozen.
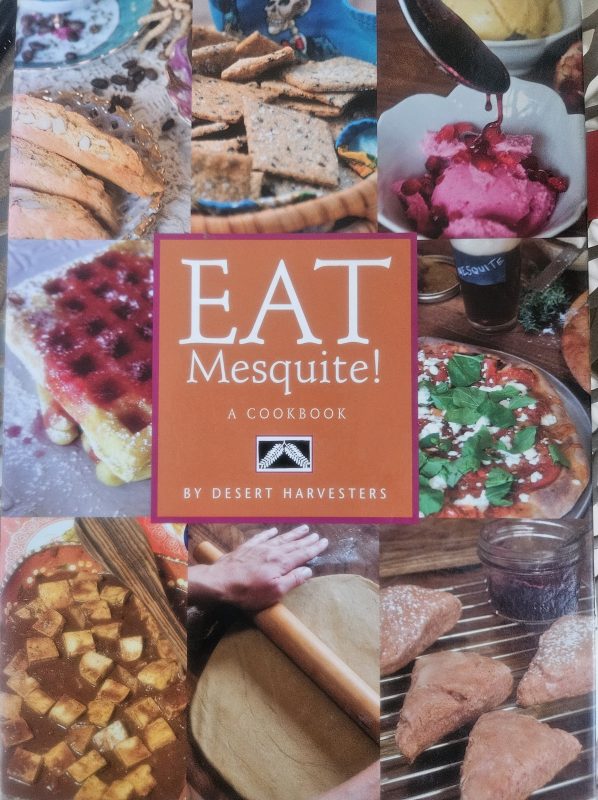
Final step: Serve for lunch. Goes well with other desert delicacies. Find recipes in the Desert Harvesters’ cookbook Eat Mesquite, a Cookbook for Sonoran Desert Foods.
_______________________________________
You can find more recipes for prickly pear and other wild desert foods in Eat Mesquite and More: a Cookbook for Sonoran Desert Foods and Living, available at Food Conspiracy Co-op, EXO, Crisol, Mission Garden, Desert Museum, and online at desertharvesters.org. More recipes can be found inCooking the Wild Southwest: Delicious Recipes for Desert Plants.
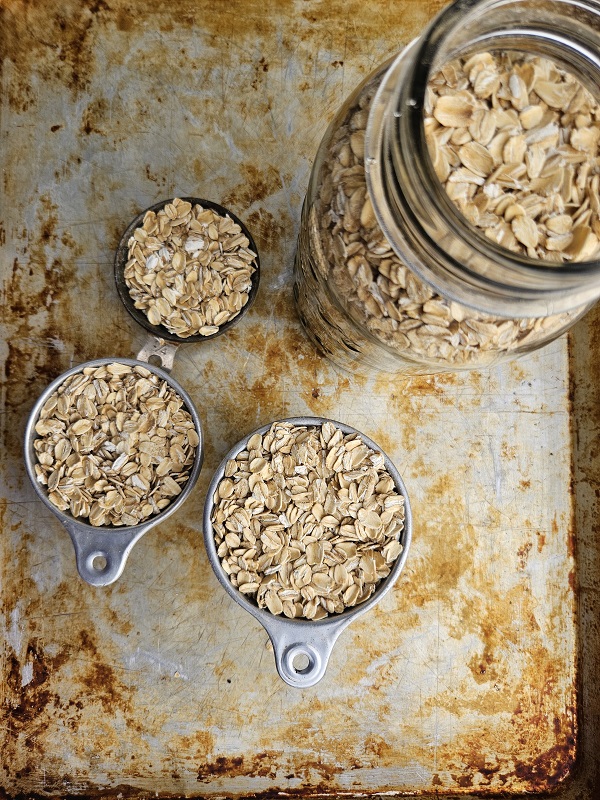
Hi friends, it’s true, crackers without the rolling. Amy here sharing this week’s iteration of this miracle recipe I found online. It all started with an abundance of oats…
A friend gifted me many pounds of organic rolled oats. Searching for inspiration to use them, I found Camilla’s Easy No-Roll Oat Crackers ( vegan, oil free, GF). It is a brilliant recipe that I’ve been making often these last few weeks since I discovered it. Besides oats, they contain seeds or mix of seeds. Sunflower makes particularly good crackers but branching out, I remembered Carolyn’s Black Beauty Wafers using saguaro seed. The seeds are strained out when making a syrup so those are a brilliant way to use the seed.
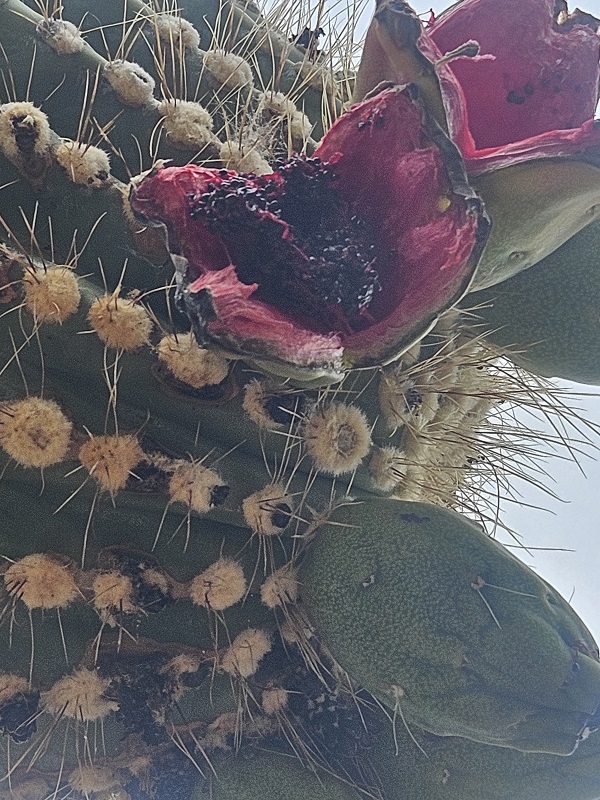
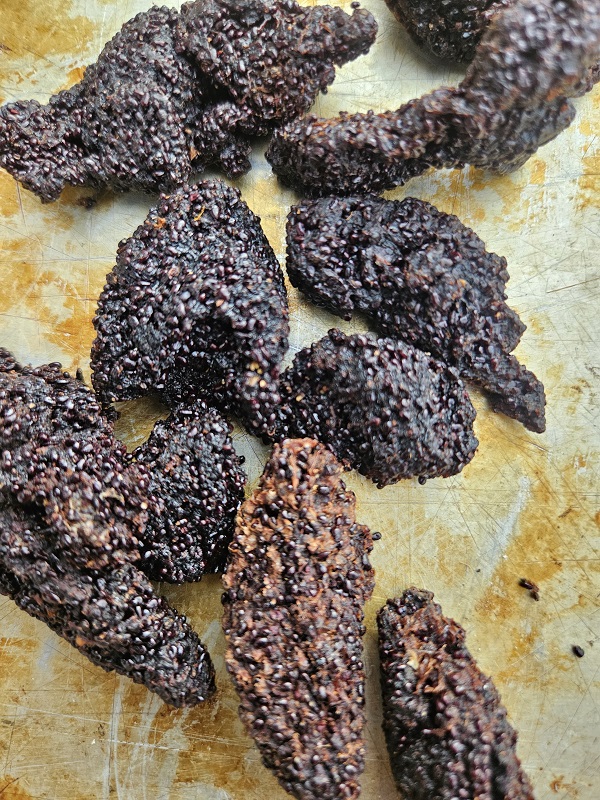
In June, the birds get the first feast of saguaro fruit. If there is more ripening fruit than the birds eat, it falls the ground, often sun dried and intensely concentrated, where I can easily harvest it without poking the plant. No need for a pole!
The ground animals get to feast first before the humans, of course, so we waited. But ripe fruit spoils in the rain, and I would never complain about glorious rain! So this year wasn’t the best saguaro fruit harvest for humans. (below, note the mesquite leaflets for scale)
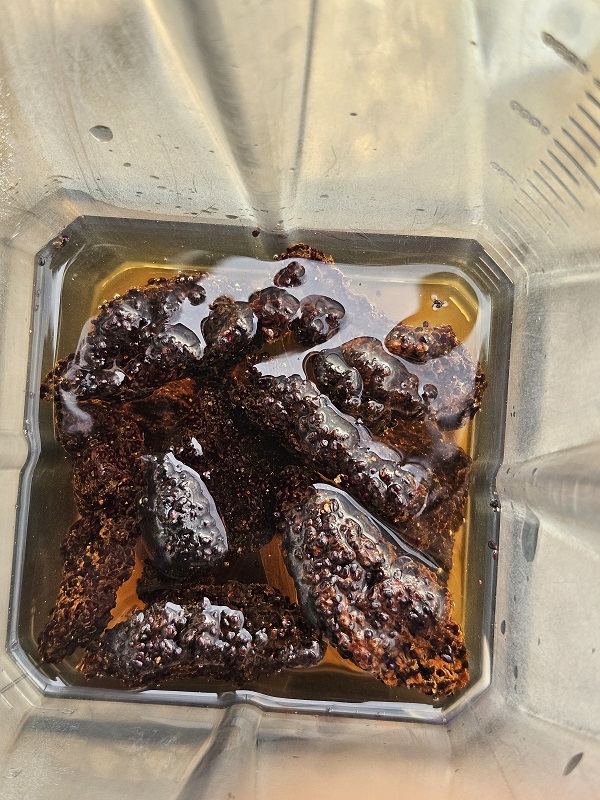
I had some oooold fruit stored in the pantry so I decided to use the whole fruit instead of just the seeds.
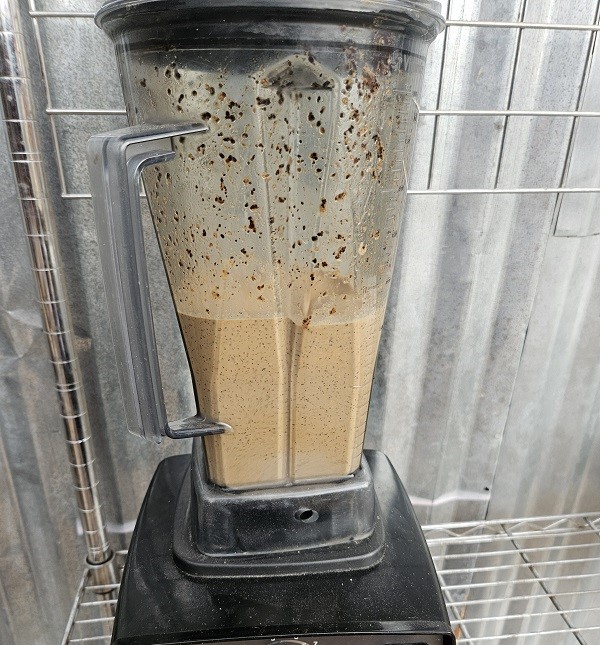
I soaked it in water to soften it.
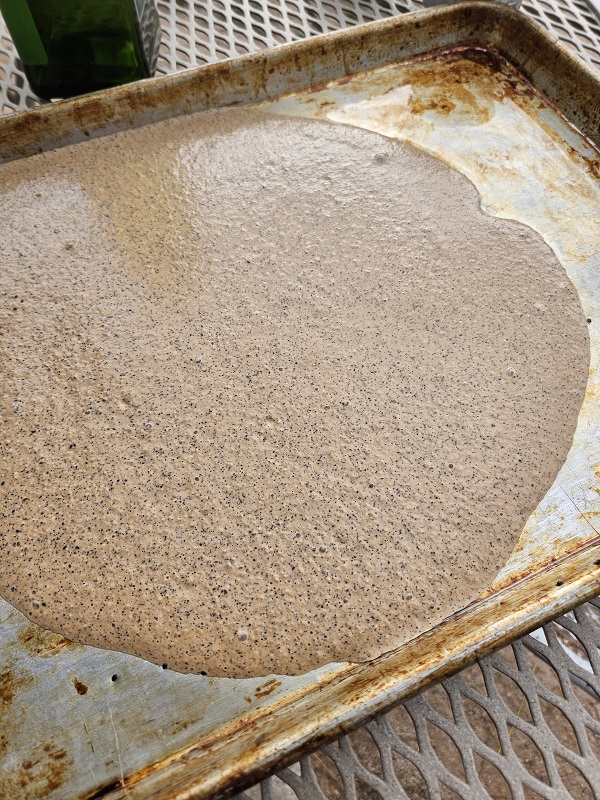
And blended it enough to grind the seeds. Then I added the oats, salt, baking powder and oil.
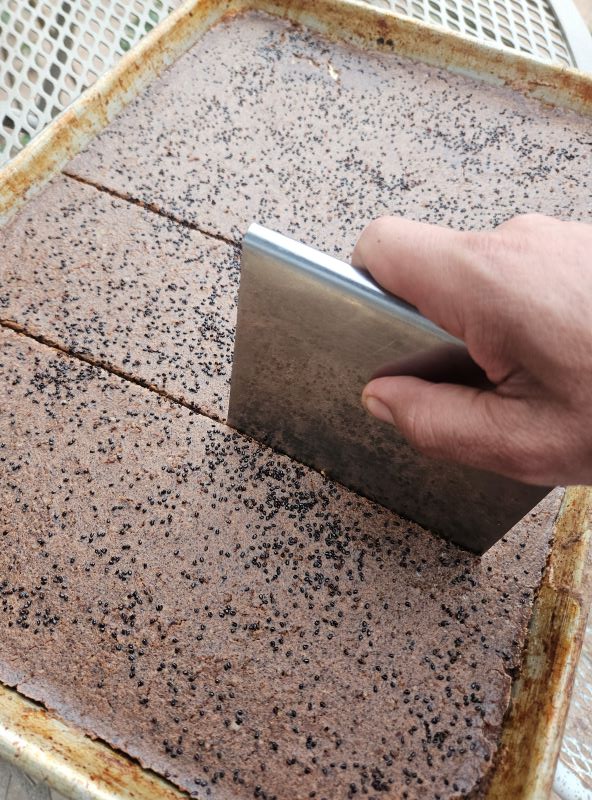
The batter is poured onto a greased half sheet pan (or even a bit larger pan to make crackers just a bit thinner).
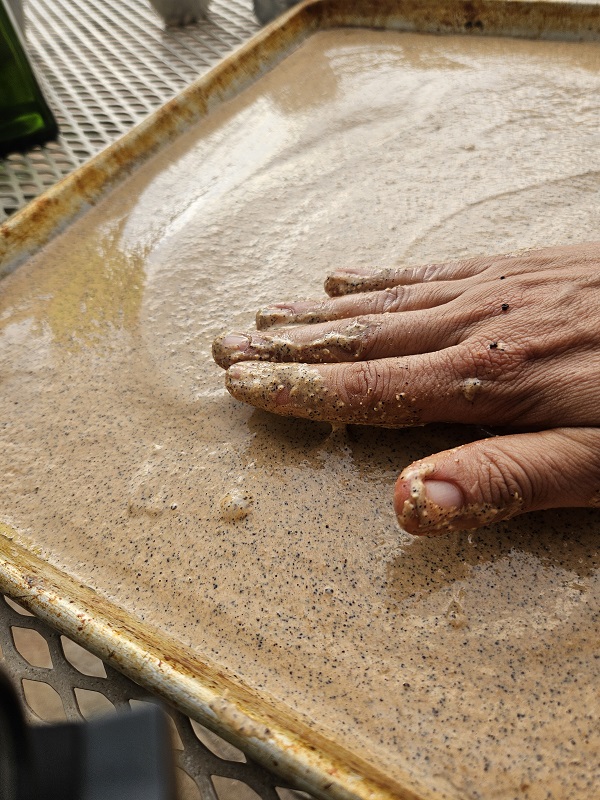
Instead of rolling the dough, it just needs to be smooth!
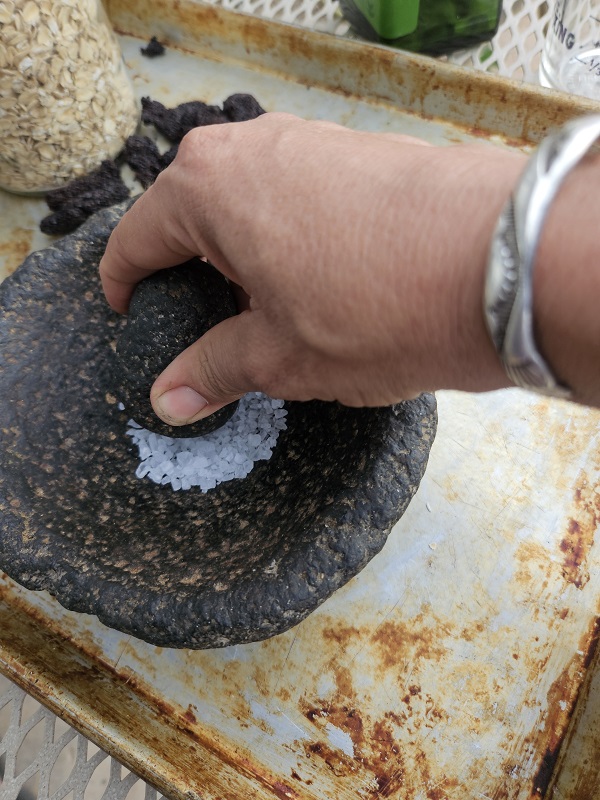
I prefer to add just a touch of salt to the batter so I can sprinkle a decent amount on top. I ground my best Mexican sea salt for this.
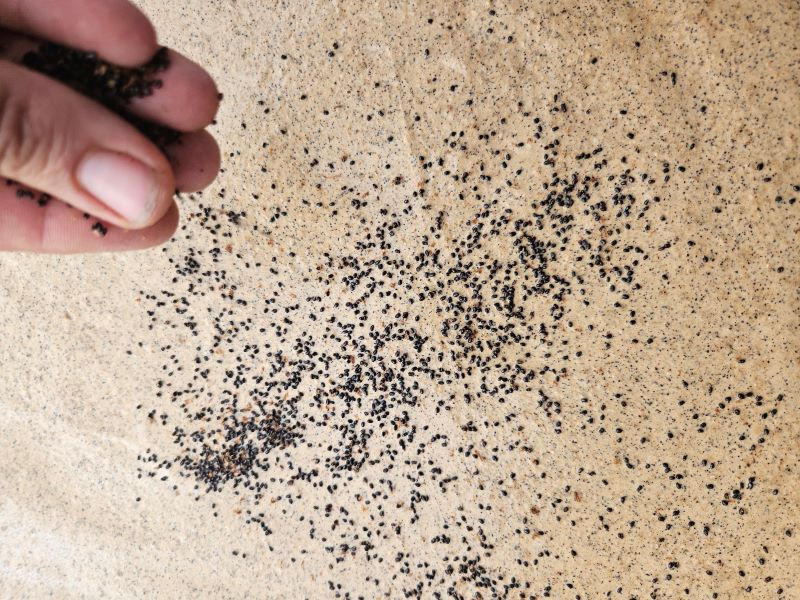
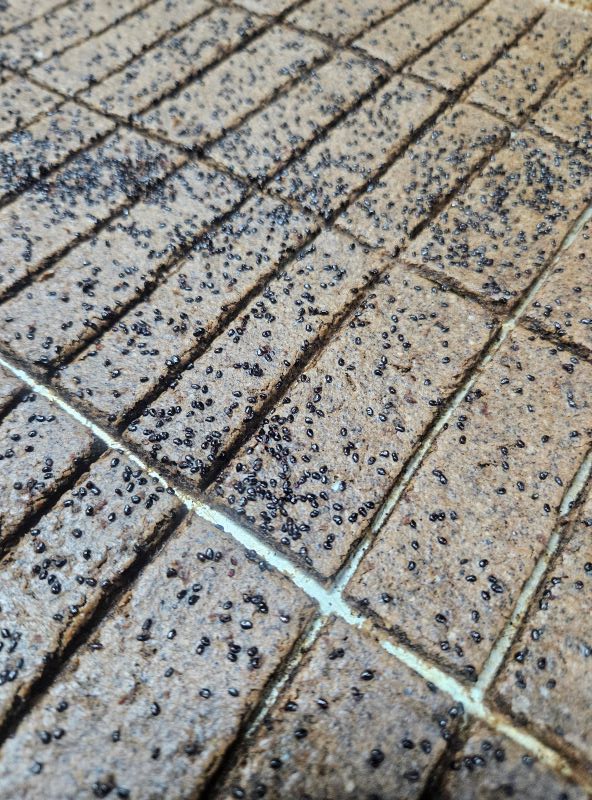
Then I sprinkled with saguaro seed.
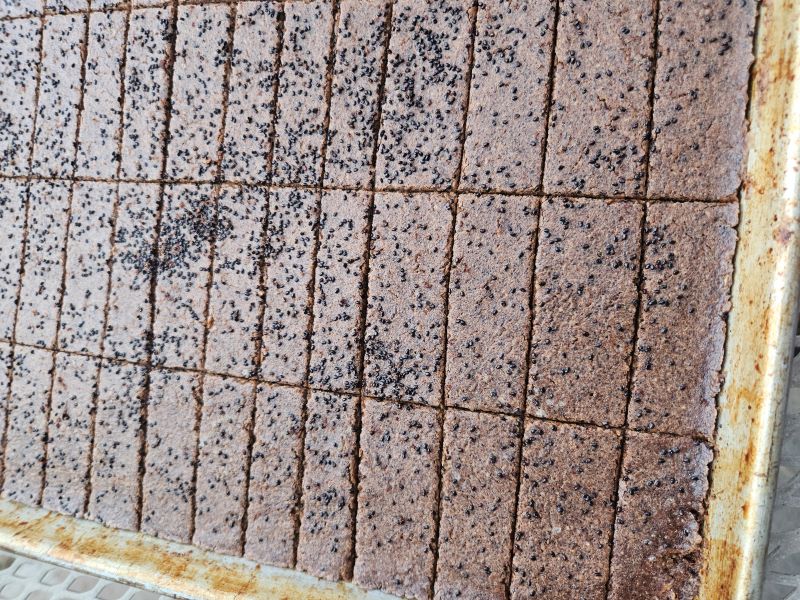
After baking for ten minutes, the crackers can be scored before returning to the oven to finish.
After baking with careful supervision, this batch got darker from the sugar in the saguaro fruit than other batches. A hit of sweetness and delicious! Next time I’ll use a slightly larger yet pan so they are a little thinner. The thinner ones are crispier and more delicate. But think or thin, they are easy to enjoy with spreads, alongside a salad or on their own as a trail snack. Enjoy!
For the recipe, see Camilla’s post on her blog powerhungry.com
Instead of seeds, I added the equivalent weight of dry saguaro fruit. I added a quarter cup of olive oil and reduced the water by that amount. I used approximately 1 teaspoon of coarse sea salt divided between the batter and sprinkled on top with the saguaro seeds. Experiment and have fun!
Josefina Lizárraga served her tepache at a recent event at Mission Garden in Tucson. Josefina is a font of wisdom on the traditional foods of the Sonoran Desert.
The summer heat has settled in here in Southern Arizona and cooling drinks are the order of the day. Of course, there is always water, but it’s nice to be amused by something more flavorful.
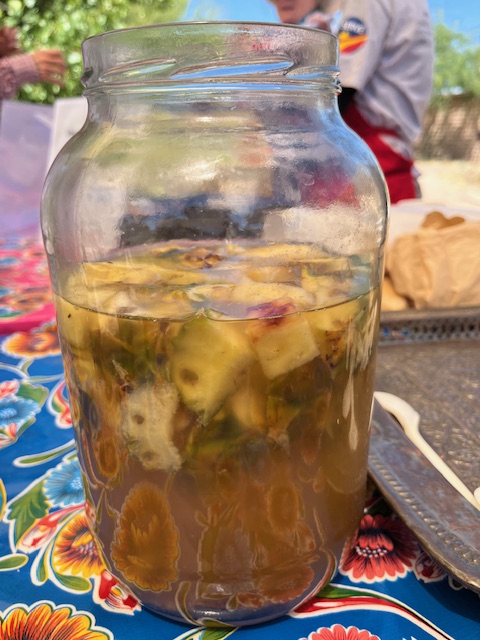
It’s Carolyn today, bringing you a recipe for tepache, a simple pineapple drink that is a classic regional favorite. It is made with pineapple peels, the part you usually throw away, and a Mexican sugar staple, a hard cone of brown sugar called piloncillo. Properly made, tepache has a slight alcoholic zing. It won’t get you drunk, but it’s best reserved for adults.
We recently learned how to make tepache from Josefina Lizárraga, who comes often to Mission Garden in Tucson to share her tips for dealing with local fruit. She is affectionately called La Madrina del Jardín. The process is pretty simple.
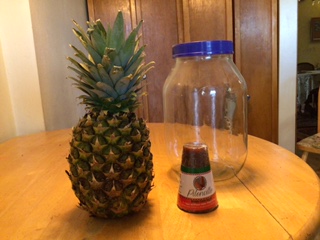
A nice ripe pineapple, a cone of piloncillo, and a jar are all you need to make tepache.
Tepache Recipe
Choose a ripe pineapple with a nice fruity fragrance. Wash the outside. As you cut off the peel, leave a little more of the fruit than you would if you were tossing it out. Cut the peel and the core into smaller pieces and add to the jar.
Bring about two cups of water to a boil in a small saucepan and add the piloncillo. Turn off the heat and let the sugar dissolve. If you can’t find piloncillo, use 8 ounces of dark brown or turbinado sugar.
Put the pineapple peels into your gallon glass jar and add whatever fruit you won’t be eating as well. Adding some of the fruit will give your tepache more flavor. You can also add a few cinnamon sticks.
Cut the pineapple peel and core into chunks.
Add the dissolved sugar and water and top up the water to about 3/5ths. Cover the jar with a cloth. DO NOT SCREW DOWN A LID. Put the jar on your counter. Josefina says just 4 to 4 1/2 days. Longer will result in vinegar. Refrigerate your tepache and enjoy with ice.
This is Josefina’s tepache she was serving at Mission Garden.
You can learn more about the history of food in Southern Arizona in my latest book A Desert Feast, the story of the last 4,000 years of food in the Sonoran Desert. Want more recipes using foods of the Southwest? You’d find ideas for collecting and using 23 easily recognized and gathered desert foods in Cooking the Wild Southwest: Delicious Recipes for Desert Foods. . Recipes from top Southwest chefs are collected in The New Southwest Cookbook. Just click on the titles for more information. You can learn more about me on my website.
Hello friends, Amy here enjoying another great year for the wolfberry bush (Lycium fremontii …I think) in my yard. Tucson’s native species of the Chinese goji berry, they are similarly packed with antioxidants and health benefits. In the tomato family, it’s called tomatillo in Spanish, not to be confused in size, shape, color or taste to the garden variety of husked ground cherries that go by that name. Wolfberries taste somewhat like tomatoes and work well in sweet and savory dishes, when I manage to harvest more than I eat raw from the bush. Thriving on only rainwater, one huge plant produces plenty of fruit for me and the resident phainopeplas.
Inspired by this recipe for millet balls, I used fresh wolfberries in place of dried Turkish barberries.
It was delicious! It reminded me of falafel, crispy on the outside and grainy on the inside. A simple cilantro, garlic, lemon juice, olive oil chutney complimented them perfectly.
So the next time, I decided to use amaranth seeds. I bought this from the store, but you can harvest your own from wild or cultivated plants in the late summer if you’re ambitious.
I toasted them in oil until they became a shade darker and a few of them popped open.
I added water, three times the volume of amaranth seed, and cooked in the solar oven until it was creamy. Then I mixed in fresh wolfberries and enough flour to make a soft dough.
The dough was muuuuch stickier, so I added significantly more flour than for the millet balls and still they looked shaggy. (I used all purpose wheat flour but next time will try amaranth flour).
The toasted flavor came though and I’m glad the only seasoning I used was salt and wolfberries. The dough certainly didn’t need any egg or flax egg to hold together! They baked up just as well as the millet version, but with the texture of a cookie. Next I’ll try them sweetened!
I served them with a lemon pickle but that tomatillo salsa would be good. I took the rest to a picnic among the wildflowers. Happy spring!
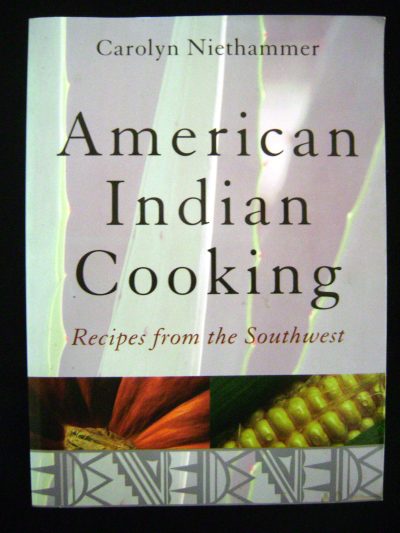
Originally published by Macmillan in 1974Current version published by University of Nebraska Press 1999.
It’s Carolyn here today with a walk down memory lane. This year celebrates 50 years since the first publication of my first book American Indian Food and Lore, now republished as American Indian Cooking: Recipes from the Southwest. In 1970, I was a young out-of-work journalist and through an unlikely set of circumstances ended up with a contract for a book on Indian cooking with Macmillan, a major New York publisher. Preliminary research showed that traditional Native American food revolved around edible wild plants and corn, beans, and squash.
My college science was zoology so I had a lot to learn about edible plants. I began by reading every ethnobotany written about Southwestern plants. I found mentors to take me on plant walks, including the late renowned botanist Richard Felger. When I knew enough to ask intelligent questions, I headed out to talk to the experts, Native American women. My first teachers were two lovely Tohono O’odham women on the San Xavier section of the reservation who spent an afternoon teaching me to cook mesquite the way their mothers had. I put the leftovers in the backseat of my car and had a head-on collision on a narrow dirt road on the way home. Woke up in the hospital with mesquite mush in my hair.
Here I am in 1971 trying to learn to distinguish one little green plant from another.
Perhaps that was some sort of christening, so for $150 I bought a Chevy wagon and the summer of 1971, I headed to remote areas on the Hopi, Navajo, Zuni, Havasupai, and Pueblo reservations. Many very generous middle-aged Native women taught me about plants they had gathered with their grandmothers. I worked in an office that winter to gather some money and headed out again the summer of 1972.
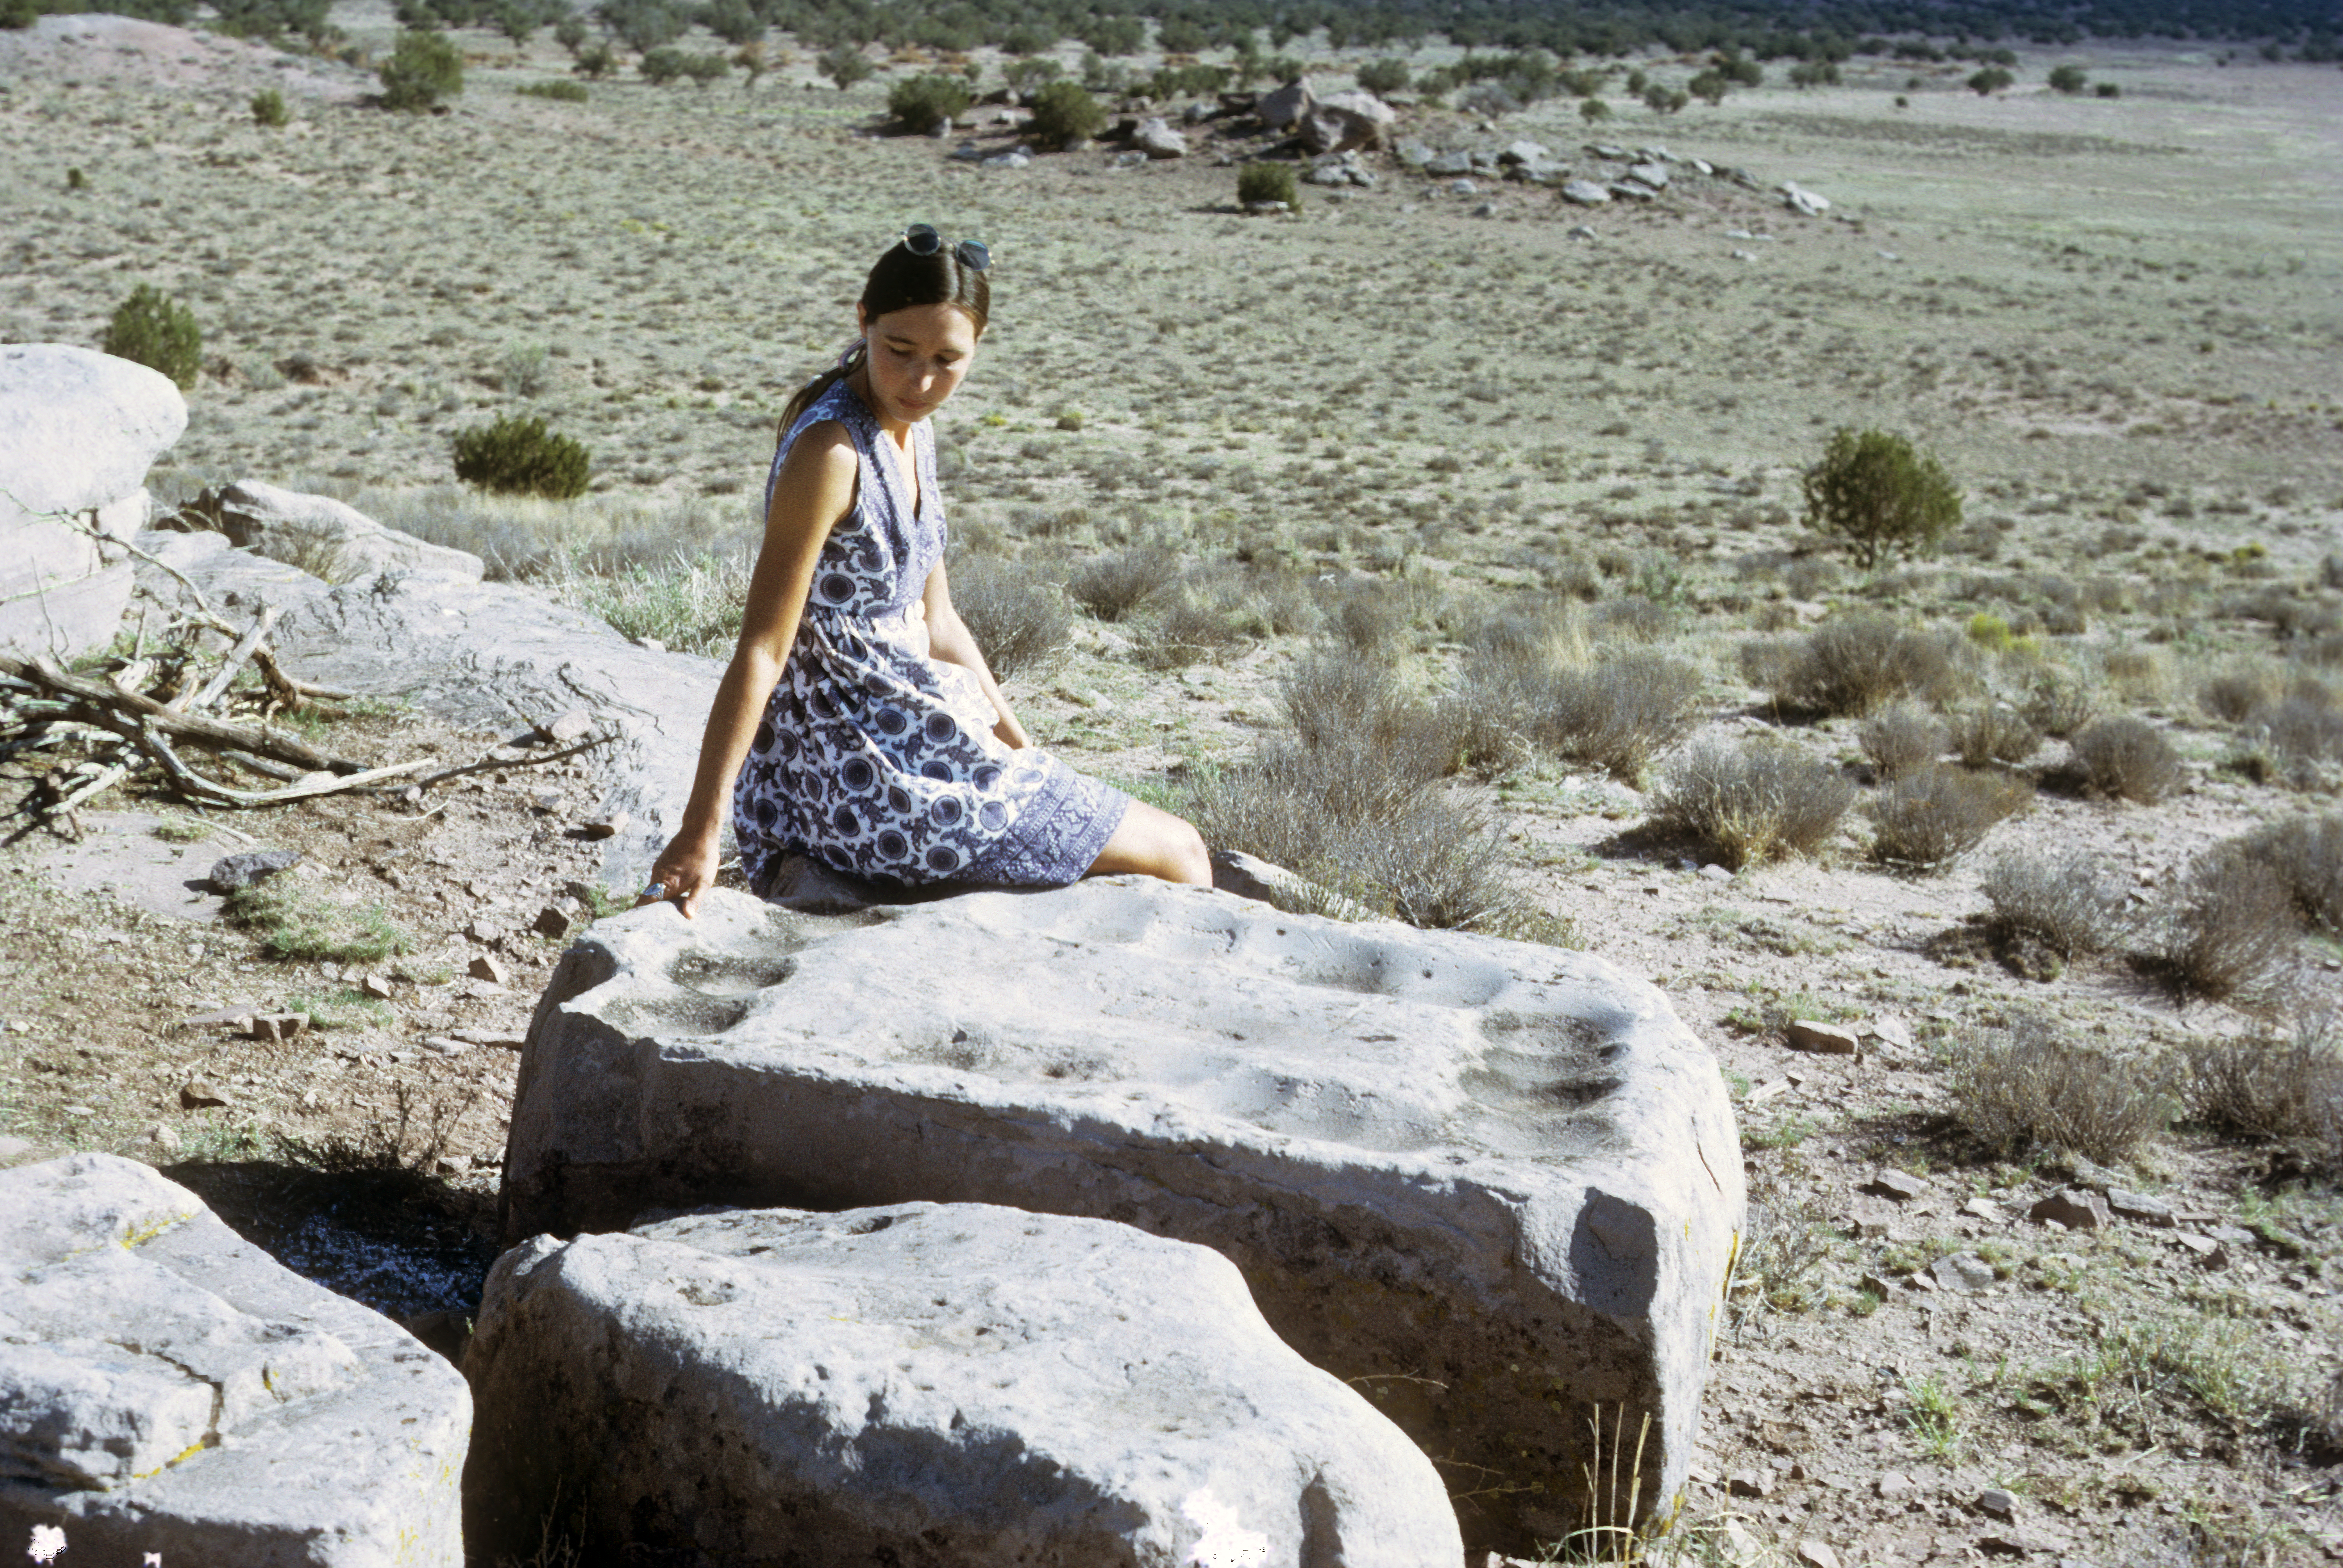
Finding a communal grinding stone at Hawikuh (founded c. 1400) near the Zuni Reservation. Imagine the women sitting around the stone doing food preparation.
Then it was time to test the recipes when I had them and develop recipes when necessary. A friend lent me an electric typewriter (such a luxury), and I wrote up what I had learned. A small grant allowed me to pay Jenean Thomson to do the gorgeous and accurate line drawings of the plants.
Jenean Thomson’s ocotillo illustration.
The book was “in press” for two years and was released by MacMillan in 1974. Euell Gibbons had published several well-known books on edible wild plants, but they were all Eastern species. American Indian Food and Lore joined a very few popular books on edible Western plants. Sunset Magazine even came and did an article on my wild food gathering class. Writer and ethnobotanist Gary Nabhan joined me, and one year we did a class we privately called Gary and Carri’s Thorny Foods Review.
After two decades, with changes in ownership, Macmillan decided the book didn’t fit their line, but the University of Nebraska Press liked it. In 1999, they republished the book under their Bison Books line as American Indian Cooking: Recipes from the Southwest with a lovely new cover.
I have followed this title with four more books on Southwestern food, but my first foray into cookbooks with the all the memories I have doing the research remains a high point of my life.
Here is one of the original recipes taught to me by a Navajo cook.
Navajo Griddle Cakes
(Makes 14 4-inch cakes)
Although this calls for lamb’s-quarter seeds, you can substitute amaranth, quinoa, chia, or sunflower seeds.
¾ cup ground lamb’s-quarter seeds
¾ cup whole wheat flour
2 tablespoons sugar or honey
½ teaspoon salt
1 teaspoon baking powder
1 egg
2 cups milk
2 tablespoons oil or bacon drippings.
Combine dry ingredients in a bowl. In another bowl beat together egg, milk, and fat and add to dry ingredients. Heat the griddle and add a small amount of oil. Test the griddle by letting a few drops of cold water fall on it. If the water bounces and sputters, the griddle is ready to use. Bake the pancakes.
__________________________________
Note from SavorSisterTiaMarta: If you want to find other fascinating, flavorful, and from-the-earth Indigenous recipes that were gifted to Carolyn 50 years ago and which she published in American Indian Food and Lore, you can chase down used book copies via Thriftbooks, Amazonbooks and other sites. This first book is a treasure trove of totally useful, current ideas!